Do you have a question about the Black & Decker POWER TO GO and is the answer not in the manual?
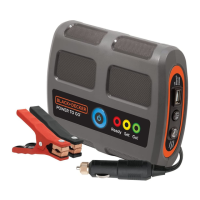
The BLACK+DECKER POWER TO GO™ is a portable lithium-ion battery booster designed to jump-start vehicles and provide portable power for USB devices and an area light. This quick start guide outlines its functions, indicator meanings, and operational procedures.
The primary function of the POWER TO GO™ is to boost a vehicle's depleted battery. It offers two methods of connection for boosting: directly to the vehicle's DC accessory outlet or to the vehicle battery using included clamps. The unit automatically detects the vehicle's battery status and initiates a multi-stage boosting process.
Beyond vehicle boosting, the device also serves as a portable power source. It features a 2 AMP USB port for charging or powering USB devices and an integrated LED area light for illumination.
*   **Connection Methods:**
    *   **DC Accessory Outlet:** Connect the unit to the vehicle's DC accessory outlet. Note: Some vehicles may require the ignition key to be in the ACC (accessory) position to activate the outlet.
    *   **Battery Clamps:** Connect the unit directly to the vehicle battery using the provided battery clamps.
*   **Boosting Process:**
    1.  Press the main power button to turn the unit ON.
    2.  The unit automatically detects the depleted battery and begins the boosting process.
    3.  The LED indicator progresses through stages:
*   **Activation:**
    1.  Press the main power button to turn the unit ON.
    2.  Press the USB/Light Button to turn on the LED area light.
*   **Deactivation:** Press the USB/Light Button again to turn the light OFF.
*   **Activation:**
    1.  Press the main power button to turn the unit ON.
    2.  Press and hold the USB/Light Button for 2 seconds and release. The ring around the port will turn blue, indicating the USB charging port is active.
*   **Charging:** Plug your USB device into the port to power or recharge it.
*   **Deactivation:** Press and hold the USB/Light Button for 2 seconds and release.
*   **Auto Shut-off:** The unit will automatically shut down after 1 minute of inactivity to protect the internal battery when the USB port is active.
*   Press the main power button. The LED indicator ring will light up to show the internal battery's charge level:
    *   **Solid Blue:** 80 - 100% charged.
    *   **Solid Yellow:** 41 - 79% charged.
    *   **Solid Red:** 1 - 40% charged.
*   Connect the AC adapter to the single pin connector port on the side of the unit.
*   Plug the AC adapter into a wall outlet.
*   **Indicator:** The LED indicator ring will flash blue while charging and turn solid blue when fully charged.
*   Connect the DC charging cable to the unit's dual pin connector.
*   Plug the DC charging cable into the vehicle's accessory outlet.
*   Press the main power button to turn the unit ON. (Note: Some vehicles may require the ignition key to be in the ACC position).
*   The unit may start to flash blue, indicating it is recharging, depending on vehicle voltage.
*   **Indicator:** The LED indicator ring will flash blue when charging and turn solid blue when fully charged.
*   **Force Charging Mode:** If the LED indicator flashes red, yellow, or green instead of blue, press the USB/Light button for 5 seconds and release to force the unit into charging mode.
The unit uses multi-colored flashing indicators to signal fault conditions, indicating it cannot perform its intended function. The indicator ring will cycle between two colors:
This device is designed for ease of use with clear visual indicators to guide the user through boosting, charging, and troubleshooting. Always refer to the full vehicle and booster instructions for complete safety and operational details.
| Brand | Black & Decker |
|---|---|
| Model | POWER TO GO |
| Category | Extender |
| Language | English |