switchboxD v1
intelligent dual switch devices
in μWiFi technology
Do not connect loads with a power greater than the permissible
one.
Connect in accordance with the scheme presented in the manual.
Incorrect connecon can be dangerous, it can
result in damage to the controller and loss of warranty.
DANGER! Danger to life due to electric current (also with the de-
vice o), voltage may be present at the outputs. All assembly work
should be carried out ALWAYS with the circuit disconnected
power.
Connecng the device to the power grid without the quality re-
quirements specied in the standard
PN-EN 50160 results in the loss of warranty.
1
INSTALLATION - BASICS
SAFETY RULES
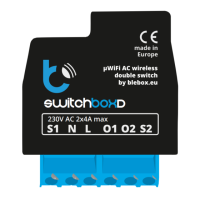
CONNECTION DIAGRAM
CONTROL DEVICES FROM ANYWHERE IN THE WORLD
Before installing the controller, disconnect the voltage in the powered circuit.
Remember that all assembly work should be performed with the power supply
disconnected (switching o the mains fuse or disconnecng the power cord from
the socket).
The controller should be mounted in a place protected against unfavorable envi-
ronmental condions, protected against access by third pares - in a ush-moun-
ted box or inside the housing of the controlled device. Remember that metal ele-
ments (cables, housing parts) negavely aect the range of the device, and thus
the comfort of use.It is advisable that the device be xed in a stable and staonary
posion.Due to the operang voltage of the device, it is necessary that the con-
nectors in the controller are protected against accidental touching or short circuits
that may result in electric shock or damage to the device.
Familiarize yourself with the scheme and then proceed to the installaon of the
controller. Pay parcular aenon to the labeling of the controller connectors.
Start by connecng the power wires - phase L (brown) and neutral N (blue).Then
connect the load. If you decide to use local control from a wall switch, also
connect the switch as shown in the diagram. For control via smartphone or
tablet only, no wall switch is required.
The controller supports all types of monostable double switches (so-ca-
lled bell switches). The sequence of connecng the S1 / S2 input to
the right / le switch buon does not maer at the installaon sta-
ge – it can be set at a later stage of the controller conguraon.
Aer making sure that the device has been connected in accordance with
the diagram and that there are no metal elements near the controller that
could accidentally short-circuit the contacts, turn on the device by swit-
ching on the power supply (switching on the mains installaon fuse or con-
necng the power cord to a socket).
FIRST START
2
Unlock your phone or tablet and download the free wBox applicaon. If
you have an Android device, the applicaon can be found in the Play store.
For iOS devices, the applicaon is available in the App Store. The Windows
Phone app can be downloaded from the Windows Phone Store.
Using a mobile phone or tablet, connect to the device’s wireless network.
To do this, enter the sengs of your smartphone or tablet, then to the
conguraon of the WiFi network and nd the network called “switch-
BoxD-xxxxxxxxxx ” where xxxxxxxxxx is the serial number of the device.
Connect with this one network.
Turn on the wBox applicaon. You will see your device at the top of the
screen. To add it to the applicaon, click “+” on the right side, next to
the name. To preliminarily congure the driver, click on the default device
name.
Test the operaon of the controller by clicking the ON / OFF buon,
paying aenon to connected load behaviour. If you connected a wall
switch, check its operaon. In the default conguraon for monostable
buons (so-called bell buons), holding the buon key should turn on the
load, releasing the buon will turn the load o. To change this behaviour,
go to sengs (buon “Sengs” in the upper right corner of the screen)
and then in the opon “set acons for input”, for the corresponding acon
(you can set up a maximum of 10 acons
for the buon) select the appropriate acon type for the given trigger. For
example, to alternately turn the light on / o with the monostable buon
each me it is pressed, select the acon type as “change state” and select
“short press” as the trigger.
Also, check the selecon in the “state aer reboot” which determines the
method behaviour of the controller aer a restart caused by e.g. a break in
the supply of electricity. You can choose if the load should stay on, o, stay
in the pre-reboot state (if it was on it should remain turned on, if it was
turned o, it must remain turned o), or take the opposite.
You can also congure it using the phone/tablet web
browser. Aer connecng with the wireless network of
the controller, turn on the browser and go to the websi-
te: hp://192.168.4.1
user manual
ACCESS POINT AND WIFI
NETWORK SETTINGS
3
Aer the rst start-up of the controller, you can proceed to its further
conguraon. Being connected to the WiFi network emied by the
device, on the control panel of the wBox applicaon, select the device,
then go to sengs (the “Sengs” buon in the upper right corner of the
screen).
You can change the name of the device under which it is displayed in the
applicaon wBox. In addion, you can change the name and password of
N
L
switchBoxD
230V AC 2x4A max
device 1
device 2