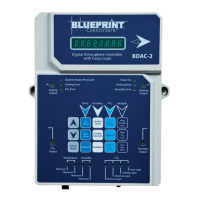
Installation
• Mount the Controller on the wall. Place the remote sensor at plant
height in an area with good air circulation. Avoid placing the sensor in
a location with direct, intense exposure to light.
• Connect the sensor cable to the bottom of the unit using the
quick-disconnect screw.
• Plug the Controller into a 120V NEMA 5-15 wall outlet.
• Turn the power on and allow the unit to warm up for 5 minutes.
While the unit is warming up, the display will read “CO
2
heat.”
• Program the desired settings before connecting any devices.
• Plug the devices to be controlled by the unit into the
receptacles on the unit’s sides.
• Ensure the devices being connected to the
Controller have the proper voltage and will
not exceed the maximum amperage rating
of the unit.
• Before using a sulfur vaporizer around the
Controller, remove the remote sensor
from the affected area or turn the unit off
and cover the sensor with a protective
plastic bag. Remove the bag before turning
the Controller back on. Note: Failure to
protect the remote sensor during sulfur use
will result in damage to the infrared CO
2
sensor and void the warranty.
• Do not expose the unit to water.
Factory Settings
The Controller is preprogrammed with the following
factory settings:
• Temperature Day Setting: Cooling – 80°F / heating – 55°F
• Temperature Night Setting: Cooling – 70°F / heating – 55°F
• Temperature Deadband: 3°F cooling and heating
• Humidity Setting: 50% RH
• Humidity Mode: Decrease
• Humidity Deadband: 5%
• CO
2
Level: 1250 ppm
• CO
2
Deadband: 50 ppm
• CO
2
Calibration: 380 ppm
• Temperature/Humidity Lock: Split
• Temperature/CO
2
Lock: Split
Restoring Factory Settings: Hold the “Enter/Reset” and DOWN
arrow buttons for 3 seconds. The display will read “f.Set.” Press the
“Enter/Reset” button again to restore the default factory settings. When
the process is complete, the display will read “donE.” Note: It may take
up to 15 seconds to complete the process.
Error LEDs
When the Controller is functioning normally, the ambient CO
2
level,
temperature and humidity will change slowly but steadily. If the
Controller does not detect a change in CO
2
level, temperature or
humidity within a 1-hour period, the unit will deactivate the affected
output and the corresponding green error LED will ash to indicate
which device may be malfunctioning. Ensure the device and remote
sensor are functioning properly. To reset the error, press the
“Enter/Reset” button.
Adjusting Photocell Sensitivity
• To change the photocell’s sensitivity, hold the DOWN arrow
button for 3 seconds. The current setting will be displayed.
• Press the UP arrow button to increase the number displayed,
decreasing the amount of light required to activate the photocell.
• Press the DOWN arrow button to decrease the number displayed,
increasing the amount of light required to activate the photocell.
• Press “Enter/Reset” to accept the new setting.
Selecting Temperature Settings
Temperature Display: Hold the UP and DOWN arrow
buttons for 3 seconds to change the temperature display from
Fahrenheit to Celsius.
Temperature Day: The Controller allows day cooling and day
heating set-points. To set the temperature at which the cooling
output will be activated during the day, press the “Day Setting”
button. The display will read “CooL__F.” Use the UP and DOWN
arrow buttons to adjust the setting. Press “Enter/Reset” to accept
the new setting. To set the temperature at which the heating output
will be activated during the day, press the “Day Setting” button twice.
The display will read “HEAt__F.” Use the UP and DOWN arrow
buttons to adjust the setting. Press “Enter/Reset” to accept the
new setting.
Temperature Night: The Controller allows night cooling and
night heating set-points. To set the temperature at which the cooling
output will be activated at night, press the “Night Setting” button. The
display will read “d.CooL__F.” Use the UP and DOWN arrow buttons
to adjust the setting. Press “Enter/Reset” to accept the new setting.
To set the temperature at which the heating output will be activated
at night, press the “Night Setting” button twice. The display will read
“HEAt__F.” Use the UP and DOWN arrow buttons to adjust the set-
ting. Press “Enter/Reset” to accept the new setting.
Temperature Deadband: The Controller allows cooling and
heating deadband settings. To set the cooling deadband, press the
“Deadband” button under “Temp.” The display will read “d.CooL__F.”
Use the UP and DOWN arrow buttons to adjust the setting. Press
“Enter/Reset” to accept the new setting. To set the heating dead-
band, press the “Deadband” button twice under “Temp.” The display
will read “d.HEAt__F.” Use the UP and DOWN arrow buttons to
adjust the setting. Press “Enter/Reset” to accept the new setting.
Note: To prevent the unit from activating both the cooling and
heating devices at the same time, the difference between the heating
and cooling set-points must be greater than the combined deadband
set-points.
Selecting Humidity Settings
Humidity Day: To select the humidity level at which the humidity
output will be activated during the day, press the “Day/Night Setting”
button. The display will read “dAy_rH.” Use the UP and DOWN arrow
buttons to adjust the setting. Press “Enter/Reset” to accept the
new setting.
Humidity Night: To select the humidity level at which the humidity
output will be activated at night, press the “Day/Night Setting” button
twice. The display will read “nit_rH.” Use the UP and DOWN arrow
buttons to adjust the setting. Press “Enter/Reset” to accept the
new setting.
Humidity Mode: To select between humidifying and
dehumidifying modes, press the “Humidify/Dehumidify” button.
The display will show the current setting, “rh_Incr” for humidifying
and “rh_dEcr” for dehumidifying. Use the UP and DOWN arrow but-
tons to choose between modes. Press “Enter/Reset” to accept the
new setting.
Humidity Deadband: To set the humidity deadband, press the
“Deadband” button under “Humidity.” The display will show the
current setting. Use the UP and DOWN arrow buttons to
adjust the setting. Press “Enter/Reset” to accept the new setting.
Caution
Warning


 To Next Page
 Loading...