Do you have a question about the Body Craft F660 Hip Sled and is the answer not in the manual?
Key safety precautions for operating the F660 HIP SLED, including consulting a physician and careful use.
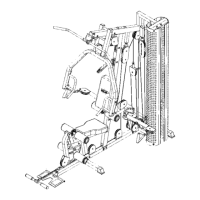
Connect the base connector to the front and rear stabilizers using specified bolts and washers.
Connect the main frame to stabilizers and attach end caps for stability.
Slide the square cap onto the linear bearing assembly.
Assemble the weight holder support to the weight holder using bolts and washers.
Secure the weight holder assembly to the linear bearing assembly.
Insert safety stoppers into the main frame and secure with locking pins.
Attach round plugs to shoulder assemblies and connect them to the main frame.
Connect the foot platform to the main frame using an axle, washer, and nut.
Attach the foot platform adjuster sleeve and inside tube to the frame and foot platform.
Secure the back pad to the leg press plate and attach the plate to the linear bearing assembly.
Attach the back pad to the linear bearing assembly using bolts and washers.
Secure two back pads to the hip pad plate using hex screws and washers.
Connect the back pad to the metal hinges on the foot platform.
Utilize spring clips to secure weight plates on the weight holder.
Attach non-slip material and end caps to the calf block.
Insert the calf block into the central hole of the foot platform for calf raises.
Connect the back pad assembly to the leg press plate.
Ensure all bolts are securely tightened and lubricate adjustable areas for optimal performance.
| Brand | Body Craft |
|---|---|
| Model | F660 Hip Sled |
| Category | Fitness Equipment |
| Language | English |