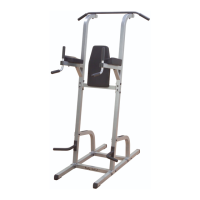
in the sequence they are presented.
Finger tighten all hardware in this step. Do Not wrench tighten until end of step 15.
Some components may be pre-assembled.
S T E P
Be careful to assemble all components
in the sequence they are presented.
1
* Some parts may be pre-assembled.
A. Insert Weight Stack Shim (9) under Main Base Frame (A).
B. Assemble Rear Leg (E) in between Main Base Frame (A) and Rear Upright Frame(B) by using:
Two 50 (M10x75 partial thread hex head bolt)
Four 101 (M10 washer)
Two 60 (M10 nylon lock nut)
C. Reinforce Rear Upright Frame (B) by using:
Two 5 (M10x15 full thread allen head bolt)
Two 101 (M10 washer)
D. Connect Assistant Support (AJ) to Main Base Frame (A) by using:
Two 49 (M10x70 partial thread hex head bolt)
Four 101 (M10 washer)
Two 60 (M10 nylon lock nut)
E. Insert Cable End Shaft (23) into Assistant Support (AJ).
Insert Foot Cap (42) to the ends of Rear Leg (E).
Insert Flat End Cap (35) into Main Base Frame (A) as shown in the diagram.
Insert Convex End Cap (29) into Rear Upright Frame (B).
1
mm
Inch
0 10 20 30 40 50 60 70 80 90 100 110 120 130 140 150
0 1" 2" 3" 4" 5" 6"
Insert Foot Cap (42) to the ends of Rear Leg (E).
Insert Flat End Cap (35) into Main Base Frame (A) as shown in the diagram.
Insert Convex End Cap (29) into Rear Upright Frame (B).
 Loading...