NOTICE1 The projector and remote control2
How to use the projector correctly:
1. Do not face to lens by eyes, it will hurt your eyes from
hard light of the projector when it’s working.
2. Do not block the air outlet, to avoid damage from
internal electronic device by projector can not cooling.
3. Do not use chemicals, cleaner or water to clean, and
also avoid rain, moisture and leucocratic liquid to
corrode circuit board.
4. Please put the projector and accessories on the place
that children can not reach.
5. Please make sure the projector working environment
is dry and windy.
6. Do not place projector in too warm or too cold room,
the high temperature or low temperature will shorten
lifespan of the device. The working environment would
be 5℃~35℃ better.
7. Do not put the projector in heating equipment(drying
machine, microwave oven)to make it dry.
8. Do not press hard or put something heavy on the
projector, it will damage projector.
9. Do not throw, beat, shake projector, it will damage
circuit board in it.
10. Do not dismounting projector. Please contact after-sales
service if you have any problem.
11. Do not fix by yourself. If projector can not working
normaly, please consult with after-sales service or
depot repair.
1
2
3
4
5
6
7
8
9
10
11
12
13
14
15
17
16
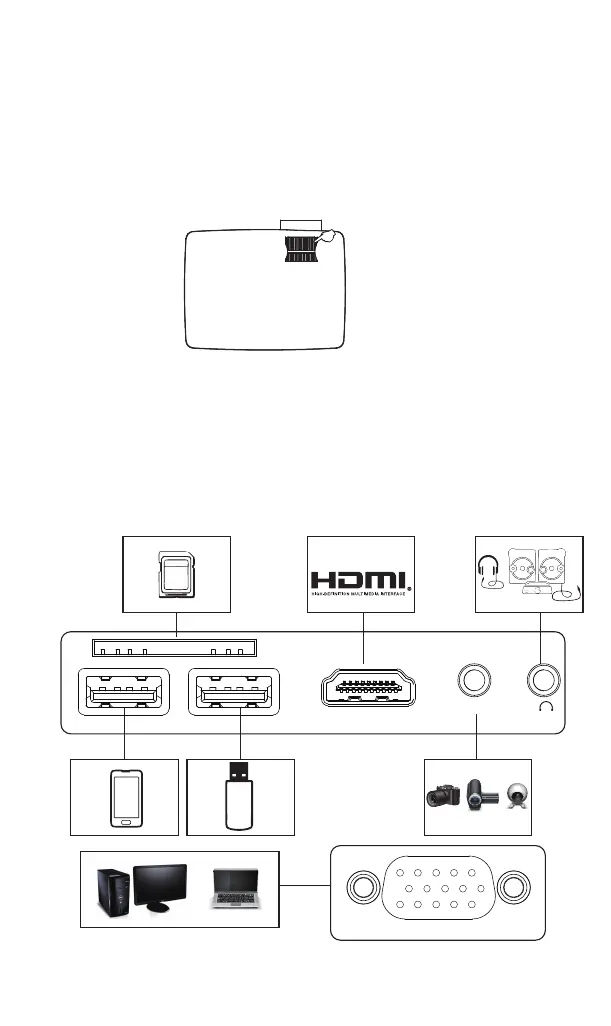
HDMI
AV
OUT 5V
VGA
1. Power
2. Arrow Keys
3. Confirm
4. Menu Button
5. Signal Source
6. Back
7. Lens Focussing
8. Keystone Correction
9. Media Card
10. Video HD Input
11. Audio, Video Input
12. Earphone/3.5mm AUDIO OUT
13. 5V Output
14. Media Input/Multi-screen interface.
15. VGA Input
16. Lens
17.Power Input(110-240V)
Note:
please refer to the product appearance,
this figure is for reference only.
3
HDMI
AV
OUT 5V
VGA
①
②
③
1. Getting Started
1.1 Projector connect to power by the power line together with the projector.
1.2 According to the front of the projector or the remote control power supply button,
start the projector, indicator light becomes green, The projector is working
2. Power on/Power off
Press the “power ”button on the top of the projector, or the button on the remote
control, to turn on or off the projector.
3. Startup interface
After power on, the boot screen appear, like the picture.
5 Image focus
Let projector be perpendicular to wall, with the Focusing button to make the
picture clear. When focusing, you can broadcasting programs to help you finsh
focus.
7. Network Multimedia Connect
7.1 Insert the removable storage, Media cards in thecorresponding interface.
7.2 According to the broadcast programs to choose:” photos” ”music” ”movie”.
7.3 Choose the file you want to play, press the key”play pause”to play or pause the file.
8. signal source selection
8.1 You can select the signal from the homepage.
8.2 Press the projector front or the remote controlsignal source key "S", enter the
signal sourcemenu interface. Use the direction key and theconfirmation key to
select the signal source.
9. AV video equipment connecting
9.1 Use the 3in 1video tieline comes with projector
to connect with AV.
9.2 Choose the media signal channel :”AV”.
10. HDMI device connection
10.1 HDMI interface can be connected to the HDMI
output interface equipment.
10.2 Select the corresponding signal channel: "HDMI".
11. 3.5mm audio equipment connecting
Support 3.5mm earphones and other cable
soundequipment.
12. other connections
Could charge the mobile phone and ipad by 5V
power.
1 System requirements
2.2 Device connection
Step 1: Select “Miracast” and press “OK” to ente miracast interface.
Step 2: Find Multi-screen/Miracast setting/software on the phone, select and connect
to the Projector name shown on the projector interface. Then your phone
content will be mirrored to big screen by the projector. (Note: Miracast setting
and display name will differ for different phones, such as Multi-screen and
Wireless Display. Pls refer to your phone for details.)
Phone
Resolution
Storage
Android 4.2 model with 1GB RAM
WVGA~1080P
At least 40MB free space needed
6. Connecting
(2)Dial the keystone button left and right to
adjust the picture to the quadrangle as
shown in ② to finish the vertical keystone
correction.
Note: Please refer to the product appearance, this figure is for
reference only.
Note: Please refer to the product
appearance, this figure is for
reference only.
Projector Operation 4 Multi-screen for Android phone
4. Keystone Correction
Focusing
Keystone Correction
4.1 Vertical keystone correction
(1)The vertical keystone correction is
required when ① and ③ below appear
during the first installation and use.
4.2 Horizontal keystone correction
Please refer to the
picture. It is normal
if the project is
slightly oblique.
If the picture is
big in the right and
small in the left,
slightly swing the
project to the left to
correct the picture.
If the picture is
big in the left and
small in the right,
slightly swing the
project to theright
to correct the
picture.
Power
Menu
Arrow
button
VOL-
Source
VOL+
Mute
Black
Play Pause
button
All-round
menu key
Only suitable for
Android projector
 Loading...