Do you have a question about the bosal 044123 and is the answer not in the manual?
Remove towbar parts and mounting materials from the vehicle.
Dismount the bumper and related components.
Dismount the inner bumper.
Mount supports "2" and "3" using specified bolts.
Mount supports "4" and "5" using specified bolts.
Mount crossbar "1" using specified bolts.
Secure the towbar using specified torque values.
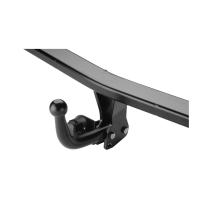
Mount the socket plate as shown in detail 1.
Mount ball housing and socket plate with specified bolts.
Secure the ball housing using specified torque values.
Make a recess in the bumper as per detail 2.
Reinstall parts removed in step 2.
Unpack towbar and check parts for completeness.
Dismount the bumper and related components.
Dismount the inner bumper.
Mount supports "2" and "3" using specified bolts.
Mount supports "4" and "5" using specified bolts.
Mount crossbar "1" using specified bolts.
Secure the towbar using specified torque values.
Mount the socket plate as shown in detail 1.
Mount ball housing and socket plate with specified bolts.
Secure the ball housing using specified torque values.
Make a recess in the bumper as per detail 2.
Reinstall parts removed in step 2.
Unpack towbar and check contents against parts list.
Dismount the bumper and related components.
Dismount the inner bumper.
Mount supports "2" and "3" using specified bolts.
Mount supports "4" and "5" using specified bolts.
Mount crossbar "1" using specified bolts.
Secure the towbar using specified torque.
Mount the socket plate as shown in detail 1.
Mount ball housing and socket plate with specified bolts.
Secure the ball housing using specified torque.
Make a recess in the bumper as per detail 2.
Reinstall parts removed in step 2.
Separate towbar elements and remove sealant.
Dismount the bumper and related components.
Dismount the inner bumper.
Mount supports "2" and "3" using specified bolts.
Mount supports "4" and "5" using specified bolts.
Mount crossbar "1" using specified bolts.
Secure the towbar using specified torque.
Mount the socket plate as shown in detail 1.
Mount ball housing and socket plate with specified bolts.
Secure the ball housing using specified torque.
Make a recess in the bumper as per detail 2.
Reinstall parts removed in step 2.
Remove towbar parts and mounting material.
Dismount the bumper and related components.
Dismount the inner bumper.
Mount supports "2" and "3" using specified bolts.
Mount supports "4" and "5" using specified bolts.
Mount towbar body "1" using specified bolts.
Secure the towbar using specified torque.
Mount the electrical kit bracket as per figure 1.
Mount ball housing and electrical kit bracket with specified bolts.
Secure the ball housing using specified torque.
Make a recess in the bumper as per figure 2.
Reinstall all removed accessories from step 2.
Remove towbar parts and mounting materials.
Dismount the bumper and related components.
Dismount the inner bumper.
Mount brackets "2" and "3" using specified bolts.
Mount brackets "4" and "5" using specified bolts.
Mount crossbar "1" using specified bolts.
Secure the crossbar using specified torque.
Mount the socket plate according to fig. 1.
Mount towbar ball housing and socket plate with specified bolts.
Secure the towbar ball housing using specified torque.
Make a cutout in the bumper according to fig. 2.
Reinstall all parts removed in step 2.
Remove supplied parts and mounting materials from towbar.
Dismount the bumper and related components.
Dismount the inner bumper.
Mount bracket "2" and "3" using specified bolts.
Mount bracket "4" and "5" using specified bolts.
Mount towbar assembly "1" using specified bolts.
Secure the towbar using specified torque.
Mount the socket holder as per detail 1.
Mount ball holder and socket holder with specified bolts.
Secure the ball holder using specified torque.
Make a recess in the bumper as per detail 2.
Reinstall all parts removed in step 2.
Unpack mounting kit and check contents against description.
Dismount the bumper and related components.
Dismount the inner bumper.
Mount brackets "2" and "3" using specified bolts.
Mount brackets "4" and "5" using specified bolts.
Mount towbar body "1" using specified bolts.
Secure the towbar using specified torque.
Mount the socket holder as marked on drawing 1.
Mount ball housing and socket holder with specified bolts.
Secure the ball housing using specified torque.
Make an inscription in the bumper according to drawing 2.
Reinstall all components removed in step 2.
Open towbar package and check if all parts are present.
Loosen the two rear light mounting nuts.
Remove inner bumper by unscrewing eight screws.
Mount brackets 2 and 3 in holes A using 4 M8x35 screws.
Mount brackets 4 and 5 in holes B using 1 M10x30 screw.
Mount towbar 1 in holes C using 1 M10x45 screw.
Secure the towbar using specified torque.
Mount the socket holder plate according to figure 1.
Mount ball support and socket holder plate using 2 M12x110 screws.
Secure the ball support using specified torque.
Make a recess in the bumper according to figure 2.
Reinstall parts removed in step two.
Open towbar packaging and check contents.
Dismount the bumper.
Dismount the inner bumper.
Mount supports "2" and "3" using specified bolts.
Mount supports "4" and "5" using specified bolts.
Mount crossbar "1" using specified bolts.
Secure the towbar using specified torque.
Mount the socket holder as indicated in detail 1.
Mount ball support and socket holder using specified bolts.
Secure the towbar ball support using specified torque.
Make a notch in the bumper according to drawing 2.
Reassemble all parts previously removed in step 2.
Check individual towbar parts according to the attached list.
Dismount the bumper and related components.
Dismount the bumper insert (8 screws).
Mount supports "2" and "3" using specified bolts.
Mount supports "4" and "5" using specified bolts.
Mount the towbar body "1" using specified bolts.
Install the towbar.
Attach the socket bracket as shown in detail 1.
Mount ball hitch plate for sockets using specified bolts.
Attach the towball cover.
Prepare a cut on the bumper based on drawing 2.
Reinstall all components removed in step 2.
Unpack towbar and check contents against parts list.
Dismount the bumper and related components.
Dismount the bumper insert (8 screws).
Mount supports nr "2" and "3" using specified bolts.
Mount supports nr "4" and "5" using specified bolts.
Mount towbar hook block nr "1" using specified bolts.
Secure the towbar.
Mount the socket plate based on drawing 1.
Mount ball hitch housing and socket plate using specified bolts.
Attach the ball hitch housing.
Make a cut on the bumper according to drawing 2.
Reinstall all parts removed in step 2.
Unpack towbar and check contents against parts list.
Dismount the bumper and related components.
Dismount the bumper insert (8 screws).
Mount the "2" and "3" supports using specified bolts.
Mount the "4" and "5" supports using specified bolts.
Mount the "1" towbar body using specified bolts.
Secure the towbar body using specified torque.
Mount the socket holder plate as shown in drawing 1.
Mount the ball housing and socket holder plate using specified bolts.
Secure the ball housing using specified torque.
Cut the bumper according to drawing 2.
Reinstall all parts removed according to step 2.
| Part Number | 044123 |
|---|---|
| Manufacturer | Bosal |
| Category | Automobile Accessories |
| Exhaust Type | Muffler |
| Shape | Oval |
| Material | Steel |