Do you have a question about the Bosch BGL35MON12/01 and is the answer not in the manual?
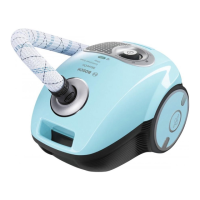
The Bosch GL35 series vacuum cleaner is a versatile appliance designed for domestic use, ensuring optimal cleaning results with its specialized accessories and high-quality dust bags. It operates at a maximum altitude of 2000 meters above sea level and adheres to recognized technical rules and safety regulations.
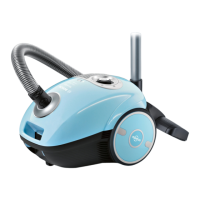
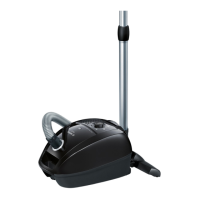
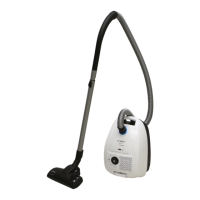
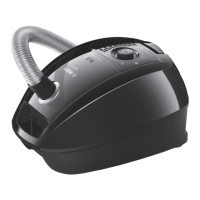
The vacuum cleaner features an adjustable floor tool (1) and a hard-floor brush (2), both with locking collars for secure attachment. The flexible hose (4) connects to the hand grip (3), and the telescopic tube (5, 6) can be adjusted for length using a sliding switch or sleeve. Power is supplied via a power cord (7), which can be extended to the desired length and plugged into a mains socket. The appliance is switched on/off and its suction power regulated using a control knob (18).
For specific cleaning tasks, various accessories can be attached to the suction pipe or hand grip. These include a crevice nozzle (11a) for tight spaces, an upholstery nozzle (11b) for furniture and curtains, and a hard-floor nozzle (11c) for effective cleaning of hard surfaces. A drill dust nozzle (12) can be used to collect fine dust during drilling, securing it to the hand grip and positioning it directly over the drill hole.
The vacuum cleaner incorporates a parking aid (8, 17) for short breaks or storage. The dust bag compartment lid (15) can be opened using a locking lever (9) to access the dust bag (11) and filters. A filter change indicator (16) signals when the dust bag needs replacement.
The appliance operates at 220-240 V, 50 Hz, and 10 A. It is designed for high energy efficiency and dust retention, as indicated by its EU energy label. The calculations for energy efficiency and cleaning performance are based on Commission Delegated Regulation (EU) No. 665/2013 and EN 60312-1:2017 standards. The motor's service life is extended by 10% when tested with a half-filled dust collector.
To begin, connect the hand grip to the flexible hose until it locks, then insert the hose adapter into the air intake opening on the vacuum cleaner lid. The telescopic tube is connected to the hand grip and the floor tool, with locking mechanisms ensuring secure attachment. The length of the telescopic tube can be adjusted by moving the sliding switch or sleeve.
The suction power can be continuously adjusted using the control knob (18). Lower power settings are suitable for delicate materials like upholstery and curtains, medium settings for daily cleaning with light dirt, and high power settings for robust floor coverings and heavily soiled surfaces.
When vacuuming stairs, the appliance should always be positioned below the user. For large particles, vacuum them up successively and carefully to prevent blockages in the floor tool's suction channel. If necessary, lift the nozzle slightly to improve dirt particle collection.
After use, disconnect the mains plug (15a) and briefly pull the power cord to retract it automatically (15b). For storage, the appliance can be stood upright, and the floor tool hook can be inserted into the storage aid on the underside (16a, 16b).
Regular maintenance is crucial for optimal performance. Always switch off the appliance and disconnect it from the mains before any cleaning or filter changes.
Dust Bag Replacement (17, 18, 19): The dust bag (11) should be replaced when the filter change indicator (16) is fully illuminated, even if not completely full, as the type of dirt can necessitate earlier replacement. To replace, open the dust bag compartment lid (18a, 18b), close the dust bag by pulling its tab (19a), remove it (19b), insert a new one (19c), and push it into the holder until it stops (19d). The lid will only close if a dust bag is correctly inserted.
Motor Protection Filter Cleaning (20): The washable motor protection filter (13) should be cleaned regularly by tapping out dirt or rinsing it. To access it, open the dust bag compartment lid (20a), release the filter from its catch (20b), tap out dirt (20c), and rinse if heavily soiled. Allow it to dry for at least 24 hours before reinserting and locking it in place (20d).
Exhaust Filter Replacement (21): For vacuum cleaners with a micro-hygiene filter (12), it should be replaced with every new replacement filter pack. Open the dust bag compartment lid (21a), release the filter holder (21b), remove the micro-hygiene filter (21c), rinse it if desired, and allow it to dry for at least 24 hours. Insert the new filter and lock the holder back into the appliance (21d, 21e).
Hepa Exhaust Filter Cleaning (22):* The Hepa* filter (12) is designed for household use and generally does not need replacement. However, to maintain optimal performance, it should be rinsed after one year of use. Open the rear flap (22a), release the Hepa* filter by pressing the locking tab (22b), tap out dirt, and rinse under running water (22c). It can also be machine-washed at max. 30°C on a gentle program with low spin speed. Ensure it is completely dry (at least 24 hours) before reinserting and closing the flap (22d, 22e).
The vacuum cleaner and plastic accessories can be cleaned with a standard plastic cleaner. Avoid abrasive materials, glass cleaners, or all-purpose cleaning products, and never immerse the vacuum cleaner in water. The dust compartment can be vacuumed out or cleaned with a dry cloth/brush if needed.
| Brand | Bosch |
|---|---|
| Model | BGL35MON12/01 |
| Category | Vacuum Cleaner |
| Language | English |