English - 1
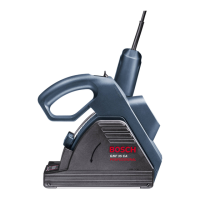
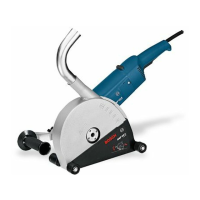
The numbering of the machine elements refers to
the representation of the machine on the graph-
ics page.
While reading the operating instructions, unfold
the graphics page for the machine and leave it
open.
1
On/Off switch
2
Cutting depth scale
3
Adjustment screw
4
Quick-clamping lever for protective cover
5
Clamping nut
6
Spacing disc
7
Diamond cutting disc*
8
Mounting flange
9
Grinder spindle
10
Chaser rollers
11
Auxiliary handle
12
Locking screw for auxiliary-handle holder
13
Spindle locking button
14
Protective cover with cutting guide
15
Clamping lever for cutting depth
pre-selection
16
Extraction elbow
17
Vacuum hose*
18
Break-out tool
19
Two-hole wrench for clamping nut
*
Not all the illustrated or described accessories are
included as standard delivery.
Working safely with this ma-
chine is possible only when the
operating and safety information
is read completely and the in-
structions contained therein are
strictly followed. In addition, the
general safety notes in the en-
closed booklet must be ob-
served. Before using for the first
time, ask for a practical demon-
stration.
■
Wear protective glasses and ear protection.
Wear additional protection equipment for your
safety, such as protective gloves, sturdy
shoes, hard hat and apron.
■
When working with the machine, always hold it
firmly with both hands and make sure you are
in a secure standing position.
■
If the cable is damaged or cut through while
working, do not touch the cable and pull the
plug immediately. Never use the machine if the
cable is damaged.
■
Always direct the cable to the rear away from
the machine.
■
Connect machines that are used in the open
via a residual current device (RCD) with an ac-
tuating current of 30 mA maximum. Do not op-
erate the machine in rain or moisture.
■
Don’t work with materials containing asbestos.
■
Only use diamond cutting discs with a maxi-
mum permissible speed that is at least as high
as the no-load speed of the machine.
■
Check the diamond cutting discs before use.
The diamond cutting discs must be mounted in
exact alignment and be able to rotate freely.
Carry out a test run for at least 30 seconds
without any load. Do not use any diamond cut-
ting discs that are damaged, out-of-balance, or
vibrate.
■
Observe the dimensions of the diamond cut-
ting discs. The diameter of the hole must fit the
mounting flange
8
. Do not use any reduction
parts or adapters.
■
Protect diamond-cutting discs against impact,
shock and grease.
■
Secure the workpiece.
Clamping devices or a
vise will hold the workpiece in place better than
the hand.
■
Apply the machine to the workpiece only when
switched on.
Tool Specifications
Wall Chaser GNF 65 A
PROFESSIONAL
Part number 0 601 368 7..
Rated input power [W] 2 400
Output power [W] 1 670
Idling speed [rpm] 5 000
Diamond cutting
discs Ø, max.
[mm] 230
Mounting hole [mm] 22.2
Slot depth [mm] 20–65
Slot width [mm] 8–40
Weight without
cable, approx.
[kg] 8.4
Safety class
/ II
Please observe the order number of your machine.
The trade names of the individual machines may vary.
Operating Controls
For Your Safety
3 609 929 482 - Buch Seite 1 Donnerstag, 28. August 2003 2:34 14
4 • 3 609 929 482 • TMS • 25.08.03
 Loading...