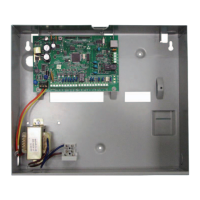
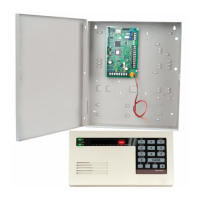
Figure 3.5: Mounting the module
Callout ᅳ Description
1 ᅳ B426 with mounting bracket installed
2 ᅳ Enclosure
3 ᅳ Mounting screws (3)
Install the DX2010 Input Expander
The control panel supports up to three DX2010 Input Expanders for Points 9 to 32.
Refer to the DX2010 Installation Instructions (P/N: 49533) for more information.
1. Set the module address.
2. Mount the module into the control panel enclosure (back wall or either side wall), or
other suitable enclosure.
3. Connect the module to the control panel. Refer to System Components and Wiring, page
18.
Connect a wire jumper to the TMPR and COM terminals to disable the DX2010's tamper input.
For point wiring options, refer to Connect Supervised Points, page 31. To disable the tamper
input on the DX2010, connect a wire jumper between the TMPR and COM terminals.
Notice!
In an NF A2P certified installation, mount the DX2010 module on one side of the panel
housing, or on one side of the auxiliary power supply IPP-PSU-2A5).
Connect Supervised Points
For wiring diagrams, refer to System Components and Wiring, page 18.
Fire Point Wiring
Supervised Point 1 supports two- and four-wire smoke detectors.
Supervised Points 2 to 32 support only four-wire smoke detectors.
To program supervised points as fire points, refer to Points, page 44.
For intrusion point configuration, refer to Intrusion Point Wiring.
When using an output to supply power to a four-wire smoke detector, program the output
function for System Reset. Refer to Outputs, page 46.
3.2.7
3.2.8
Easy Series Control Panel System Installation and Configuration | en 31
Bosch Security Systems, Inc. System Reference Guide 2014.09 | 01 | F.01U.306.221
 Loading...