English
Battery precautions
1. Do not use rechargeable batteries.
2. Use only 3V, CR2025 battery of the same or equivalent type.
3. Insert batteries with the correct polarity.
4. Keep batteries away from children.
5. Dispose of exhausted batteries according to local legal requirements. Do not
dispose them by throwing away with normal household rubbish.
6. Avoid short circuiting the contacts in the battery compartment and battery terminals.
7. Remove batteries from the unit if it will be not used for long period of time.
8. Exhausted batteries should be removed from the battery compartment to prevent
over-discharge, which can cause leakage and may cause damage to the clock.
Getting started
1. Remove the battery door.
2. Take out button cell battery and remove the plastic strip.
3. Replace the button cell battery for time backup.
4. Close the battery door.
5. A DC adapter is being used to power the clock, plug the adapter into the DC
jack at the back of the clock.
Function keys
Alarm/time/12/24 hour/brightness switch
-Slide to the alarm position to set the alarm time
-Slide to the time position to set the clock time
-Slide to the 12/24 hour position to set 12/24 hour format
-Slide to the brightness position to set the clock display brightness.
+ key
- In the alarm/time setting mode, press to increase the setting value. Press and
hold to speed up the setting. In the 12/24 hour setting mode, press to switch
between 12/24 hour format. In the brightness mode, press to increase the
clock display brightness.
- key
-In the alarm/time setting mode, press to decrease the setting value. Press and
hold to speed up the setting. In the brightness mode, press to decrease the
clock display brightness
ALARM ON/OFF button
- Press to turn the alarm on/off.
Snooze zone
-Touch to stop the alarm and activate the snooze function.
Reset button
- Press by using a pin to reset all values to default. In case of a malfunction,
the unit has to be reset.
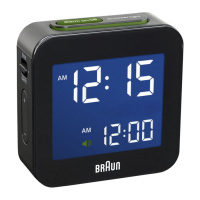
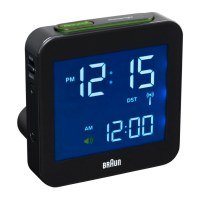
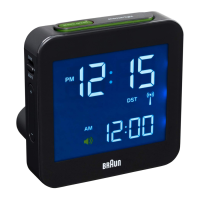
Product description (Image 1)
1. LCD display
2. Alarm/time/12/24 hour/brightness
switch
3. DC jack
4. Backup Battery compartment
5. Reset button
6. Alarm ON/OFF button
7. Snooze zone
8. -- key
9. + key
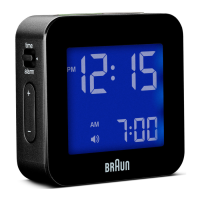
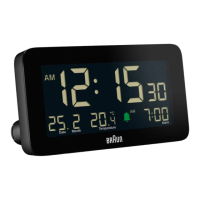
Display symbols (Image 2)
A. Time
B. Alarm icon
C. Alarm time
Setting the time
1. Slide the “ALARM / TIME / 12/24 HOUR / BRIGHTNESS” switch to the TIME
position.
2. Press the “+” or “-” key to set the desired value. Press and hold to speed up
the setting.
3. Slide the “ALARM / TIME / 12/24 HOUR / BRIGHTNESS” switch to the
“BRIGHTNESS” position to return to normal display and save the setting.
Setting the alarm
1. Slide the “ALARM / TIME / 12/24 HOUR / BRIGHTNESS” switch to the ALARM
position.
2. Press the “+” or “-” key to set the desired value. Press and hold to speed up
the setting.
3. Slide the “ALARM / TIME / 12/24 HOUR / BRIGHTNESS” switch to the
BRIGHTNESS position to return to normal display and save the setting.
Setting the 12/24 hour format
1. Slide the “ALARM / TIME / 12/24 HOUR / BRIGHTNESS” switch to the 12/24
HOUR position.
2. Press the “+” key to set the 12 or 24 hour format.
3. Slide the “ALARM / TIME / 12/24 HOUR / BRIGHTNESS” switch to the
BRIGHTNESS position to return to normal display and save the setting.
Setting the clock display brightness
1. Slide the “ALARM / TIME / 12/24 HOUR / BRIGHTNESS” switch to the
BRIGHTNESS position.
2. Press the “+” or “-” key to set the desired brightness.
Using the alarm and snooze function
1. Activate the alarm by pressing the “ALARM ON/OFF” button. The bell icon “
” will appear on the LCD display.
2. Press the SNOOZE zone to stop the alarm and activate the snooze function.
When the alarm sounds, the alarm icon will ash.
3. To de-activate the alarm and snooze function, press the ALARM ON/OFF but-
ton. The bell icon will disappear.
Note:
1. When the snooze function is activated, the alarm will automatically start again
after 5 minutes. The snooze function will not stop unless you press the ALARM
ON/OFF button to turn off the snooze. If no button is pressed to deactivate the alarm
sound, the clock will automatically enter into snooze function, the alarm sound will repeat
again after 5 minutes, this process will repeat a maximum of three times.
2. Do not put the adapter wire near the top of the SNOOZE zone as this will affect the
snooze function.
Battery replacement
1. If the DC adapter is removed from the clock and plugged back in and the current time
is not memorised, then the button cell battery must be replaced immediately.
2. It is recommended to replace the button cell battery once a year.
Note: Exposure to an electrostatic environment may cause the clock to reset. In this event
please follow the instructions as described in this manual to set the clock again.
Guarantee
2 year guarantee against material and workmanship defects (except battery). The
guarantee is valid in those countries where the alarm clock is ofcially being sold.
Broken or cracked lens screen are not covered under the Guarantee.
Precaution of using adaptor:
1. The AC/DC adaptor and apparatus should not be exposed to dripping or splashing
and no objects lled with liquids, should be placed on the AC/DC adaptor and apparatus.
2. When the AC/DC adaptor is used to disconnect device. The AC/DC adaptor should
not be obstructed and should be easily accessed during intended use. To completely
disconnect the power input, the AC/DC adaptor should be disconnected from the mains.
3. Rated power consumption of the LCD clock is dc 5V (insert symbol) 200mA, so use
the provided 5V dc (insert symbol) 200mA adaptor for the LCD clock.
4. Battery should not be exposed to excessive heat such as sunshine, re or the like.
CAUTION: Danger of explosion if battery is incorrectly replaced. Replace only with the
same (CR2025) or equivalent type.
FCC STATEMENT
This device complies with part 15 of the FCC Rules. Operation is subject to the following
two conditions:
1. This device may not cause harmful interference, and
2. This device must accept any interference received, including interference that may
cause undesired operation.
Warning! Changes or modications to this unit not expressly approved by the party
responsible for compliance could void the user’s authority ot operate the equipment.
Note: This equipment has been tested and found to comply with the limits for a Class B
digital device, pursuant to part 15 of the FCC Rules. These limits are designed to provide
reasonable protection against harmful interference in a residential installation. This
equipment generates, uses and can radiate radio frequency energy and, if not installed
and used in accordance with the instructions, may cause harmful interference to radio
communications. However, there is no guarantee that interference will not occur in a
particular installation. If this equipment does cause harmful interference to radio or
television reception, which can be determined by turning the equipment off and on, the
user is encouraged to try to correct the interference by one or more of the following
measures:
1. Reorient or relocate the receiving antenna.
2. Increase the separation between the equipment and receiver.
3. Connect the equipment into an outlet on a circuit different from that to which the
receiver is connected.
4. Consult the dealer or an experienced radio/TV technician for help.
US Distributor: AMEICO, 1 CHURCH STREET, NEW MILFOR, CT 06776, USA
TEL. NO.: 860354 8765
Braun helpline
Should you have a problem with your product, please check your local service centre at:
www.braun-clocks.com
www.braun-watches.com
or contact +44 208 208 1833
WARNING! This product is covered by the Waste Electrical
and Electronic Equipment (WEEE) directive. It should not be
discarded with normal household waste but taken to your local
collection centre for recycling.
Braun is a registered trademark of Braun GmbH, Kronberg, Germany used under license
by Zeon Ltd
Deutsch
Vorsichtsmaßnamen für Batterien
1. Nutzen Sie keine Akkus.
2. Nutzen Sie nur CR2025-Batterien mit 3 V des gleichen oder eines gleichwertigen Typs.
3. Achten Sie beim Einlegen der Batterien auf die richtige Polarität.
4. Halten Sie die Batterien von Kindern fern.
5. Entsorgen Sie verbrauchte Batterien nach den örtlich geltenden Vorgaben. Entsorgen
Sie die Batterien nicht mit dem normalen Hausmüll.
6. Vermeiden Sie Kurzschlüsse an den Kontaktstellen des Batteriefachs und der
Batterieklemmen.
7. Entfernen Sie die Batterien aus dem Gerät, wenn dieses für eine längere Zeit nicht
genutzt wird.
8. Verbrauchte Batterien sollten aus dem Batteriefach entfernt werden, um so
übermäßiges Entladen zu verhindern, das zum Auslaufen des Batterieinhalts führen und
Schäden an der Uhr verursachen kann.
Die ersten Schritte
1. Entfernen Sie die Batterieabdeckung.
2. Entnehmen Sie die Knopfzelle und entfernen Sie den Plastikstreifen.
3. Setzen Sie die Knopfzelle für die Speicherung der Uhrzeit wieder ein.
4. Schließen Sie das Batteriefach.
5. Für den Betrieb der Uhr wird ein DC-Adapter genutzt, stecken Sie den Adapter dazu in
die DC-Buchse auf der Rückseite der Uhr.
Funktionstasten
Schalter für Alarm/Zeit/12-/24-Stunden-Format/Helligkeit
- Schieben Sie den Schalter in die Alarm-Position, um die Zeit für den Alarm
einzustellen
- Schieben Sie den Schalter auf die Time-Position, um die Uhrzeit einzustellen
- Schieben Sie den Schalter auf die 12/24Hour-Position, um das 12-/24-Stunden-
Format einzustellen
- Schieben Sie den Schalter auf die Brightness-Position, um die den Helligkeit des
Bildschirms einzustellen
+ Taste
- Drücken Sie Sie diese Taste im Alarm-/Zeit-Modus, um die Einstellung
zu erhöhen. Halten Sie die Taste gedrückt, um die Einstellung schneller zu verändern.
Drücken Sie die Taste im 12/24Hour-Modus, um zwischen dem 12-Stunden- und dem
24-Stunden-Format zu wechseln. Drücken Sie die Taste im Brightness-Modus, um die
Helligkeit des Displays zu erhöhen.
- - Taste
- Drücken Sie Sie diese Taste im Alarm/Time-Modus, um die Einstellung zu erhöhen.
Halten Sie die Taste gedrückt, um die Einstellung schneller zu verändern. Drücken Sie
die Taste im Brightness-Modus, um die Helligkeit des Displays zu senken.
ALARM ON/OFF-Taste
- Drücken Sie diese Taste, um den Alarm an-/auszuschalten.
Schlummerfunktion
- Drücken Sie die Taste, um den Alarm zu unterbrechen und die Schlummerfunktion
zu aktivieren.
Reset-Knopf
- Benutzen Sie einen Stift, um diesen zu betätigen und alles auf die
Standardeinstellung zurückzusetzen. Bei einer Fehlfunktion müssen Sie das Gerät
zurücksetzen.
Produktbeschreibung (Bild 1)
1. LCD-Display
2. Schalter für Alarm/Zeit/12-/24-Stunden-
Format/Helligkeit
3. DC-Buchse
4. Ersatzbatteriefach
5. Reset-Knopf
6. Alarm ON/OFF-Taste
7. Schlummerfunktion
8. - Taste
9. + Taste
Symbole auf dem Display (Bild 2)
A. Zeit
B. Alarmsymbol
C. Alarmzeit
Einstellen der Zeit
1. Schieben Sie den Schalter für „ALARM / TIME / 12/24 HOUR / BRIGHTNESS“ auf die
TIME-Position.
2. Drücken Sie die Taste „+“ oder „-“, um die gewünschte Zeit einzustellen. Halten Sie die
Taste gedrückt, um die Einstellung schneller zu ändern.
3. Schieben Sie den „ALARM / TIME / 12/24 HOUR / BRIGHTNESS“-Schalter in die
BRIGHTNESS-Position, um zur normalen Anzeige zurückzukehren und die Einstellungen
zu speichern.
Einstellen des Alarms
1. Schieben Sie den Schalter für „ALARM/ZEIT/12-/24-STUNDEN/HELLIGKEIT“ auf die
ALARM-Position.
2. Drücken Sie die Taste „+“ oder „-“, um die gewünschte Zeit einzustellen. Halten Sie die
Taste gedrückt, um die Einstellung schneller zu ändern.
3. Schieben Sie den „ALARM / TIME / 12/24 HOUR / BRIGHTNESS“-Schalter in die
BRIGHTNESS-Position, um zur normalen Anzeige zurückzukehren und die Einstellungen
zu speichern.
Einstellen des 12-/24-Stunden-Formats
1. Schieben Sie den „ALARM / TIME / 12/24 HOUR / BRIGHTNESS“-Schalter in die
12/24 HOUR-Position.
2. Drücken Sie auf „+“, um das 12- oder das 24-Stunden-Format einzustellen.
3. Schieben Sie den „ALARM / TIME / 12/24 HOUR / BRIGHTNESS“-Schalter in die
BRIGHTNESS-Position, um zur normalen Anzeige zurückzukehren und die Einstellungen
zu speichern.
Einstellen der Displayhelligkeit
1. Schieben Sie den „ALARM / TIME / 12/24 HOUR / BRIGHTNESS“-Schalter auf die
BRIGHTNESS-Position.
2. Drücken Sie die Taste „+“ oder „-“, um die gewünschte Helligkeit einzustellen.
Nutzung der Alarm- und Schlummerfunktion
1. Aktivieren Sie den Alarm, indem Sie auf die „ALARM ON/OFF“-Taste drücken. Das
Alarmsymbol „ “ erscheint auf dem LCD-Display.
2. Drücken Sie auf die SNOOZE-Taste, um den Alarm zu unterbrechen und die
Schlummerfunktion zu aktivieren. Wenn der Alarm ertönt, blinkt das Alarmsymbol.
3. Um den Alarm und die Schlummerfunktion zu deaktivieren, drücken Sie die ALARM
ON/OFF-Taste. Das Symbol wird ausgeblendet.
Hinweis:
1. Wenn die Schlummerfunktion aktiviert ist, ertönt der Alarm automatisch nach 5 Minuten
erneut. Die Schlummerfunktion wird erst dadurch unterbrochen, dass die ALARM ON/
OFF-Taste gedrückt wird. Wenn kein Knopf gedrückt wird, um den Alarm zu deaktivieren,
wechselt die Uhr automatisch in die Schlummerfunktion und der Alarmton ertönt nach 5
Minuten erneut. Dieser Vorgang wiederholt sich maximal drei Mal.
2. Verlegen Sie das Adapterkabel nicht in die Nähe der SNOOZE-Taste, da dies die
Schlummerfunktion beeinträchtigen kann.
Austauschen der Batterie
1. Wenn der DC-Adapter aus der Uhr gezogen und dann wieder eingesteckt wird
und die aktuelle Zeit nicht gespeichert wird, sollte die Knopfzelle sofort ersetzt
werden.
2. Es wird empfohlen, die Knopfzelle einmal im Jahr auszutauschen.
Hinweis: Elektrostatische Umgebungen können dazu führen, dass sich die Uhr
zurückstellt. Befolgen Sie in diesem Fall die Anleitungen in der Gebrauchsanwei-
sung, um die Uhr manuell einzustellen.
Garantie
Es besteht eine 2-jährige Garantie auf Material- und Verarbeitungsfehler
(ausgenommen der Batterien). Die Garantie ist in den Ländern gültig, in
denen der Wecker ofziell verkauft wird.
Ein beschädigter oder gesprungener Displayschutz wird nicht von der
Garantie abgedeckt.
Vorsichtsmaßnahmen bei der Benutzung des Adapters:
1. Der AC/DC Adapter und das Gerät dürfen keinen üssigen Materialien (Trop-
fen, Spritzern) ausgesetzt sein. Gegenstände, die mit Wasser gefüllt sind, dürfen
nicht auf den AC/DC Adapter und das Gerät gestellt werden.
2. Der AC/DC Adapter kann dazu verwendet werden, das Gerät vom Stromkreis
zu trennen. Der AC/DC Adapter darf nicht blockiert sein und muss während der
Benutzung frei zugänglich sein. Zur vollständigen Unterbrechung der Stromver-
sorgung muss der AC/DC Adapter vom Netz getrennt werden.
3. Die Nennleistung der LCD-Uhr beträgt 5V Gleichstrom (Symbol einfügen)
200mA. Verwenden Sie deshalb den bereitgestellten 5V (Symbol einfügen)
200mA Gleichstromadapter für die LCD-Uhr.
4. Batterien dürfen keiner übermäßigen Hitze wie direkter Sonneneinstrahlung,
Feuer oder ähnlichem ausgesetzt werden.
ACHTUNG: Explosionsgefahr bei unsachgemäßem Austausch der Batterien. Nur
durch gleiche (CR2025) oder gleichwertige Batterietypen ersetzen.
Braun Infoline
Wenn Sie Probleme mit unserem Produkt haben sollten, bitte wenden Sie sich an
Ihr örtliches Dienstleistungszentrum unter:
www.braun-clocks.com
www.braun-watches.com
oder rufen Sie an unter +44 208 208 1833
ACHTUNG! Dieses Produkt unterliegt der WEEE-Richtlinie
(Richtlinie 2002/96/EG über Elektro- und Elektronik-
Altgeräte). Das Produkt sollte nicht mit dem normalen
Hausmüll entsorgt werden, sondern zu Ihrer örtlichen
Sammelstelle gebracht werden.
Braun ist eine registrierte Handelsmarke von Braun GmbH, Kronberg,
Deutschland unter Lizenz von Zeon Ltd. verwendet.
Français
Précautions d’utilisation des piles
1. N’utilisez pas de piles rechargeables.
2. Utilisez uniquement des piles boutons CR2025 3 V de type identique ou similaire.
3. Insérez les piles en respectant la polarité.
4. Conservez les piles hors de portée des enfants.
5. Les piles usagées doivent être évacuées conformément à la réglementation
locale. Ne vous en débarrassez pas avec les ordures ménagères.
6. Évitez de court-circuiter les contacts du compartiment de la pile et les bornes
de la pile.
7. Retirez la pile de l’appareil en cas d’inutilisation prolongée.
8. Les piles usagées doivent être retirées du compartiment des piles an d’éviter
une décharge excessive, qui peut provoquer une fuite et endommager le réveil.
Démarrage
1. Retirez le cache de protection de la pile.
2. Retirez la pile bouton puis la languette en plastique.
3. Remettez la pile bouton de secours (pour la sauvegarde de l’heure) en place.
4. Replacez le cache de protection de la pile.
5. Ce réveil fonctionne avec un adaptateur secteur.
Branchez cet adaptateur dans la prise CC à l’arrière du réveil.
Fonctions des touches
Curseur « alarm / time / 12/24 hour / brightness »
- Positionnez-le sur « alarm » pour régler l’heure de réveil.
- Positionnez-le sur « time » pour régler l’heure.
- Positionnez-le sur « 12/24 hour » pour choisir le mode d’afchage de l’heure
en 12 ou 24 heures.
- Positionnez-le sur « brightness » pour régler la luminosité d’afchage.
Touche +
- En mode de réglage réveil / heure, appuyez sur cette touche pour augmenter
la valeur afchée. Appuyez et maintenez pour augmenter plus rapidement la
valeur afchée. En mode de réglage 12 / 24 heures, appuyez sur cette touche
pour basculer entre l’afchage en 12 ou 24 heures. En mode de réglage de la
luminosité, appuyez sur cette touche pour augmenter la luminosité de l’écran.
Touche -
- En mode de réglage réveil / heure, appuyez sur cette touche pour diminuer la
valeur afchée. Appuyez et maintenez pour diminuer plus rapidement la valeur
afchée. En mode de réglage de la luminosité, appuyez sur cette touche pour
diminuer la luminosité de l’écran.
Touche «alarm on/off»
- Appuyez sur cette touche pour activer ou désactiver l’alarme.
Pavé tactile « SNOOZE »
- Touchez cette zone pour stopper l’alarme et activer la fonction de répétition.
Reset button
- Appuyez sur cette touche à l’aide d’une épingle pour réinitialiser tous les
paramètres à leurs valeurs par défaut. En cas de dysfonctionnement, l’appareil
doit être réinitialisé.
Description du produit (image 1)
1. Écran LCD
2. Curseur « alarm / time / 12/24
hour / brightness »
3. Prise adaptateur
4. Compartiment de la pile de secours
5. Touche « reset »
6. Touche « alarm on/off »
7. Pavé tactile « SNOOZE »
8. Touche -
9. Touche +
Symboles d’afchage (image 2)
A. Heure
B. Icône d’alarme
C. Heure de réveil
Réglage de l’heure
1. Positionnez le curseur «alarm / time / 12/24 hour / brightness» en position « time ».
2. Utilisez les touches « + » et « - » pour obtenir la valeur souhaitée. Appuyez et
maintenez pour diminuer / augmenter plus rapidement la valeur afchée.
3. Positionnez le curseur « alarm / time / 12/24 hour / brightness » sur
«brightness» pour revenir à l’afchage normal et enregistrer le réglage effectué.
Réglage de l’heure de réveil
1. Positionnez le curseur « alarm / time / 12/24 hour / brightness » en position «alarm».
2. Utilisez les touches « + » et « - » pour obtenir la valeur souhaitée. Appuyez et
maintenez pour diminuer / augmenter plus rapidement la valeur afchée.
3. Positionnez le curseur « alarm / time / 12/24 hour / brightness » en position
« brightness » pour revenir à l’afchage normal et enregistrer le réglage effectué.
Afchage en 12 ou 24 heures
1. Positionnez le curseur « alarm / time / 12/24 hour / brightness » en position
«12/24 hour».
2. Appuyez sur la touche « + » pour choisir entre les modes d’afchage en 12 ou
24 heures.
3. Positionnez le curseur « alarm / time / 12/24 hour / brightness » en position
«brightness» pour revenir à l’afchage normal et enregistrer le réglage effectué.
Réglage de la luminosité d’afchage
1. Positionnez le curseur « alarm / time / 12/24 hour / brightness » en position
« brightness ».
2. Utilisez les touches « + » et « - » pour obtenir la luminosité souhaitée.
Utilisation de la fonction réveil et répétition
1. Activez l’alarme en appuyant sur la touche « alarm on/off ». Le symbole sonore
« » s’afche sur l’écran LCD.
2. Touchez le pavé tactile « SNOOZE » pour stopper l’alarme et activer la fonction
de répétition. Lorsque l’alarme retentit, l’icône d’alarme clignote.
3. Pour désactiver la fonction d’alarme et de répétition, appuyez sur la touche
« alarm on/off ». Le symbole sonore disparaît.
Remarque :
1. Lorsque la fonction de répétition est activée, l’alarme se répète
automatiquement après 5 minutes. La répétition se poursuit jusqu’à ce que vous
appuyiez sur la touche « alarm on/off » pour la désactiver. Si vous n’appuyez sur
aucune touche pour couper le son de l’alarme, le réveil passe automatiquement
en mode répétition. L’alarme retentira alors au maximum trois fois, à intervalles
de 5 minutes.
2. Le câble de l’adaptateur ne doit pas se trouver à proximité du pavé tactile
« SNOOZE » car il peut en affecter le fonctionnement.
Remplacement de la pile
1. Lorsque l’adaptateur secteur est débranché du réveil et que l’heure n’est pas
sauvegardée, cela signie que la pile bouton de sauvegarde de l’heure doit être
immédiatement remplacée.
2. Il est recommandé de remplacer la pile bouton une fois l’an.
Remarque : l’exposition à l’électricité statique peut déclencher la réinitialisation
de l’appareil. Dans ce cas, veuillez suivre les instructions de ce manuel pour
procéder à nouveau au réglage de l’appareil.
Garantie
2 ans de garantie contre les défauts matériels et de fabrication (à l’exclusion
des piles). Cette garantie est valable dans les pays où ce réveil est ofcielle-
ment disponible à la vente.
Les écrans cassés ou ssurés ne sont pas couverts par la garantie.
Précautions à observer lors de l’utilisation de l’adaptateur:
1. Ne pas exposer l’adaptateur CA/CC et l’appareil à des gouttes ou des écla-
boussures. Ne pas placer d’objets remplis de liquide au-dessus de l’adaptateur
CA/CC et de l’appareil.
2. C’est possible utiliser l’adaptateur CA/CC pour déconnecter l’appareil. Ne rien
mettre devant l’adaptateur CA/CC qui le bloquerait et en maintenir l’accès facile
lorsqu’il est prévu de l’utiliser. Pour couper complètement l’alimentation électrique,
il convient de déconnecter l’adaptateur CA/CC au niveau de la prise du secteur.
3. La consommation électrique nominale de l’horloge LCD est de 5V en CC
(insérer symbole) 200mA. Utiliser l’adaptateur fourni de symbole d’insertion)
200mA pour l’horloge LCD.
4. Ne pas soumettre la pile à une chaleur excessive (ne pas la mettre au soleil,
la tenir éloignée du feu, etc.)
PRUDENCE: Danger d’explosion en cas d’utilisation du mauvais type de pile. La rem-
placer exclusivement par une pile du même type (CR2025) ou d’un type équivalent.
Ligne d’assistance Braun
En cas de problème avec votre produit, veuillez vous adresser au centre d’assistance
local renseigné sur le site:
www.braun-clocks.com
www.braun-watches.com
ou composer le +44 208 208 1833
AVERTISSEMENT ! Ce produit est couvert par la directive relative
aux déchets d’équipements électriques et électroniques (DEEE). Il
ne doit pas être évacué avec les ordures ménagères. Il convient de
le déposer dans un centre de collecte local pour recyclage.
Braun est une marque de commerce enregistrée par Braun GmbH, Kronberg, Allemagne,
sous licence de Zeon Ltd.
Italiano
Istruzioni per le batterie
1. Non utilizzare batterie ricaricabili.
2. Utilizzare solo batterie 3V, CR2025 dello stesso tipo o equivalente.
3. Inserire le batterie facendo attenzione a rispettare la corretta polarità.
4. Tenere le batterie fuori dalla portata dei bambini.
5. Smaltire le batterie esauste in conformità alle disposizioni di legge locali. Non smaltire
le batterie con i comuni riuti domestici.
6. Evitare il corto circuito dei contatti nell’alloggiamento e con i terminali della batteria.
7. Rimuovere le batterie dall’unità se non se ne prevede l’utilizzo per periodi di tempo
prolungati.
8. Le batterie esauste dovrebbero essere rimosse dall’alloggiamento per evitarne lo
scaricamento eccessivo che può causare perdite e danni all’orologio.
Per iniziare
1. Rimuovere lo sportello della batteria.
2. Estrarre la batteria a bottone e rimuovere l’etichetta in plastica.
3. Sostituire la batteria a bottone per la memorizzazione dell’ora.
4. Chiudere lo sportello della batteria.
5. L’orologio è alimentato da adattatore DC, collegare l’adattatore alla presa DC che si
trova nella parte posteriore dell’orologio.
Tasti di funzione
Interruttore sveglia/ora/12/24 ore/luminosità
-Collocare in posizione sveglia per impostare l’orario della sveglia
-Collocare in posizione ora per impostare l’ora
-Collocare in posizione 12/24 ore per impostare il formato dell’ora
-Collocare in posizione luminosità per impostare la luminosità dello schermo.
Pulsante +
-In modalità di impostazione sveglia/ora, premere il pulsante per aumentare il valore da
impostare. Tenere premuto per velocizzare l’avanzamento. In modalità di impostazione
12/24 ore, premere per passare da un formato all’altro. In modalità luminosità, premere
per aumentare la luminosità dello schermo dell’orologio.
Pulsante -
-In modalità di impostazione sveglia/ora, premere il pulsante per ridurre il valore da
impostare. Tenere premuto per velocizzare l’avanzamento. In modalità luminosità,
premere per ridurre la luminosità dello schermo dell’orologio.
Pulsante ALARM ON/OFF (SVEGLIA ON/OFF)
-Premere per attivare/disattivare la sveglia.
Snooze
-Toccare per arrestare la sveglia e attivare la funzione snooze.
Pulsante reset
-Premere utilizzando un oggetto appuntito per riportare tutti i valori all’impostazione
predenita. In caso di malfunzionamento, l’unità deve essere resettata.
Descrizione del prodotto (Immagine 1)
1. Schermo LCD
2. Sveglia/ora/12/24 ore/luminosità
3. Presa DC
4. Alloggiamento batteria tampone
5. Pulsante reset
6. Pulsante sveglia ON/OFF
7. Snooze
8. Pulsante -
9. Pulsante +
Simboli visualizzati sullo schermo (Immagine 2)
A. Ora
B. Simbolo sveglia
C. Ora sveglia
Impostare l’ora
1. Collocare l’interruttore “ALARM / TIME / 12/24 HOUR / BRIGHTNESS” (SVEGLIA/
ORA/ 12/24 ORE/LUMINOSITA’) in posizione TIME (ORA).
2. Premere il pulsante “+” o “-” per impostare il valore desiderato. Tenere premuto per
velocizzare l’avanzamento.
3. Collocare l’interruttore “ALARM / TIME / 12/24 HOUR / BRIGHTNESS” (SVEGLIA/
ORA/ 12/24 ORE/LUMINOSITA’) in posizione “BRIGHTNESS” (LUMINOSITA’) per tornare
alla normale visualizzazione e salvare l’impostazione.
Impostare la sveglia
1. Collocare l’interruttore “ALARM / TIME / 12/24 HOUR / BRIGHTNESS” (SVEGLIA/
ORA/ 12/24 ORE/LUMINOSITA’) in posizione ALARM (SVEGLIA).
2. Premere il pulsante “+” o “-” per impostare il valore desiderato. Tenere premuto per
velocizzare l’avanzamento.
3. Collocare l’interruttore “ALARM / TIME / 12/24 HOUR / BRIGHTNESS”(SVEGLIA/ORA/
12/24 ORE/LUMINOSITA’) in posizione BRIGHTNESS(LUMINOSITA’) per tornare alla
normale visualizzazione e salvare l’impostazione.
Impostare il formato 12/24 ore
1. Collocare l’interruttore “ALARM / TIME / 12/24 HOUR / BRIGHTNESS”(SVEGLIA/ORA/
12/24 ORE/LUMINOSITA’) in posizione 12/24 HOUR(12/24 ORE).
2. Premere il pulsante “+” per impostare il formato 12 o 24 ore.
3. Collocare l’interruttore “ALARM / TIME / 12/24 HOUR / BRIGHTNESS”(SVEGLIA/ORA/
12/24 ORE/LUMINOSITA’) in posizione BRIGHTNESS(LUMINOSITA’) per tornare alla
normale visualizzazione e salvare l’impostazione.
Impostare la luminosità dello schermo dell’orologio
1. Impostare l’interruttore “ALARM / TIME / 12/24 HOUR / BRIGHTNESS”(SVEGLIA/
ORA/ 12/24 ORE/LUMINOSITA’) in posizione BRIGHTNESS(LUMINOSITA’).
2. Premere il pulsante “+” o “-” per impostare la luminosità desiderata.
Utilizzare la funzione sveglia e snooze
1. Attivare la sveglia premendo il pulsante “ALARM ON/OFF” (SVEGLIA ON/OFF). Verrà
visualizzato il simbolo della campana “ ” sullo schermo LCD.
2. Premere SNOOZE per arrestare la sveglia e attivare la funzione snooze. Quando la
sveglia suona, il simbolo della campana lampeggia.
3. Per disattivare la funzione sveglia e snooze, premere il pulsante “ALARM ON/OFF”
(SVEGLIA ON/OFF). Il simbolo della campana scompare.
Nota:
1. Se la funzione snooze è disattivata, la sveglia riparte automaticamente dopo cinque
minuti. La funzione snooze non si arresta se non viene premuto il pulsante “ALARM ON/
OFF” (SVEGLIA ON/OFF). Se non viene premuto alcun pulsante per disattivare la sveg-
lia, l’orologio attiva automaticamente la funzione snooze e la sveglia suonerà nuovamente
dopo 5 minuti, ma al massimo per tre volte.
2. Non collocare il lo dell’adattatore vicino all’area di attivazione della funzione SNOOZE
perché potrebbe comprometterne la funzionalità.
Sostituzione delle batterie
1. Se l’adattatore DC viene scollegato e ricollegato all’orologio e l’ora non è stata memo-
rizzata, la batteria deve essere sostituita immediatamente.
2. Si consiglia di sostituire la batteria una volta l’anno.
Nota: L’esposizione ad ambiente elettrostatico può causare il ripristino delle impostazioni
iniziali dell’orologio. In questo caso seguire le istruzioni riportate nel presente manuale per
impostare nuovamente l’orologio.
Garanzia
Due anni di garanzia contro i difetti di materiale e di fabbricazione (ad eccezione
della batteria). La garanzia è valida nei paesi in cui la sveglia è ufcialmente in
vendita.
I vetri/lenti rotti o scalti non sono coperti da garanzia.
Precauzioni nell’uso adattatore:
1. L’adattatore CC/CA, con le relative attrezzature, non deve essere esposto a perdite o
spruzzi, né vi dovrebbero essere appoggiati oggetti pieni di liquidi.
2. Si possono utilizzare l’adattatore CC/CA per scollegare il dispositivo, non deve essere
ostruito, ma facilmente accessibile durante tutto l’utilizzo per cui è stato destinato. Per
interrompere completamente l’ingresso della corrente, scollegare l’adattatore CC/CA dalla
rete elettrica.
3. Il consumo di potenza nominale dell’orologio LCD è di 5V CA (inserire simbolo) e 200
mA; utilizzare pertanto l’adattatore 5V CA (inserire simbolo) 200 mA per l’orologio LCD.
4. La batteria non deve essere esposta a calore eccessivo, come quello del sole, di
amme o simili.
CAUTELA: Se la batteria viene sostituita in maniera non corretta vi è pericolo di esplo-
sione. Sostituire solo con batterie identiche (CR2025) o equivalenti.
Contatti Braun
Per qualsiasi problema o informazione, contattare il centro servizi locale sul sito:
www.braun-clocks.com
www.braun-watches.com
oppure contattare il numero +44 208 208 1833
ATTENZIONE! Questo prodotto è coperto dalla direttiva Waste
Electrical and Electronic Equipment (WEEE). Non deve essere
eliminato con i normali riuti domestici ma portato presso il
vostro centro locale di raccolta per il riciclaggio.
Braun è un marchio registrato di Braun GmbH, Kronberg, Germania utilizzato su licenza
da Zeon Ltd.
Nederlands
Voorzorgsmaatregelen batterij
1. Geen oplaadbare batterijen gebruiken
2. Gebruik alleen CR2025-batterijen van 3 V van hetzelfde of gelijkwaardig type.
3. Plaats de batterijen met de juiste polariteit.
4. Batterijen buiten bereik van kinderen houden.
5. Lege batterijen volgens de plaatselijke wettelijke vereisten weggooien. Gooi ze
niet weg bij het gewone huishoudelijke afval.
6. Voorkom kortsluiting van de contacten in het batterijcompartiment en batterijpolen.
7. Verwijder de batterijen uit het apparaat als deze langere tijd niet wordt gebruikt.
8. Lege batterijen moeten worden verwijderd uit het batterijcompartiment om
overtollige ontlading te voorkomen, dit kan leiden tot lekkage en kan schade aan de
klok veroorzaken.
Aan de slag
1. Verwijder het klepje van het batterijcompartiment.
2. Neem de knoopcelbatterij uit en verwijder de plastic strip.
3. Plaats de knoopcelbatterij terug voor back-upenergie.
4. Sluit het klepje van het batterijcompartiment.
5. Er wordt een DC-adapter als energiebron gebruikt voor de klok, steek de adapter
in de DC-ingang aan de achterkant van de klok.
Functieknoppen
“Alarm/time/12/24 hour/brightness”-schakelaar
- Schuif naar de wekkerstand (ALARM) om de wekker in te stellen.
- Schuif naar de tijdstand (TIME) om de tijd in te stellen.
- Schuif naar de 12/24-uursweergave (12/24 HOUR) om 12/24-uursformaat in te
stellen
- Schuif naar de helderheidsstand (BRIGHTNESS) om de helderheid in te stellen.
+ knop
- Indrukken in de wekker-/tijdinstellingsmodus de instelling te verhogen.
Vasthouden om de instelling te versnellen. Indrukken in de 12/24-uursinstelling
om te schakelen tussen het 12/24 uur-formaat. Indrukken in de helderheidsmodus
om de helderheid van het display van de klok te verhogen.
- knop
- Indrukken in de wekker-/tijdinstellingsmodus de instelling te verlagen.
Vasthouden om de instelling te versnellen. Indrukken in de helderheidsmodus om
de helderheid van het display van de klok te verlagen.
ALARM ON/OFF-knop
- Indrukken om de wekker aan-/uit te schakelen.
Sluimerzone (SNOOZE)
- Indrukken om de wekker te stoppen en de sluimerfunctie te activeren.
Reset-knop
- Indrukken met behulp van een speld om alle waarden weer op de fabrieksstand
in te stellen. In het geval van een storing, moet het apparaat worden gereset.
Productbeschrijving (Afbeelding 1)
1. LCD-scherm
2. “Alarm/time/12/24 hour/brightness”-
schakelaar
3. DC-aansluiting
4. Compartiment voor back-upbatterij
5. Reset-knop
6. Alarm ON/OFF-knop
7. Sluimerzone (SNOOZE)
8. - knop
9. + knop
Symbolen op het scherm (Afbeelding 2)
A. Tijd
B. Wekkersymbool
C. Wektijd
Instellen van de tijd
1. Schuif de “ALARM / TIME / 12/24 HOUR / BRIGHTNESS”-schakelaar op de
tijdstand (TIME).
2. Druk op de “ +” of “ -” knop om de gewenste waarde in te stellen. Vasthouden om
de instelling te versnellen.
3. Schuif de “ALARM / TIME / 12/24 HOUR / BRIGHTNESS”-schakelaar naar de
helderheidsstand (BRIGHTNESS) om naar normale display terug te keren en de
instellingen te bewaren.
Instellen van de wekker
1. Schuif de “ALARM / TIME / 12/24 HOUR / BRIGHTNESS” -schakelaar op de
wekkerstand (ALARM).
2. Druk op de “ +” of “ -” knop om de gewenste waarde in te stellen. Vasthouden om
de instelling te versnellen.
3. Schuif de ALARM / TIME / 12/24 HOUR / BRIGHTNESS” -schakelaar naar de
helderheidsstand (BRIGHTNESS) om naar normale display terug te keren en de
instellingen te bewaren.
Instellen van het 12/24-formaat
1. Schuif de “ALARM / TIME / 12/24 HOUR / BRIGHTNESS”-schakelaar naar de
12/24-tijdsindelingsstand (12/24 HOUR).
2. Druk de “+”-knop in om het 12 of 24-uursformaat in te stellen.
3. Schuif de ALARM / TIME / 12/24 HOUR / BRIGHTNESS” -schakelaar naar de
helderheidsstand (BRIGHTNESS) om naar normale display terug te keren en de
instellingen te bewaren.
Instellen van de helderheid van het display van de klok
1. Schuif de “ALARM / TIME / 12/24 HOUR / BRIGHTNESS”-schakelaar naar de
helderheidsstand (BRIGHTNESS).
2. Druk op de “ +” of “ -” knop om de gewenste helderheid in te stellen.
Wekker en sluimerfunctie gebruiken
1. Activeer de wekker door de “ALARM ON/OFF”-knop in te drukken. Het
wekkersymbool “ “ verschijnt op het LCD-scherm.
2. Druk op sluimerzone (SNOOZE) om de wekker te stoppen en de sluimerfunctie te
activeren. Als de wekker afgaat, knippert het wekkersymbool.
3. Druk de ALARM ON/OFF-knop in om de wekker en de sluimerfunctie te
deactiveren. Het wekkersymbool verdwijnt.
Opmerking:
1. Als de sluimerfunctie is geactiveerd, zal de wekker automatisch na 5 minuten
weer afgaan. De sluimerfunctie zal niet stoppen totdat u op de ALARM ON/OFF-
knop drukt om de sluimerfunctie uit te schakelen. Als de knop om het alarm uit te
schakelen niet wordt ingedrukt, gaat de klok automatisch over op de sluimerfunctie
en zal het alarm na 5 minuten weer afgaan. Dit proces herhaalt zich maximaal drie
keer.
2. Plaats het adaptersnoer niet in de buurt van de bovenkant van de SNOOZE-zone
2.
6.
3.
7.
4.
8.
5.
9.

 Loading...