EasyManua.ls Logo

BrewBuilt IceMaster Max 4 - User Manual

BrewBuilt IceMaster Max 4
3 pages
Print Icon
To Next Page IconTo Next Page
Loading...
ATTENTION
This IceMaster is designed to manage your
fermentations by cooling water/glycol to
a set temperature in a reservoir which will
then be circulated via a submersible pump
through your specic cooling coils/jacket/
plate/system.
Freezing can occur so icing in the reservoir
is considered normal operation. To
compensate for this we recommend that
one uses a 20% propylene glycol solution
to lower the freezing point.
Unpack your unit and open the top cover to nd the
power cord, drain plug, and temperature probes.
Install the drain plug and place the power cord aside
for now.
Plug in the temperature probes to all pump controllers
and attach 3/8" tubing to form a return loop on all sets
of inlets and outlets.
Open the top cover and ll the reservoir with tap water.
Plug in the power cord and ip the red switch to power
on the unit.
Set the temperature for each controller at the front of
the unit to 2°C.
Hold the ‘Up’ button for 3 seconds until the
number is ashing. The ashing number is your set
temperature.
While the number is ashing, press the ‘Down’
button to decrease the set temperature or press the
‘Up’ button to increase the set temperature.
Once you have adjusted the set temperature, wait
for the number to stop ashing and the controller
will return to normal operation mode and display
the temperature probe reading.
The pumps should now kick on and begin recirculating
water through the return loops. Look for water ow
and conrm each pump is operating correctly and
check for leaks around your connections.
TIP
-
If you plan to use a propylene glycol If you plan to use a propylene glycol
solution with the IceMaster, unthread the drain solution with the IceMaster, unthread the drain
plug to drain the tap water used for testing. plug to drain the tap water used for testing.
If you will be using water only, be sure to keep If you will be using water only, be sure to keep
the reservoir temperature set at or above 2°C the reservoir temperature set at or above 2°C
to avoid freezing.to avoid freezing.
Icemaster Reservoir
At the back of the unit, adjust the reservoir
controller to 2°C.
• Hold the ‘S’ button until F1 is displayed.
Press ‘S’ again, which will enter the temperature
adjustment mode.
Then hold ‘S’ and the up or down button
simultaneously to alter the set temperature of
the reservoir.
Once you have conrmed that the reservoir is
cooling, the pumps are operating, and you have
no leaks, you are nished with the initial assembly
and testing and can move onto to setting up the
unit with your cooling system.
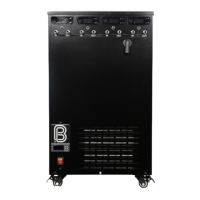
Assembly And Testing Instructions
ICEMASTER MAX 4
Thank you for purchasing the IceMaster refrigeration
unit. You are taking a big step to better manage
fermentation temperatures, and ultimately making
cleaner, more consistent beverages.
1
2
3
4
5
6
7
8
Question and Answer IconNeed help?

Do you have a question about the BrewBuilt IceMaster Max 4 and is the answer not in the manual?

Overview

The IceMaster Max 4 is a refrigeration unit designed to manage fermentation temperatures, ensuring cleaner and more consistent beverages. It achieves this by cooling a water/glycol solution in a reservoir to a set temperature, which is then circulated via a submersible pump through specific cooling coils, jackets, plates, or other systems.

Function Description:

The primary function of the IceMaster Max 4 is to maintain precise fermentation temperatures. It utilizes a cooling system to chill a water/glycol solution, which acts as a heat transfer medium. This chilled solution is then pumped through a user's fermentation vessel's cooling system, allowing for accurate temperature control of the fermenting liquid. The unit features multiple pump controllers, each capable of managing a separate cooling loop and maintaining a distinct set temperature. A dedicated reservoir controller manages the temperature of the cooling solution within the IceMaster itself.

Important Technical Specifications:

While specific numerical specifications like power consumption or cooling capacity are not explicitly detailed, the manual highlights several operational parameters:

  • Temperature Range: The pump controllers allow for a setpoint range of -40.0°C to 90.0°C. The minimum value for the setpoint (F1) is -40.0°C, and the maximum (F2) is 90.0°C.
  • Cooling Differential (F3): This parameter, adjustable from 0.1°C to 10.0°C (default 0.5°C), determines the temperature fluctuation allowed before a pump activates. For example, if the set temperature is 20°C and the differential is 0.5°C, the pump will activate when the probe reads 20.5°C and cool until it reaches 20°C.
  • Heating Differential (F4): Adjustable from -10.0°C to 10.0°C (default 0.5°C).
  • Temperature Probe Calibration (F5): Allows for calibration from 1 to 10.0°C.
  • Cooling Start Delay (F6): Adjustable from 0 to 300 minutes (default 1 minute).
  • Cooling Start Delay After Power Failure (F7): Adjustable from 1 to 10.0 seconds (default 10 seconds).
  • Heating Start Delay (F8): Adjustable from 0 to 300 minutes (default 1 minute).
  • Heating Start Delay After Power Failure (F9): Adjustable from F11 to 99.9 seconds (default 10 seconds).
  • Maximum Temperature Before Alarm Activation (F10): Adjustable from -45.0°C to F10 (default 90.0°C).
  • Minimum Temperature Before Alarm Activation (F11): Adjustable from 1°C to 120°C (default -40.0°C).
  • Alarm Delay (F12): Adjustable to 1 minute.
  • Reservoir Temperature Control: The reservoir controller (STC-1000) has its own settings, including a desired temperature setting (F1), a +/- temperature range (F2) for cycling on/off (lowest setting 0.3°C), a compressor delay time (F3) from 1-10 minutes (default 3 minutes), and a calibration function (F4).
  • Cooling Solution: The manual recommends a 20% propylene glycol solution (4 parts RO/distilled/deionized water to 1 part 99.9% propylene glycol) to lower the freezing point and prevent icing in the reservoir, which is considered normal operation. If using water only, tap water is recommended, as RO/distilled/deionized water may damage the heat exchanger.

Usage Features:

  • Initial Setup and Testing:
    1. Unpack and install the drain plug.
    2. Plug in temperature probes to all pump controllers and attach 3/8" tubing to form return loops on inlets and outlets.
    3. Fill the reservoir with tap water for initial testing.
    4. Plug in the power cord and power on the unit.
    5. Set each pump controller to 2°C by holding the 'Up' button for 3 seconds until flashing, then using 'Down' or 'Up' to adjust.
    6. Confirm pump operation and check for leaks.
    7. Adjust the reservoir controller to 2°C by holding 'S' until F1 displays, pressing 'S' again, then holding 'S' and 'Up'/'Down' simultaneously.
    8. Once confirmed, the unit is ready for connection to the cooling system.
    9. If using propylene glycol, drain the tap water after testing. If using water only, keep the reservoir temperature at or above 2°C to avoid freezing.
  • Pump Controller Operation:
    • Power On/Off: Hold the 'POWER' button for a few seconds.
    • Readout: Displays the temperature (Celsius) from the temperature probe.
    • Check Set Temperature: Press and hold the 'Up' arrow.
    • Check Differential: Press and hold the 'Down' arrow.
    • Adjust Set Temperature: Hold the 'Up' button for 3 seconds until the number flashes, then use 'Down' or 'Up' to adjust.
  • Reservoir Controller Operation (STC-1000):
    • Power On/Off: Hold the 'POWER' button for a few seconds.
    • Readout: Shows the temperature (Celsius) of the liquid inside the IceMaster.
    • Check Set Temperature: Press & hold the 'Up' arrow.
    • Check Differential: Press & hold the 'Down' arrow.
    • Changing Functions (F1-F4):
      1. Hold 'S' until F1 shows.
      2. Use 'Up' or 'Down' arrows to select the desired function number.
      3. Press & hold 'S' while using 'Up'/'Down' arrows to adjust the setting.
      4. Release 'S'.
      5. Press 'POWER' to lock in the setting.
  • Connecting Cooling System: Connect the cooling system outlet hose to the IN bulkhead and the cooling system inlet hose to the OUT bulkhead.
  • Temperature Probe Installation: Install the temperature probe in a thermowell or tape it directly to the outside of the vessel.

Maintenance Features:

  • Regular Cleaning: It is recommended to dust/clean the heat exchangers every 6 months to ensure proper unit function.
  • Troubleshooting: The manual provides a troubleshooting guide for common issues:
    • Unit not turning on: Check circuit breaker, fuse, and plugs.
    • Not cold enough: Check temperature setting, place a thermometer in the reservoir, compare after 30 minutes, and calibrate with F4 function if needed.
    • Shuts off/on too often: Adjust F2 function (set temperature range) on the reservoir controller to a higher range.
    • Always on: Ambient room temperature may be too high, causing the unit to work harder.
    • Too much noise: Humming is normal, and gurgling sounds are caused by the cooling liquid. Ensure the unit is level.

BrewBuilt IceMaster Max 4 Specifications

General IconGeneral
BrandBrewBuilt
ModelIceMaster Max 4
CategoryChiller
LanguageEnglish