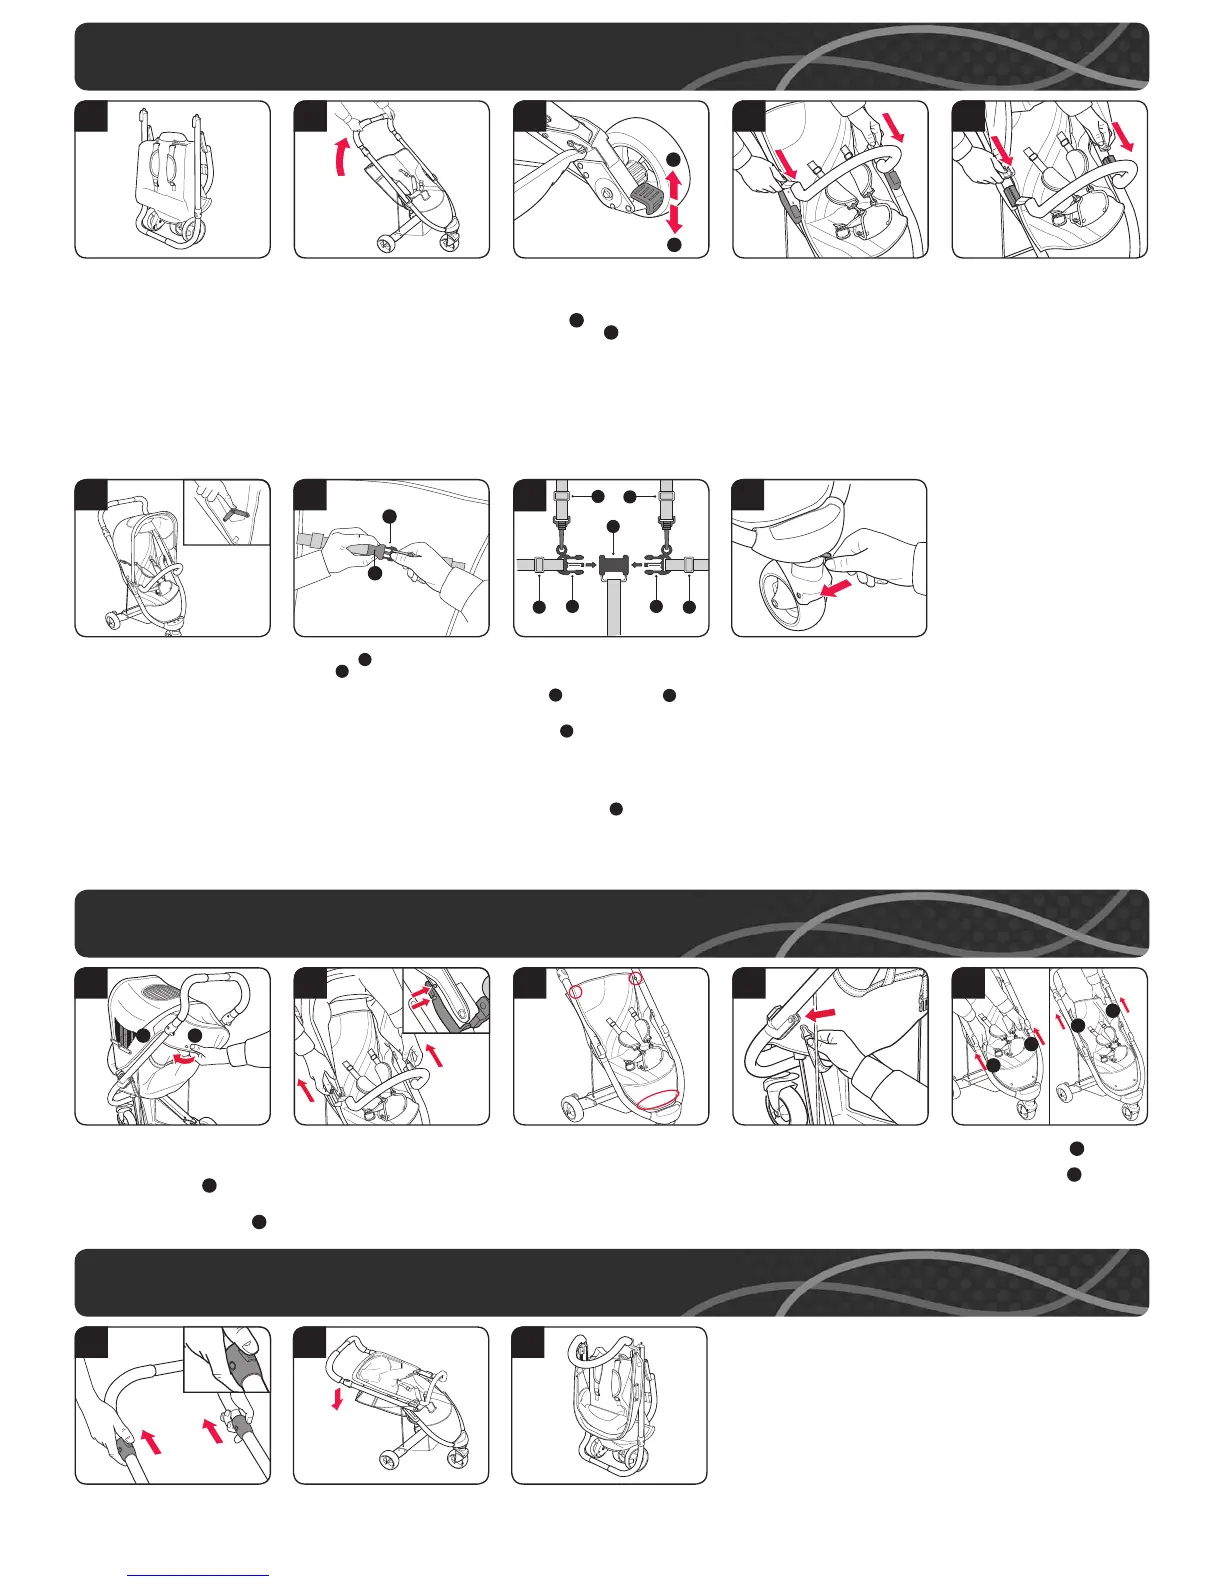
1 Assembling and using your buggy
(this vehicle is intended for children from 6 months and up to 15kgs)
3 Folding your buggy
Buggy shown in its fully closed position
(dia 1a).
1a
Hold the handle and lift upwards until
the chassis is fully extended ensuring
that it clicks in to position (dia 1b).
WARNING – Ensure that all locking
devices are engaged before use.
1b
To attach the bumper bar, remove the
hood (if tted). Align the bumper bar
mouldings with the xings then slide
both bumper bar mouldings (dia 1d)
onto the buggy until fully engaged.
Check the bumper bar is securely
in place by carefully pulling on it. To
remove the bumper bar, remove the
hood (if tted) then slide both bumper
bar mouldings off the buggy xings by
simultaneously pressing the buttons
on the mouldings on both sides of the
buggy and slide them upwards until they
disengage.
WARNING! DO NOT lift the buggy
by the bumper bar or hood. It may
disengage.
1d
To t the hood align with the xings on
the bumper bar and slide down until
fully engaged (dia 1e).
The hood can be tted without the
bumper bar by aligning the xings on
the buggy and sliding down until fully
engaged.
To remove the hood, slide the hood
off the xings on the buggy, or off the
xings on the bumper bar (if tted) by
simultaneously pressing the buttons
on the mouldings on both sides of the
buggy and slide them upwards until they
disengage.
1e
HANDY HINT - You may nd it easier
to apply the brake when assembling the
buggy.
To operate the brake push the brake
lever down . To unlock the brake, lift
the brake lever up (dia 1c).
IMPORTANT – Always apply the
brakes when you park the buggy.
1c
B
A
B
A
To lock the front swivel wheel, push the
front swivel lock from right to left (dia 1i).
To unlock push the front swivel lock from
left to right.
1i
To open the hood, pull the front of
the hood forward then push the hood
hinges down on both sides (dia 1f).
1f
To adjust your backrest, release the
backrest clip B from the backrest
housing A to enable it to recline fully
(dia 1g).
IMPORTANT – Support the back of the
pushchair seat unit when adjusting the
angle.
1g
B
A
3b 3c
Push the handle downwards until the
buggy folds in half (dia 3b).
Fully close and store in a safe, dry space
(dia 3c).
IMPORTANT - DO NOT fold and store
your buggy if it is damp. You must
ensure it is dry before folding and
storing.
IMPORTANT - Always remove your
child from the buggy prior to installation,
removal or folding.
Press and hold the safety latch (at the
same time) pull up the release latches
(dia 3a).
3a
Unfasten the comfort pad to reveal the
ve-point harness. A ve-point harness
is provided to restrain your child (dia 1h).
To secure the child in the harness, push
buckle A into buckle housing B until
the buckle prongs snap into position.
Carefully adjust the harness by pulling
the slider C until the desired t is
achieved in the waist belt, shoulder and
crotch straps (dia 1h).
Always adjust the harness when
changing the seating position of the child.
To release the buckle, squeeze the top
and bottom prongs A .
WARNING – Always use the crotch strap
in combination with the waist belt.
WARNING – Fasten the harness when
not in use to prevent it becoming trapped
when folding the buggy.
1h
A
B
C
A
C
A
HANDY HINT – You may nd it easier
to apply the brake before removing or
re-tting the seat unit. To operate the
brake refer to (dia 1c).
Unfasten the press studs A on the
backrest and unfasten the hook and
loop fastenings on both sides of the
seat unit where it overlaps the hood B
(dia 2a).
2a
HANDY HINT – You may nd it easier
to stand behind or to the side of the
buggy.
Remove the hood and bumper bar by
simultaneously pressing the buttons
on the mouldings on both sides of the
buggy and slide them upwards until they
disengage (dia 2b).
2b
Unclip the hooks on both sides of the
buggy (dia 2d).
2d
Remove the seat unit from the chassis
by sliding the base tabs A upwards
and out of the grooves.
Then slide the top tabs B upwards and
out of the grooves until the seat unit is
disengaged (dia 2e).
To re-t the seat unit reverse these
instructions.
2e
Unfasten the press studs and hook and
loop fastenings shown by the red circles
(dia 2c).
2c
B
A
B
A
A
B
A
A
B
B
C
C
A
B
A
B
2 Removing or re-tting your seat unit
C
 Loading...