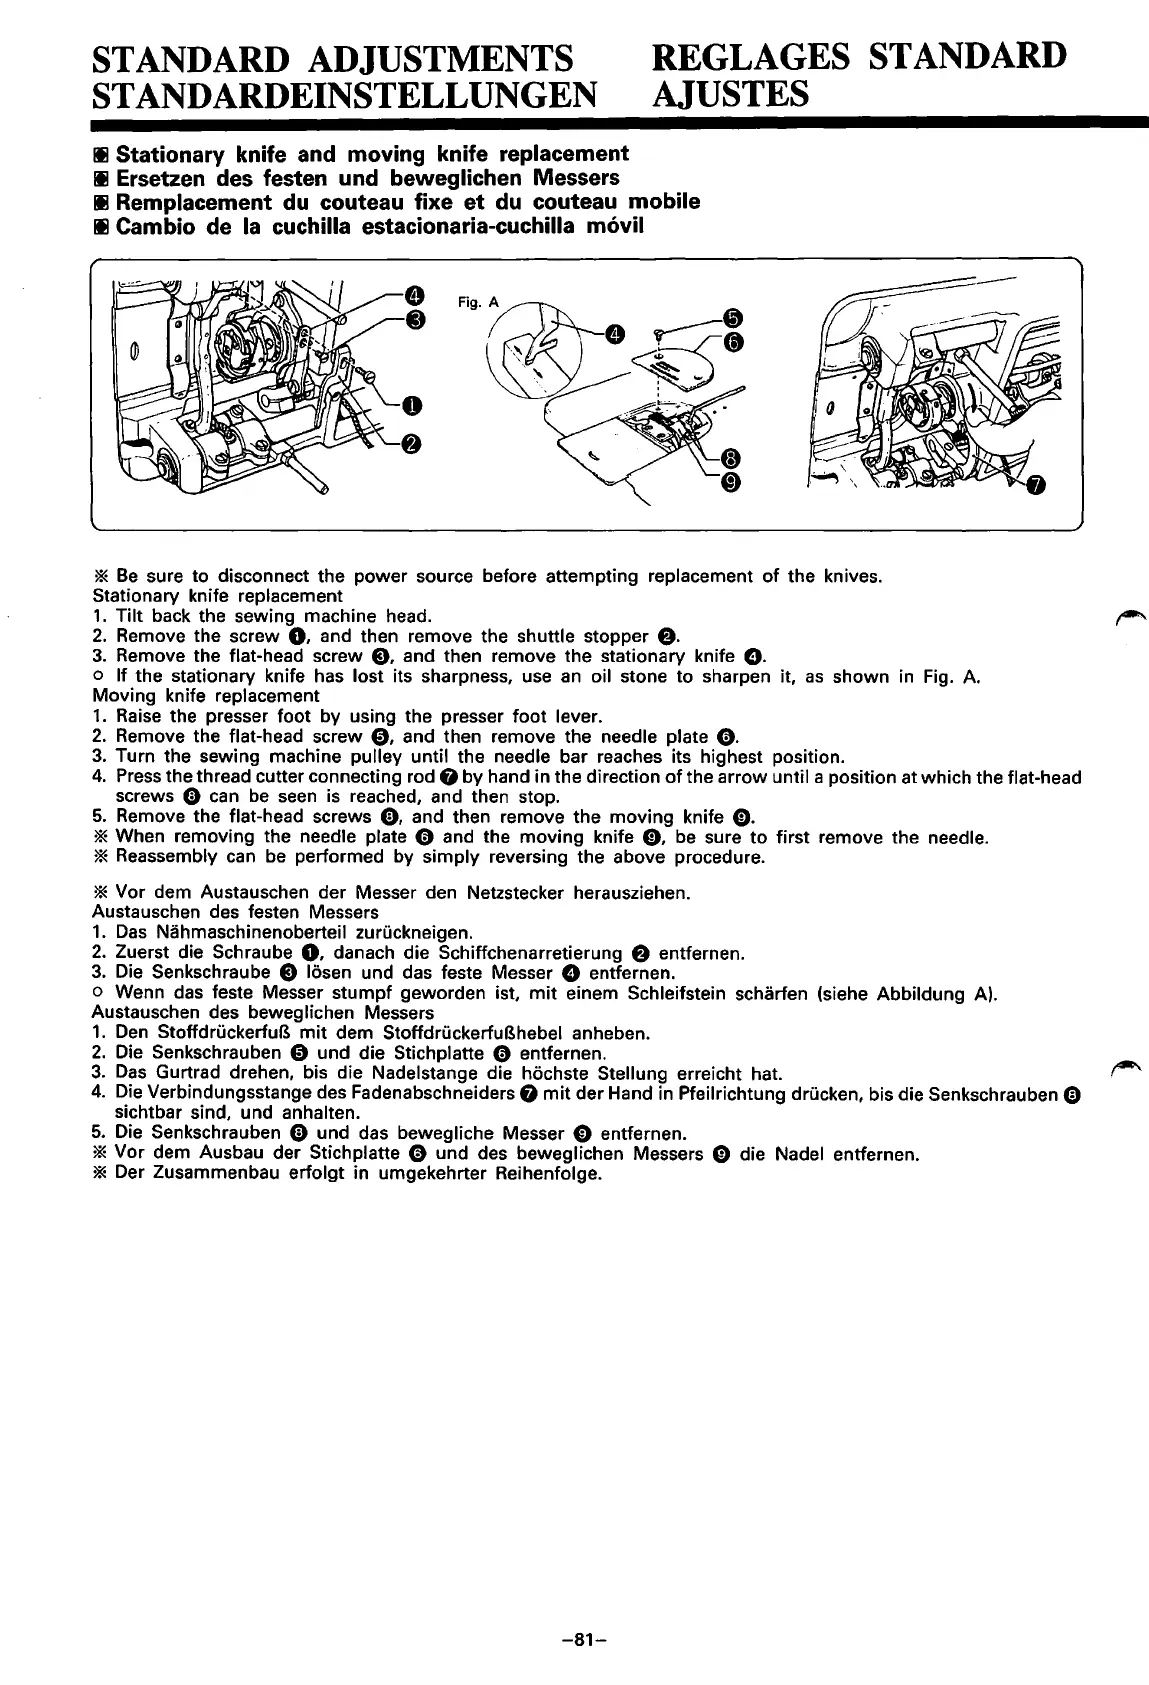
STANDARD
ADJUSTMENTS
STANDARDEINSTELLUNGEN
Ill
Stationary knife
and
moving knife replacement
Ill
Ersetzen
des
festen
und
beweglichen Messers
REGLAGES
STANDARD
AJUSTES
Ill
Remplacement
du
couteau fixe et
du
couteau mobile
Ill
Cambio de
Ia
cuchilla estacionaria-cuchilla m6vil
Fig.~A~'.;
-~~~
·.
~
~
~
.....
' :
~
........
*
Be
sure to disconnect the power source before attempting replacement
of
the knives.
Stationary knife
replacement
1.
Tilt
back the sewing machine head.
~
2.
Remove the screw
0.
and then remove the shuttle stopper
e.
3.
Remove the flat-head screw E), and then remove the stationary knife Q.
o
If
the stationary knife has lost its sharpness, use an oil stone to sharpen it,
as
shown in Fig.
A.
Moving knife replacement
1.
Raise the presser foot by using the presser
foot
lever.
2.
Remove the flat-head screw
0.
and then remove the needle plate
0.
3.
Turn the sewing machine pulley until the needle bar reaches its highest position.
4.
Press the thread cutter connecting rod G by hand
in
the direction
of
the arrow until a position at which the flat-head
screws (!) can
be
seen is reached, and then stop.
5.
Remove the flat-head screws (!), and then remove the moving knife
0.
* When removing the needle plate 0 and the moving knife
0.
be sure
to
first remove the needle.
* Reassembly can be performed by
simply
reversing the above procedure.
* Vor dem Austauschen der Messer den Netzstecker herausziehen.
Austauschen des festen Messers
1.
Das
Nahmaschinenoberteil zuruckneigen.
2.
Zuerst die Schraube
0.
danach die Schiffchenarretierung 8 entfernen.
3.
Die Senkschraube
E)
losen und das teste Messer Q entfernen.
o Wenn das teste Messer
stumpf
geworden ist,
mit
einem Schleifstein scharfen (siehe Abbildung A).
Austauschen des
beweglichen Messers
1.
Den StoffdruckerfuB
mit
dem StoffdruckerfuBhebel anheben.
2.
Die Senkschrauben 0 und die Stichplatte 0 entfernen.
3.
Das
Gurtrad drehen, bis die Nadelstange die hochste Stellung erreicht hat.
r----
4.
Die Verbindungsstange des Fadenabschneiders G
mit
der Hand in Pfeilrichtung drucken, bis die Senkschrauben 0
sichtbar sind, und anhalten.
5.
Die Senkschrauben 0 und das bewegliche Messer 0 entfernen.
* Vor dem Ausbau der Stichplatte 0 und des beweglichen Messers 0 die Nadel entfernen.
* Der Zusammenbau erfolgt in umgekehrter Reihenfolge.
-81-
From the library of: Superior Sewing Machine & Supply LLC
 Loading...