PART 1
English
11
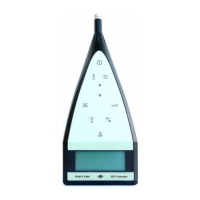
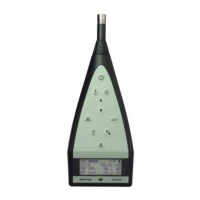
2) Sliding cover: Underneath the cover is a quick reference guide to help you use the three
control keys for setup and display of measurements. Slide to open, do not press. A diagram
of the quick guide is found in Fig.2.6.
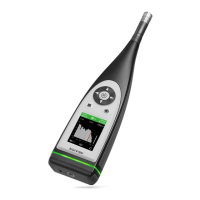
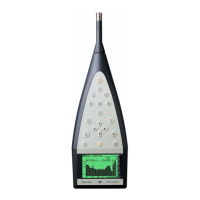
3) Microphone: Brüel& Kjær’s Prepolarized Free-field ½″ Microphone Type 4188 is used. A
robust and reliable microphone with a wide frequency range.
4) Preamplifier: Conditions the microphone signal before further processing.
5) Display screen: An LCD display showing:
a) the sound level parameter currently being viewed
b) elapsed measurement time
c) measurement reading in dB (decibels)
d) quasi-analogue bar graph representing current sound pressure level
e) battery level indicator
6) Start/Stop key : Press to start or stop a measurement.
7) Sound Level Parameter key : Press to scroll through sound level parameters that are
available to display (L
A
, L
Aeq
, L
Amax
, or L
Cpeak
), or hold down for 3 seconds to calibrate.
8) Sound Level Range key : Press to set sound level range (30 – 110dB or 60–140dB).
9) Calibration switch: Adjust instrument calibration using the included screwdriver.
10) Power switch: Turn the instrument on and off.
11) Battery compartment: Slide the compartment’s lid to replace batteries when needed.
Instructions on replacing batteries follow in “Installing Batteries” on page 13.
Control Keys
Fig.2.6
Under the front panel’s
sliding cover is a quick
guide to help you use the
three control keys
L
A
L
Aeq
L
Amax
L
Cpeak
(3 sec.=Cal.)
30-110dB
60-140dB

 Loading...