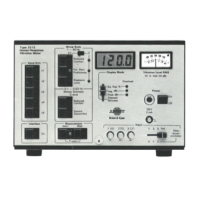
1.
Switch the instrument on and check the batteries as in section 3.2.1. If the battery
condition meter reading is not within the blue region, the batteries should be replaced.
2.
Set the FILTER SELECTOR switch on the instrument's rear panel as required. When the
Type 2512 is used alone this will normally be in the bottom position labelled Weighting
Filter
"In"
and Ext. Filter
"Out",
in
which position the internal weighting filters are in use.
3.
Set the
INPUT
CHANNEL SELECTOR to the position required, corresponding to the input
socket from which the signal to be analyzed is to be taken. The use of the
"Ref"
position is
described
in
detail
in
Section
3.3.
4.
Preset the instrument by pressing both the MEASUREMENT pushkeys
"Start"
and
"Stop"
simultaneously. The LEDs in both pushkeys come on to indicate that the instrument has
been successfully preset. This is the only state in which the measurement mode
of
the
instrument, i.e. the filter characteristic
or
limit criterion, can be altered. Presetting empties
all the registers and initiates the instrument ready for a new measurement.
5.
Select the required filter characteristic and limit criterion via the MEASUREMENT MODE
pushkeys. If the WHOLE BODY
1 -
80
Hz
mode is selected, then it will also be necessary
to select the required axis via the AXIS SELECTOR.
An
LED in the relevant pushkey will
come on to indicate the selected mode
of
operation. The needle
of
the analogue meter
should now be allowed to settle down before progressing to the next step. This is
necessary because the time constants are relatively long at the frequencies of interest,
especially
in
the MOTION SICKNESS mode.
6.
If the analysis is to be output on the IEC bus to
an
Alphanumeric Printer Type
2312,
or to
another instrument using the digital interface, the INTERFACE pushkey should be pressed
to activate the digital output. The LED in the pushkey will light to indicate that the digital
output is active.
7.
Press the MEASUREMENT
"Start"
pushkey
in
order to start the measurement. The
LED
in
the
"Stop"
pushkey will now go out but that in the
"Start"
pushkey will remain on to
indicate that the instrument is
in
the process of making a measurement. The measurement
may be halted temporarily at any time by pressing MEASUREMENT
"Stop",
and may then
be resumed by pressing MEASUREMENT
"Start"
again. A new measurement may be
begun by presetting and then pressing MEASUREMENT
"Start".
8.
Set the DISPLAY MODE as required to display the elapsed time
in
minutes, the peak value
in
dB,
the
equivalent
continuous
vibrataion
level
in
dB
or
the
equivalent
exposure
of
the
. measurement in %
of
the allowed exposure for the selected limit criterion. All these
parameters are held simultaneously within the instrument; the DISPLAY MODE selector
merely allows the user to display the one required.
Special Considerations Relating to Hand-Arm Measurements
The HAND-ARM panel of the 2512 contains five pushkeys, each of which represents a different
proportion of rest period to vibration exposure during a working hour. Any of these pushkeys
can be selected to measure the equivalent vibration and peak level, although use
of
the
"x1"
pushkey is recommended if either equivalent exposure is not required
or
the length and
frequency
of
rest periods is not known. The table below can be entered at the measurement
value obtained to find the allowable duration of the working day, for either uninterrupted work
or for work regularly interrupted with rest periods of the stated duration.
27
 Loading...