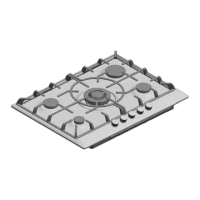
If the cooking hob is to be installed above
to the assembly manual.
in the kitchen unit.
2- The chipboard used to make the worktops
tends to swell quite quickly when it comes into
contact with moisture. Thus we recommend
treating the cut edges with a special glue, to
protect them from steam
or any condensation that might drip down
beneath the cooker unit's work surface.
The seal ensures that the entire work
surface will be watertight, and prevents water
seepage.
If this item has not been fitted in the factory,
remove the pan supports and the gas burner
covers and diffusers from your cooking hob,
seal supplied with the
accessories bag and screw them into the lower
For disassembly, unscrew the clip and
proceed in the reverse manner
.
and turn it upside down.Fig. 2. Now fit the
adhesive
appliance
onto the lower edge of the cooking
hob,
A rigid connection.
Fig. 9.
Do not remove the disc seal
If you see the By-pass adjustment hole
insert a screwdriver in the hole, Fig. 10a.
Otherwise remove the outer retainer.
when the remote control is removed, Fig. 10,
points designed for this purpose, Fig. 4.
Once the hob is fitted you should turn the clip
and
tighten the screw as shown in Fig. 5.
Depending on the model, the clips and the
watertight seal (lower edge of the cooking hob)
may already be fitted; if this is the case, do not
remove them under any circumstance.
ventilation, and check the dimensions
according
an oven, check that the oven is fitted with
power
Centre the cooking hob in the space
provided
Fig. 3a/3b/3c,remove the clips from the attached
If no oven is installed under an electrical or
mixed (gas and electric) hob, place a
separator of non-flammable material e.g.
plywood or metal at a distance of 10 mm.
from the bottom of the hob to prevent access
to the lower part of the hob.
If no oven is installed under a gas hob, it is
suggested to place a separator of non-
flammable material e.g. plywood or metal at
a distance of 10 mm. from the bottom of the
hob to prevent access to the lower part of the
hob.
In the event that a drawer is located beneath
the appliance, please make sure that the
drawer contains no heat-sensitive or easily
combustible objects, such as spray cans or
shoe polish. Use a heat-resistant utility drawer
only.
en
(Fig. 11):
All installation, regulation and adaptation to
other types of gas must be carried out by an
authorised installation technician,
respecting all applicable regulations,
standards and the country's electrical and
gas supply companies' specifications.
It is recommended that you call our
Technical Assistance Service for adaptation
to other types of gas. Before you begin, turn
off the appliance's electricity and gas supply.
(see
table I).
All installation, regulation and adaptation to
other types of gas must be carried out by an
authorised installation technician,
respecting all applicable regulations,
standards and the country's electrical and
gas supply companies' specifications.
It is recommended that you call our
Technical Assistance Service for adaptation
to other types of gas. Before you begin, turn
off the appliance's electricity and gas supply.
(see table II).
(20,955 mm)
(L min. 1m - max. 3m).
use only, not for commercial or professional
use. This appliance cannot be installed on
yachts or in caravans. The warranty will only
This appliance has been designed for home
purpose for which it was designed.
be valid if the appliance is used for the
 Loading...