25
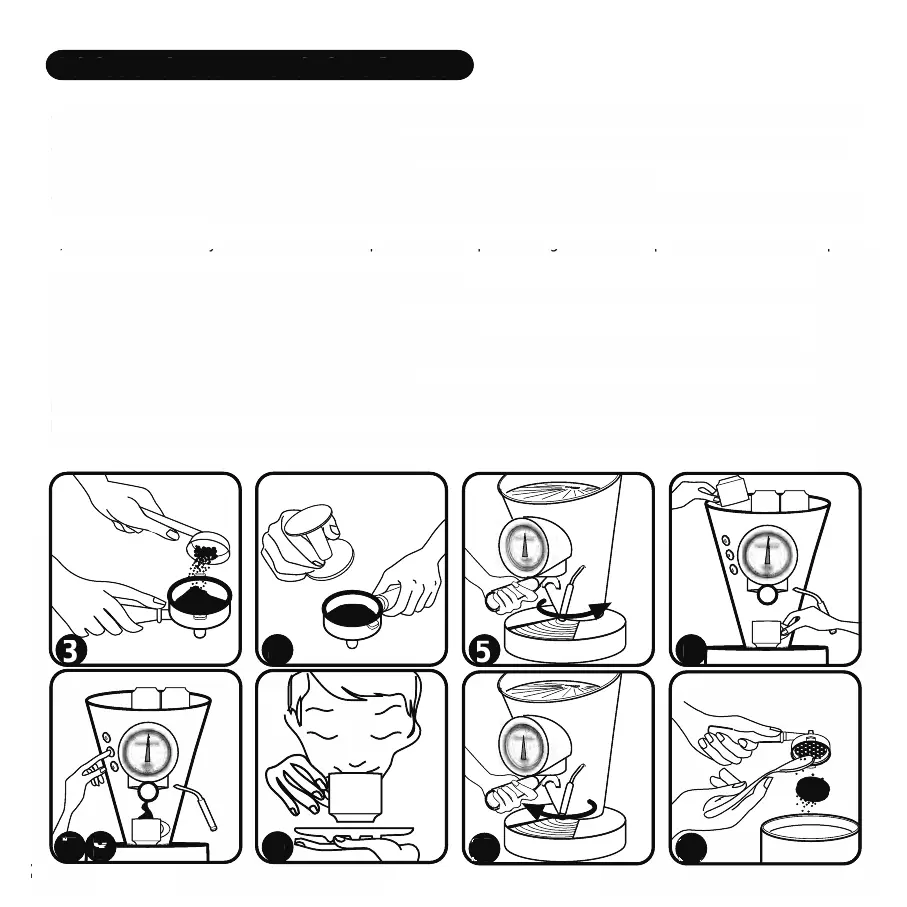
3) Take the filter-holder unit for ground coffee (16) insert the filter (18) for one coffee or the filter (19)
for two coffees, according to requirements.
3) Pour the ground coffee with the appropriate measure (23): one measure for one coffee or two measures
for two coffees, according to the chosen filter.
4) Level the coffee powder inside the filter with the appropriate pressing tool.
5) Insert the filter-holder unit (16) into the seat of the brewing unit (9) and fix it by rotating the handle to
the right to about the centre of the machine (handle must be rotated until correct pressure for a seal during
delivery is reached).
6) Take one or two dry and warm coffee cups from the cup-warming surface and place them under the spout
of the filter holder.
7) Press the button (4) to start delivery of the coffee.
8) Then press the button (4) again to stop delivery of the coffee: you can decide what type of coffee to
enjoy: “ristretto”, “espresso”, “lungo” or ...
9) Serve the coffee immediately to fully enjoy its aroma.
10) Remove the filter-holder unit (16) from the brewing unit (9) by turning the handle to the left.
11) Remove the coffee powder and place it in the litter bin. ( See chapter: Cleaning and Maintenance)
12) The machine is ready to make a new coffee.
13) At the end of each cycle we suggest to leave inserted the filter unit-holder (16) into the seat of the
brewing unit (9) : the filter remain warm and ready to make a new coffee at the correct temperature. (see
picture 5)
14) WARNING: frequently check the level of water in the tank (2). Do not operate the appliance without
water!
Advice and recommendations for use
11
9
i
t
a
l
i
a
n
e
s
p
r
e
s
s
o
d
e
s
i
g
n
-
s
t
a
r
s
/
a
n
d
r
e
a
s
s
e
e
g
a
t
z
6
3
4
i
t
a
l
i
a
n
e
s
p
r
e
s
s
o
d
e
s
i
g
n
-
s
t
a
r
s
/
a
n
d
r
e
a
s
s
e
e
g
a
t
z
7
8
5
10
3) Ta
e t
e
i
ter-
o
er unit
or groun
co
ee (16) insert t
e
i
ter (18)
or one co
ee or t
e
i
ter (19)
or two co
ees, accor
in
to re
uirements
3) Pour t
e groun
co
ee wit
t
e appropriate measure (23): one measure
or one co
ee or two measures
or two co
ees, accor
in
to t
e c
osen
i
ter
4) Leve
t
e co
ee pow
er insi
e t
e
i
ter wit
t
e appropriate pressing too
5) Insert t
e
i
ter-
o
er unit (16) into t
e seat o
t
e
rewing unit (9) an
ix it
y rotating t
e
an
e to
t
e rig
t to a
out t
e centre o
t
e mac
ine (
an
e must
e rotate
unti
correct pressure
or a sea
uring
e
ivery is reac
e
).
Ta
e one or two
an
warm co
ee c
s
rom t
e c
-warmi
sur
ace an
ace t
em un
er t
e
out
Advice and recommendations for use
t
e
i
ter
o
er.
Press t
e
utton
to start
e
iver
o
t
e co
ee
8) T
en press t
e
utton (4) again to stop
e
ivery o
t
e co
ee: you can
eci
e w
at type o
co
ee to
n
o
:
ristretto
,
es
resso
,
un
o
or ..
9) Serve t
e co
ee imme
iate
y to
u
y enjoy its aroma
10) Remove t
e
i
ter-
o
er unit (16)
rom t
e
rewing unit (9)
y turning t
e
an
e to t
e
e
t.
11) Remove t
e co
ee pow
er an
p
ace it in t
e
itter
in. ( See c
apter: C
eaning an
Maintenance
12) T
e mac
ine is rea
y to ma
e a new co
e
13) At t
e en
o
eac
cyc
e we suggest to
eave inserte
t
e
i
ter unit-
o
er (16) into t
e seat o
t
e
rewin
unit
: t
e
i
ter remain warm an
rea
to ma
e a new co
ee at t
e correct te
erature.
see
icture 5)
14
WARNING: frequent
y c
ec
t
e
eve
of water in t
e tan
2
. Do not operate t
e app
iance wit
out
 Loading...