Do you have a question about the Buki Poterie Professional POTTERY Studio and is the answer not in the manual?
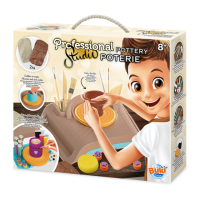
| Product Name | Buki Poterie Professional POTTERY Studio |
|---|---|
| Category | Toy |
| Age Recommendation | 8 years and up |
| Batteries Required | No |
| Skill Level | Beginner to Intermediate |
| Includes | Pottery wheel, clay, tools |
| Contents | Pottery wheel, clay, sculpting tools, paint |
Advises adult supervision and notes age restrictions for safe use.
Instructions for connecting, cleaning, and inspecting the transformer.
Details clay colors, properties, and proper storage methods.
Lists and describes the various tools and components included in the kit.
Guides on connecting the motor unit and pedals for station assembly.
Instructions for installing the wheel, drawer, and accessories.
Steps for using the cutter and weighing the correct amount of clay.
Instructions on wetting, kneading, and removing air bubbles from clay.
Guidance on centering clay on the wheel and initial shaping techniques.
How to start creating the central hole using your finger and the pedal.
Techniques for widening and deepening the initial hole with thumbs.
Using tools to hollow out the pot and ensure a solid base.
Cutting the pot rim to an even height and smoothing it flat.
Using fingers to pinch and pull the clay outwards to widen the shape.
Smoothing the inside/outside and trimming the rim to a flat finish.
Using fingers and pedal to create decorative wavy patterns on the clay.
Pinching clay edges to form a spout and smoothing the shape.
Creating a clay cylinder and attaching it securely to the pot.
Using a wire tool to detach the pot and moving it to dry.
Instructions for safely cleaning the station and its components.
Washing instructions for the station and accessories with soapy water.
Guidance on removing the creation and drying times.
Using paint, palette, and stamps for decorative patterns.
Instructions for adding glitter and rhinestones using glue and a stylus.