LED POWER LED MODE
10
14
BATTERY AND POWER
1. The Bumpboxx Flare8 Pro features a rechargeable battery.
2. Charge your battery using the included 22V 4A charger.
3. LED light will flash while charging, then turn solid when fully charged.
4. Full charge cycle takes 4 to 6 hours.
5. Full battery could be used for up to 10 hours.
6. Please charge the battery for 4 to 6 hours before using it for the first time.
BLUETOOTH CONNECTION
1. Power on your Flare8 Pro
2. Flashing BLUE on screen display means your Flare8 Pro is ready to pair to
a mobile device. Solid BLUE display means your Flare8 Pro has established
a connection and can not pair to a new device, if this happens, please turn off
Bluetooth on all previously paired cell phones within range until you see both
unit display's flashing the words BLUE.
3. Scan for "Flare8 Pro" on your mobile device.
4. Pair via Bluetooth
5. Once paired, you can control volume and tracks using the paired mobile device,
the Flare8 Pro control panel or the included remote control.
AUDIO INPUT & OUTPUT
Insert the audio cable into AUX input to connect external audio resources and tap
the mode button on the control panel to switch to LINE mode.
DC 5V 1A OUTPUT
Connect your mobile device to the 5V 1A Type C charging port to charge
your mobile device.
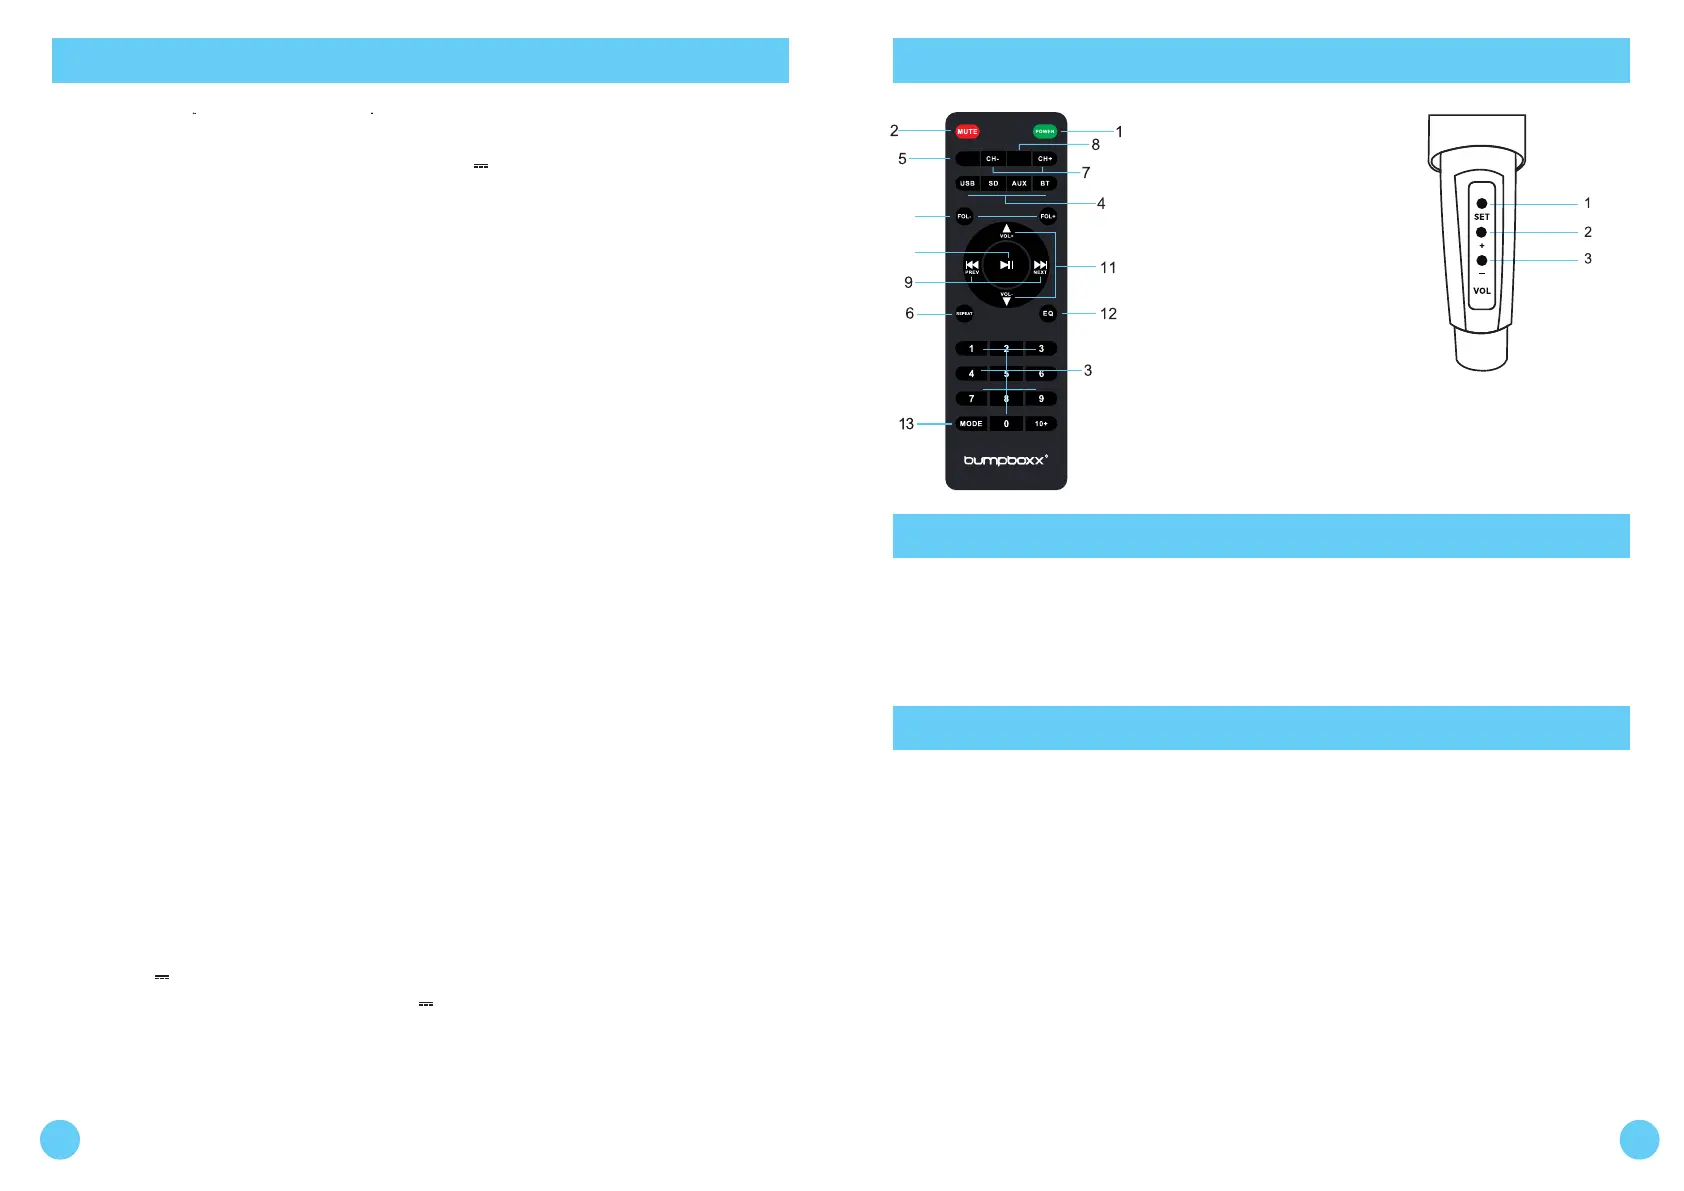
FUNCTION DESCRIPTION REMOTE CONTROL / BACK PANEL
1. Power
2. Mute
3. 0-9
4. USB/SD/AUX/BT Mode
5. LED Power
6. Repeat
7. CH+ / CH-
8. LED Mode
9. Previous / Next
10. Play / Pause
11. Volume +/-
12. EQ Modes
13. Mode
14. Folder +/-
1. Set Changes Frequency
2. + Volume Up
3. - Volume Down
To Access Microphone Controls,
Unscrew Battery Cap
1 2
BEST CARE AND INSTRUCTIONS
TWS PAIRING INSTRUCTIONS
• Once you’ve unpackaged the unit and it has finished its charging cycle
of roughly 4 to 6 full hours, it will allow your unit to function properly.
• It’s perfectly fine to power on the unit during this charging process.
1. Power on both Bumpboxx Flare8 Pro units. Both of your Bumpboxx Flare8 Pro
control panel display screens should be flashing the word BLUE if unit's are ready
to pair, if not please turn off Bluetooth on all previously paired cell phones within
range until you see both unit display's flashing the words BLUE.
2. Hold the TWS (Pause/Play) button on your master unit (the one closest to your
device) for 5-10 seconds until you see the letters BT ST and release, you will hear
a short simultaneous chime from both units within 10 seconds. This means you
have successfully established your TWS connection. (If this is unsuccessful, power
down both devices, make sure all previously paired cell phones and devices have turned
off Bluetooth and try step 2 again.)
3.Just like you would normally do, find your Bumpboxx “Flare8 Pro” on the
bluetooth list on your phone and pair to it.
4. Crank up the volume and enjoy.
CAREFULLY READ THIS OPERATING MANUAL TO USE
AND ENJOY THIS UNIT PROPERLY.
KEEP THIS MANUAL FOR FURTHER REFERENCE.
MODE CONTROL
1. Insert 3.5mm AUX cable into AUX input (Tap mode button to switch to LINE mode)
2. Insert Micro SD Card into TF slot (Unit automatically changes to LINE mode)
3. Insert USB drive into USB port (Unit automatically changes to LINE mode)
4. LED Control - Tap LED MODE button to scan 5 different modes.
5. TWS Mode - Link 2 Bumpboxx Flare8 Pro's together for a True Wireless Stereo experience.
(See TWS Pairing section for instructions)
 Loading...