7
INITIAL SET-UP
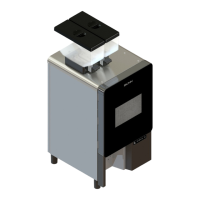
3. Remove the bean hoppers from the packaging,
and note the differences; shown in the image to
the right; is the Left hopper and the Right hopper
NOTE: They cannot be installed opposite to this
configuration.
4. Prior to installing the bean hoppers, visually
verify that there are no obstructions or any
debris blocking the bean chutes or bean
detection sensors (not shown).
5. Shown is the left hopper set in place.
NOTE: The hopper should sit flat.
1. Unpack the Drip Tray assembly and slide it in
between the front legs.
2. Remove taped Keys from above Drip Tray and
use them to unlock the front door.
1
2
3
4
5
Chutes
continued >
Left Right
 Loading...