Contents:
(2) Band Clamps
(4) M5 Socket Head Screws
(4) Washers
(2) Lock Nuts
Tools Required: 4mm Hex Key Wrench
5mm Hex Key Wrench
Installation Instructions
1. Using washers and socket head screws,
attach bottom of rack to holes in
bicycle dropouts.
2. Position top of rack parallel to the ground.
Check distance from stay mounting hole
on Moose Rack to the bicycle’s seat
stays. FIGURE 1
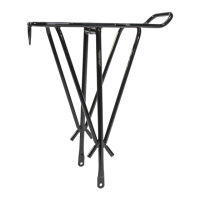
3. Adjust rack stays to fit. PHOTO 1
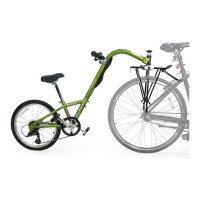
Moose Rack Instructions
RACK MUST BE LEVEL. WHEN PULLING A
TRAILERCYCLE, A NON-LEVEL RACK CAN
ADVERSELY AFFECT BICYCLE HANDLING,
RESULTING IN AN ACCIDENT OR
SERIOUS INJURY.
WARNING
PHOTO 1
FIGURE 1:
The difference between heights A & B must be less than
3/4” (19.05 mm)
B
A
Contents:
(2) Band Clamps
(4) M5 Socket Head Screws
(4) Washers
(2) Lock Nuts
Tools Required: 4mm Hex Key Wrench
5mm Hex Key Wrench
Installation Instructions
1. Using washers and socket head screws,
attach bottom of rack to holes in
bicycle dropouts.
2. Position top of rack parallel to the ground.
Check distance from stay mounting hole
on Moose Rack to the bicycle’s seat
stays. FIGURE 1
3. Adjust rack stays to fit. PHOTO 1
Moose Rack Instructions
RACK MUST BE LEVEL. WHEN PULLING A
TRAILERCYCLE, A NON-LEVEL RACK CAN
ADVERSELY AFFECT BICYCLE HANDLING,
RESULTING IN AN ACCIDENT OR
SERIOUS INJURY.
WARNING
PHOTO 1
FIGURE 1:
The difference between heights A & B must be less than
3/4” (19.05 mm)
B
A
Rack
StayS
Rack
StayS