C H Byron
34, Sherwood Rd
Aston Fields
Bromsgrove
B60 3DR
Contact Details:
433MHz
R&TTE
APPROVED
CH Byron Electrical United Kingdom. www.chbyron.eu
A
B
DK
FIN
F
D
GR
LT
IRL
I
L
NL
P
E
S
UK
BG
CZ
EST
H
IS
LV
M
N
SK
SLO
CH
PL
RO
Tel: 0845 2301231
Fax: 01527 557701
Web: www.chbyron.eu
Support:
www.chbyron.eu/support
Contact: Helpline: 0845 2301 231
Up to Six remote control units can be paired with each HE430 Accessory
Output Channel. To program a channel press the "Learn" button e.g.
accessory output channel 1 for 2 seconds.
Deleting Remote Control:
To delete a remote control that has been paired with a Accessory Output
Channel, simply press the "Learn" button for 2 seconds. The LED will start to
blink; press the "Off" button on the remote control, the LED will blink twice to
confirm that the remote control has been removed from the receiver sockets
memory.
Channel reset:
To delete all the remote control units from the memory of the Accessory
Output Channel, hold the "Learn" button for more than 6 seconds, the LED will
start to blink continuously. Press the learn button again, the LED will blink
twice to confirm the deletion of all remote controls form the receiver memory.
Pairing/Deleting with Remote Control:
Accessory Ouput
Channel 1
Learn
Button
LED
The LED will start to flash,
now press the "ON" button
on the remote control, the
LED will stop flashing.
The units are now paired
together, you can test this by
pressing the selected
"ON/OFF" button
Always refer to the original instruction when using with additional
products
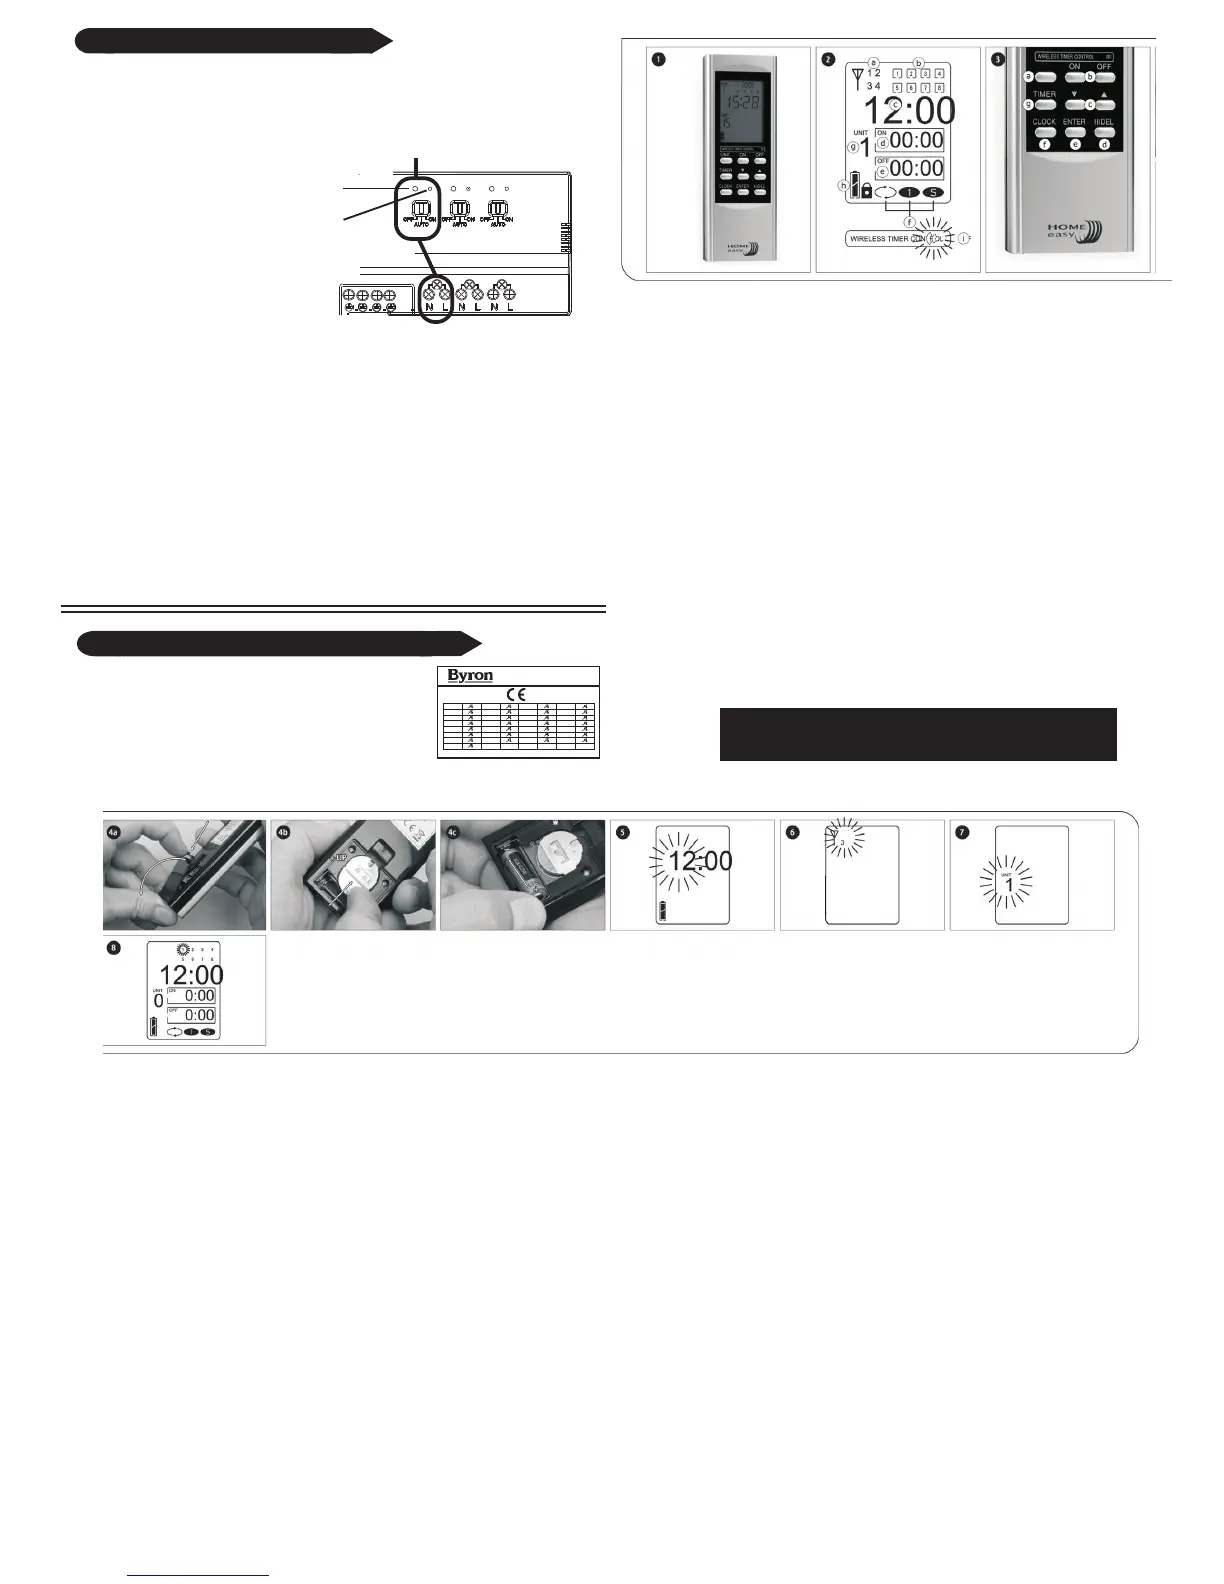
REMOTE CONTROL DISPLAY (2)
a.Code number d.ON time g.Unit number
b.Memory space number e.OFF time h.Battery level
c.Real time f.Mode setting i.Signal sent
REMOTE CONTROL BUTTONS (3)
a.CODE (MUST BE 3) e.ENTER key
b.ON and OFF select f.CLOCK setting
c.Up/Down select g.TIMER setting
dPause/DEL key
BATTERY INSTALLATION
-Open the battery compartment by sliding its cover off (4a)
-At first Insert CR2032 3V battery; mind the + and (4b)
-Insert A23 12V battery; mind the + and (4c), then close the cover back in
Its place.
CLOCK SETTING
-Press and hold CLOCK button (3f). Hour starts Flashing (5).
-Select the hour setting with the Up/Down buttons (3c), press ENTER (3e)
to confirm.
-Select the minute setting with the Up/Down buttons, press ENTER to
confirm.
PROTOCOL SELECTING (6)
-Press CODE key (3a) to switch to code number 3 (2a).
PLEASE NOTE: THE CODE MUST BE SET ON
3 TO OPERATE THE HE43O RECEIVER.
TIMER PROGRAMMING
-Press and hold the TIMER button (3g). The home screen will change into
timer programming mode (8).
-First you have to select which memory space (2b) you want to use by
pressing the Up/Down buttons (3c) and press ENTER (3e).Note: there are
8 memory spaces available.
-Now select the unit number (2g) you want to switch by pressing the
Up/Down buttons, press ENTER to confirm.Note: there are 15 unit
numbers.
-Change the turn on hour settings by using the Up/Down buttons, press
ENTER. Now change the minute settings and press ENTER.
-Change the turn off hour and minute settings In the same way as above.
Press ENTER to confirm.
-Now you can select between 3 mode settings (2f):
Daily Timer - will switch on and off every day at the set times.
Single Timer - will switch on and off only one time.
Security Timer - will switch on and off every day at
random times, varying from 40 minutes before to 120 minutes after
switch on time and 40 minutes before and 180 minutes after switch off
time. Press ENTER to confirm.
- The remote will now go back to selecting the memory space. Press
TIMER button to return to home screen, or wart for the device to switch
back
automatically after some time.
PAUSING SET TIMERS
-Press and hold the TIMER button (3g).
-Select which memory space (2g) you want to pause, by pressing the
Up/Down buttons (3c).
-Press Pause button (3d). Selected memory space will appear with sign
(for example [1]). Press ENTER button (3a) to confirm pausing.
-Press TIMER button to exit or wait for device to switch back automati-
cally after some time.
-To stop pausing use exactly the same way.
DELETING SET TIMERS
-Press and hold the TIMER button (3g).
-Select which memory space (2g) you want to clear, by pressing the
Up/Down buttons (3c).
-Press and hold the DEL button (3d) until both ON (2d) and OFF (2e)
times, mode (2f) and unit number (2g) start flashing. Press ENTER button
(3e) to confirm deleting.
-Press TIMER button to exit or wait for device to switch back automati-
cally after some time.
TIPS
-The transmitting range is shortened when signal needs to go through
walls and floors
-Multiple switches can have the same unit code, these will the simultane-
ously switch on and off.
-Always give dimmers their own unit code, as to set them up separately.
-Metal will have a negative influence on the transmitting range.
-Using code 4 will have a negative Influence on the battery
consumption and results In lower switching speed.
To enable the screen lock hold both ENTER and DEL buttons for 5
seconds. A lock symbol will now appear to disable the lock repeat the
process and the lock will disappear.
PLEASE VIEW
PROTOCOL SELECTING
REMOTE CONTROL DISPLAY (2)
a.Code number d.ON time g.Unit number
b.Memory space number e.OFF time h.Battery level
c.Real time f.Mode setting i.Signal sent
REMOTE CONTROL BUTTONS (3)
a.CODE select e.ENTER key
b.ON and OFF select f.CLOCK setting
c.Up/Down select g.TIMER setting
dPause/DEL key
BATTERY INSTALLATION
-Open the battery compartment by sliding its cover off (4a)
-At first Insert CR2032 3V battery; mind the + and (4b)
-Insert A23 12V battery; mind the + and (4c), then close the cover back in
Its place.
CLOCK SETTING
-Press and hold CLOCK button (3f). Hour starts Winking (5).
-Select the hour setting with the Up/Down buttons (3c), press ENTER (3e)
to confirm.
-Select the minute setting with the Up/Down buttons, press ENTER to
confirm.
PROTOCOL SELECTING (6)
-Press CODE key (3a) to switch between four different protocol settings
(2a).
PLEASE NOTE: THE CODE MUST BE SET ON 3 TO
OPERATE THE HE44O RECEIVER.
TIMER PROGRAMMING
-Press and hold the TIMER button (3g). The home screen will change into
timer programming mode (8).
-First you have to select which memory space (2b) you want to use by
pressing the Up/Down buttons (3c) and press ENTER (3e).Note: there are
8 memory spaces available.
-Now select the unit number (2g) you want to switch by pressing the
Up/Down buttons, press ENTER to confirm.Note: there are 15 unit
numbers.
-Change the turn on hour settings by using the Up/Down buttons, press
ENTER. Now change the minute settings and press ENTER.
-Change the turn off hour and minute settings In the same way as above.
Press ENTER to confirm.
-Now you can select between 3 mode settings (2f):
Daily Timer - will switch on and off every day at the set times.
Single Timer - will switch on and off only one time.
Security Timer - will switch on and off every day at random
times, varying from 40 minutes before to 120 minutes after switch on
time and 40 minutes before and 180 minutes after switch off time. Press
ENTER to confirm.
- The remote will now go back to selecting the memory space. Press
TIMER button to return to home screen, or wart for the device to switch
back
automatically after some time.
PAUSING SET TIMERS
-Press and hold the TIMER button (3g).
-Select which memory space (2g) you want to pause, by pressing the
Up/Down buttons (3c).
-Press Pause button (3d). Selected memory space will appear with sign
(for example [1]). Press ENTER button (3a) to confirm pausing.
-Press TIMER button to exit or wait for device to switch back automati-
cally after some time.
-To stop pausing use exactly the same way.
DELETING SET TIMERS
-Press and hold the TIMER button (3g).
-Select which memory space (2g) you want to clear, by pressing the
Up/Down buttons (3c).
-Press and hold the DEL button (3d) until the screen starts flashing. Press
ENTER button (3e) to confirm deleting.
-Press TIMER button to exit or wait for device to switch back
automatically after some time.
TIPS
-The transmitting range is shortened when signal needs to go through
walls and floors
-Multiple switches can have the same unit code, these will the simultane-
ously switch on and off.
-Always give dimmers their own unit code, as to set them up separately.
-Metal will have a negative influence on the transmitting range.
-Make sure code is set on 3. (6)
To enable the screen lock hold both ENTER and DEL buttons for 5
seconds. A lock symbol will now appear to disable the lock repeat the
process and the lock will disappear.
CODE
 Loading...