Cabelcon ApS, Industriparken 10, DK 4760 Vordingborg
Tel: +45 55 98 55 99 · Fax: + 45 55 98 55 04
E-mail: cabelcon@cabelcon.dk · www.cabelcon.dk
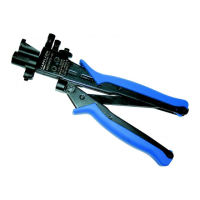
Operating instructions for CX3 All Size Compression Tool
1) Install the proper plunger tip:
- Plunger A for F short RG6/59
- Plunger B for BNC Male RG5/59
- Plunger C for F & IEC RG 6/59
- Plunger C for F Male RG7/11
2) Turn the tool head to select for RG6/59 sizes or RG7/11 sizes.
3) Prepare the cable and install your Cabelcon CX3 connector on the cable according to instructions.
4) Open the lever arm and insert your connector as shown on picture 2.
5) Close the lever arm until fully closed.
6) Open the lever arm and remove the compressed connector.
Plunger A
Plunger C
Plunger B
Turnable tool head
For RG6/59 sizes
Storage of plunger tips
For RG7/11 sizes
Picture 2
Compression of a Cabelcon CX3 RG11 connector
COMPRESSION TOOL CX3 ALL SIZE F, BNC & IEC for RG6/7/11/59 98029072-01
Plunger tips kit for 98029072 (see picture 3) 98029997
Picture 3
Rev. 160610