Do you have a question about the Cabin PROCABIN 67-Z and is the answer not in the manual?
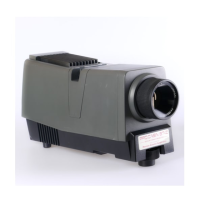
Overview of projector parts, including ventilation, lens, slide inlet, and controls.
Details film formats supported (6x7cm, 6x6cm, 35mm) and available projection lens specifications (f3.5 150mm, f4.5 200mm).
Technical specifications covering power source, consumption, cooling system, height adjustment, dimensions, and weight.
Warning against using warped or damaged slide mounts to prevent jamming and focus issues.
Instructions for positioning the projector perpendicular to the screen for optimal projection.
Table showing projected screen sizes for different distances with 150mm and 200mm lenses.
Connect the power cord to the projector and wall socket; cooling fan starts automatically.
Turn on the lamp using the switch and ensure ventilation grilles are clear for cooling.
Adjust projector height using the wheel; avoid exceeding the maximum elevation angle.
Insert 6x7 cm slides into the slide inlet until they are correctly positioned.
Adjust the projection lens to achieve a sharp focus on the screen.
Gently hold the slide by its top corners and pull it out of the projector.
Turn off the lamp, but leave the power connected for the fan to cool the projector.
Always allow the projector to cool and disconnect power before changing parts.
Step-by-step guide for removing the old lamp and inserting a new one, with handling tips.
Instructions on how to remove the fuse holder and replace the fuse with the correct rating.
Details optional carriers for 6x6cm and 35mm formats and their manual insertion system.
Instructions for using the optional carrier for unmounted 6x7cm film or filmstrips.
Guide for interchanging lenses and repositioning the condenser for optimal projection.
Recommends GEPE SPECIAL FORMAT MOUNTS for panoramic cameras for best results.
Details using the 6x7cm film carrier with the 150mm lens and distance, plus a lamp warning.