EasyManua.ls Logo

Caldwell 720001 - User Manual

Caldwell 720001
8 pages
Print Icon
To Next Page IconTo Next Page
Loading...
Product #720001 #721122 Instructions #1037402
Care & Usage Instructions
#721122 Premium Kit Contents:
1 - Chronograph
1 - Tripod
2 - Sun Shades
2 - IR LED Strips
1 - Carrying Case
1 - 15’ Audio Jack Cable
1 - Battery pack
1 - LED Strip splitter cable
4 - Rods
#720001 Chronograph Contents:
1 - Chronograph
2 - Sun Shades
1 - Carrying Sack
1 - 15’ Audio Jack Cable
4 - Rods
Question and Answer IconNeed help?

Do you have a question about the Caldwell 720001 and is the answer not in the manual?

Summary

Safety and Warnings

Safe Backstop and General Safety Rules

Ensure a safe backstop and follow all applicable safety rules for firearms, airguns, and archery.

Velocity Measurement Limitations

Do not use velocity measurements for cartridge or chamber pressure calculations.

Protection Against Ricochets

Avoid armor plating; bullet ricochets can cause damage, injury, or death.

Measurement Uncertainty Factors

Understand that variables like lighting, wind, and reflectivity affect measurement accuracy.

Ammunition Specific Precautions

Handle specific ammunition types carefully as components can damage the chronograph.

Specifications and Assembly

Specifications

Velocity range up to 9000 FPS, requires 9v battery, operates 20-120F, has Smart Phone Interface.

Install 9 Volt Battery

Install a 9-volt battery into the designated compartment.

Attach Rods to Housing

Insert rod ends into the rod pockets on the chronograph housing.

Install Sun Shades on Rods

Attach Sun Shades to the rod ends, ensuring they are fully seated.

Operation and Premium Kit Notes

Positioning the Chronograph

Place unit 10-15 feet from muzzle/bow; align height, tilt, and left/right for projectile path.

Powering On and Unit Selection

Turn unit on by selecting FPS or MPS using the power switch.

Smart Phone Connection (Optional)

Connect to a smartphone via the included audio cable for enhanced functionality.

Install Light Kit (Optional)

Install LED strips onto rods and connect to power source for improved performance.

LED Strip Usage and Battery Life

IR LEDs improve performance; high output LEDs consume battery rapidly, lasting approx. 2 hours.

Display Reading and Smartphone Connectivity

Interpreting Display Indicators

Understand indicators for ready status, velocity, duplicate alerts, errors, and low battery.

App Installation and Setup

Download the 'Caldwell Ballistic Precision Chronograph' app from your device's marketplace.

Connecting Chronograph to Smartphone

Connect the chronograph to your smartphone using the 15' audio jack cable.

Tips for Optimal Use

Understand Bullet Trajectory

Be aware bullet path is lower than sight picture; aim higher than the middle of the shooting area.

Avoid Low Light Conditions

Low light angles can cause variation; use the optional light kit for improved performance.

Clean Lenses

Remove dust from sensors using a Q-tip or canned air, being careful not to scratch.

Ensure Chronograph is Level

Leveling ensures the projectile height is consistent over each sensor opening.

Use a Stable Platform

A stable platform like a table or tripod ensures proper positioning and alignment.

Avoid Reflective Surfaces

Shooting over snow or sand can cause reflections; use a dark tarp to reduce interference.

Achieve Even Lighting

Overcast skies provide the best readings due to diffused light; avoid direct sunlight.

Manage Sun Shades

Remove Sun Shades in overcast conditions to allow more light into the chronograph.

Create Shadow on Sunny Days

Place chronograph in shade of building/wall for sunny days, ensuring sensors view the sky.

Avoid Florescent Lighting

Florescent lighting can trigger sensors and cause false readings.

Arrow and Crossbow Shooting

Stand one arrow length away; shoot arrows evenly over sensors at the same height.

Shotgun and Paintball Gun Use

Stand 5 feet from shotguns; be cautious of wads. Paintball guns can be fired from any distance.

Optional Light Kit Performance

IR LEDs enhance performance; use high-quality batteries for approx. 2 hours of optimal light.

Overview

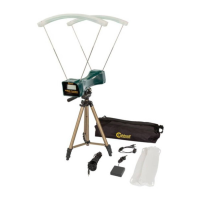
The Caldwell Ballistic Precision Chronograph is a device designed to measure projectile velocity. It comes in two main kits: the #720001 Chronograph Contents and the #721122 Premium Kit Contents, with the latter offering additional features for enhanced performance.

Function Description:

The primary function of the Caldwell Ballistic Precision Chronograph is to accurately measure the velocity of projectiles. It utilizes sensors to detect the projectile's passage, calculating its speed in either feet per second (FPS) or meters per second (MPS). The device is suitable for a wide range of applications, including firearms, airguns, paintball guns, and bows. It can be connected to a smartphone via an audio jack cable, allowing users to access an application for advanced data logging and analysis.

Important Technical Specifications:

  • Velocity Range: 1 to 9000 FPS (Feet Per Second).
  • Power Requirements: 9V battery (not included). The Premium Kit also includes a battery pack and a 110 Volt AC Adapter for extended use, especially with the optional light kit.
  • Operating Temperature: 20 – 120 degrees F.
  • Interface: Smart Phone Interface via a 3.5mm TRRS Jack. A USB Port is also present for factory use only.
  • Mounting: Features a ¼-20 threaded insert for tripod mounting.

Usage Features:

Kit Contents:

  • #720001 Chronograph Contents:

    • 1 - Chronograph (A)
    • 2 - Sun Shades (B)
    • 1 - Carrying Sack (C)
    • 1 - 15' Audio Jack Cable (D)
    • 4 - Rods (E)
  • #721122 Premium Kit Contents (All Chronograph contents plus):

    • 1 - Tripod (F)
    • 1 - Battery pack (G)
    • 1 - LED Strip splitter cable (H)
    • 2 - IR LED Strips (I)
    • 1 - Carrying Case (J)
    • 1 - 110 Volt AC Adapter (K)

Assembly:

  1. Battery Installation: Install a 9-volt battery into the designated compartment. The chronograph housing also includes a spare battery compartment.
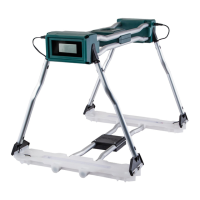
  2. Rod Insertion: Insert the rod ends into the Rod Pockets on the Chronograph housing.
  3. Sun Shade Installation: Install the Sun Shades onto the ends of the rods, ensuring the rod ends are fully seated into the pockets on the Sun Shades.
  4. Optional Light Kit Installation (Premium Kit ONLY):
    • Remove the Sun Shades.
    • Place the LED Strip Housings on top of the Rods.
    • Connect the LED Strip Splitter Cable to each LED Strip.
    • Connect the Splitter Cable to either the Battery Pack or the 110 Volt AC Adapter.
    • Rotate the switch on the Splitter Cable to "on." One visible red LED in each strip will illuminate, confirming the light kit is active.

Operation:

  1. Placement: Place the Chronograph on a stable surface at the appropriate height for the projectile to travel through the shooting window. It can be mounted on a tripod using the ¼-20 threaded insert.
  2. Positioning: Position the unit 10 to 15 feet in front of the muzzle of a firearm. If using with a bow, place it at least one full arrow length in front. For shotguns, stand only 5 feet away. Paintball guns can be fired from any distance.
  3. Alignment:
    • Height: Ensure the projectile travels through the center of the shooting window.
    • Tilt Angle: Ensure the projectile travels parallel to the top surface of the housing.
    • Left/Right: Ensure the projectile is in line with the housing.
  4. Power On: Turn the unit on by selecting either Feet Per Second (FPS) or Meters Per Second (MPS) with the power switch.
  5. Smartphone Connection (Optional): Connect to a smartphone via the included audio cable.
    • Download the "Caldwell Ballistic Precision Chronograph" app from your smartphone's application marketplace or from the Battenfeld Technologies website.
    • Connect the 15' audio jack cable to the side of the Chronograph and the other end to the smartphone's headphone jack.

Smartphone App Functions:

  • Instant read out of velocity.
  • Note Log for recording data.
  • Displays Temperature, Barometric Pressure, Average velocity, Standard Deviation, Minimum, Maximum, Spread, and Shots per second.
  • Ability to save, email, and text Shot Groups.
  • Imperial/Metric Units selection.
  • Zip Code location feature.

Display Readings:

  • -[]-: Initial "ready" screen after startup sequence.
  • [Velocity Reading]: Projectile velocity reading – ready for the next shot.
  • du01: Duplicate reading alert (alternates flashing with shot velocity) – ready for the next shot.
  • Err2: Error Alert: Projectile not recorded by the front sensor – ready for the next shot.
  • Err3: Error Alert: Projectile not recorded by the rear sensor – ready for the next shot.
  • BATT: Low battery alert – change battery.

Tips for Optimal Performance:

  • Bullet Flight: Understand that the bullet's flight will be lower than your sight picture. Aim higher than the middle of the shooting area.
  • Lighting Conditions: Avoid low light conditions (sunrise, sunset) as they can cause variations due to reflections. The optional light kit significantly improves performance in these conditions.
  • Even Lighting: Best readings are achieved with even lighting, such as overcast skies.
  • Shade Placement: On sunny days, place the chronograph in the shadow of a building or opaque wall, ensuring the sensors have a clear view of the sky. Avoid placing it in the shade of a tree, as uneven sunlight can cause problems.
  • Sun Shades: Remove Sun Shades in heavy overcast or shaded conditions to allow more light into the chronograph. They are only necessary in sunny or partly cloudy conditions.
  • Reflective Surfaces: Avoid shooting over reflective surfaces like snow or certain types of sand. A dark-colored tarp can be used to reduce reflections.
  • Fluorescent Lighting: Avoid fluorescent lighting as it can inadvertently trigger sensors and give false readings.
  • Arrow Placement: For bows and crossbows, shoot arrows evenly over the projectile sensors, maintaining the same height over both sensors. Blunt arrow tips work best.
  • Shotgun Distance: Stand only 5 feet away for shotguns. Be aware of flying wads that might damage the chronograph.
  • Paintball Guns: Be careful not to get paint splatter on the projectile sensors.
  • Light Kit (Premium Kit ONLY): Infrared (IR) LEDs provide the highest level of performance. The visible red LED is for visual confirmation only. High output LEDs consume battery power rapidly; use high-quality Alkaline or Lithium batteries. A set of batteries provides optimal light output for approximately 2 hours. If errors or inconsistent readings occur, switch to 110V power or replace batteries. Use the 110V AC adapter whenever possible.

Maintenance Features:

  • Cleaning Lenses: Remove dust buildup on the sensors using a Q-tip or canned air. Be careful not to scratch the lenses.
  • Leveling: Ensure the chronograph is level to maintain consistent projectile height over each sensor.
  • Stable Platform: Use a stable platform (table or dedicated metal stand) for accurate positioning and alignment.
  • Battery Replacement: Replace batteries when the "BATT" alert is displayed.
  • Water Protection: As an electronic device, water can damage components. Do not use the chronograph outside in the rain without protection.

Safety and Warnings:

  • Read Instructions: Thoroughly read all directions and safety instructions to prevent property damage, personal injury, or death.
  • Safe Backstop: Always use a safe backstop for your target.
  • Safety Rules: Follow all applicable safety rules, including firearm, airgun, paintball gun, ammunition reloading, and archery safety rules. Consult the manufacturer(s) if unfamiliar with specific rules.
  • Velocity Measurements: Do NOT use velocity measurements to calculate combustion pressures. Do NOT exceed published maximum powder levels in ammunition.
  • Armor Plating: Do NOT attempt to protect the chronograph with armor plating. Bullet ricochet can cause property damage, personal injury, or death. Chronograph components are replaceable.
  • Inherent Uncertainty: All chronograph units have inherent uncertainty. Variables like sunlight intensity, orientation, cloud cover, wind, shadows, and ground reflectivity can affect measurements. Be suspicious of data points with greater than 4% difference from the ammo's average string velocity.
  • Ammunition Types: Special care is needed with certain ammunition types (gas checks, wads, sabots) as they can separate and impact the chronograph, causing damage.

Caldwell 720001 Specifications

General IconGeneral
BrandCaldwell
Model720001
CategoryWatch
LanguageEnglish

Related product manuals