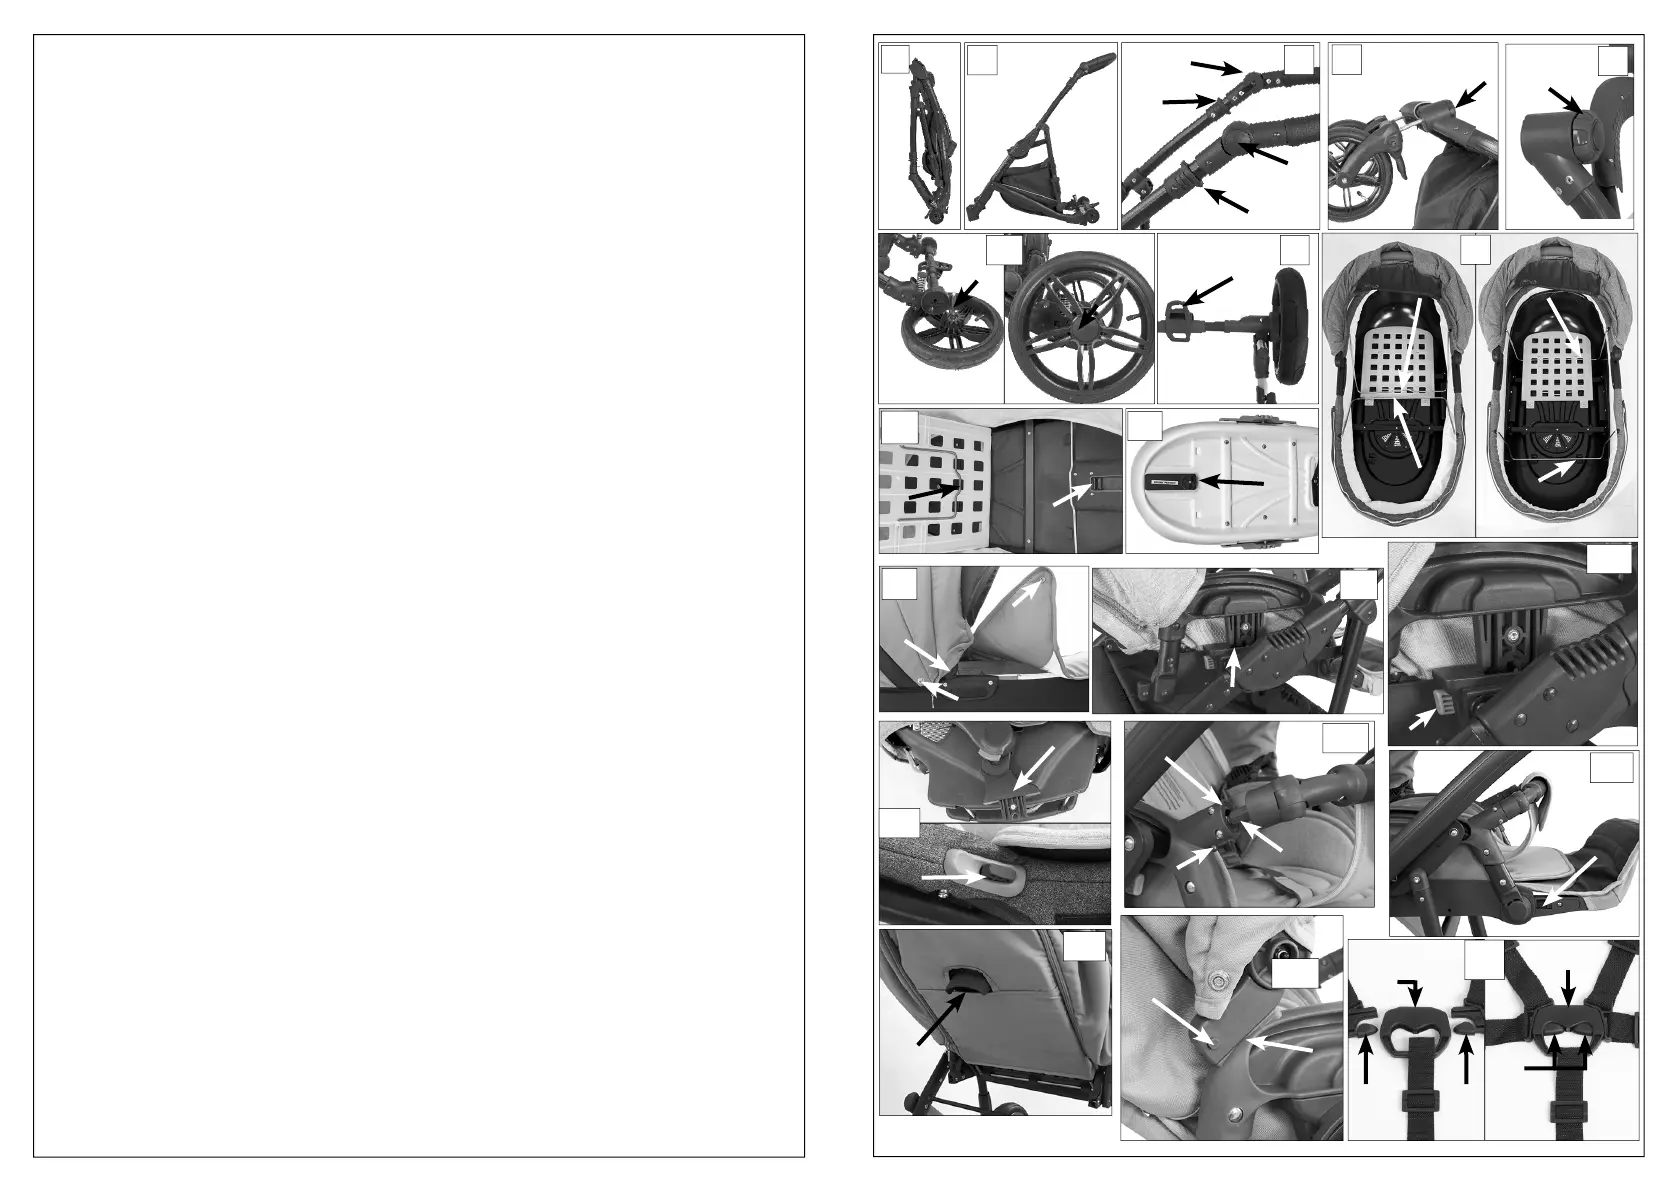
1. Folded chassis.
2. Unfolded chassis.
3. Before folding please remove the carrycot/seat unit/car seat. To fold the chassis move both handles
upwards at the same time and pull the frame downwards. Handle height adjustment. Push the buttons
(1) placed on the both sides of the handle and while holding them put the handle into desired position.
4. Assembly of front wheel. Move the chassis upwards and place the axis in the hub. Dismantle of front whe-
el. Move the chassis upwards, press the button (1) and slide out of the hub.
5. Blocking of front wheels. Twist the ring (1) right to block the wheel. Unblocking front wheels. Twist the ring
left (1) for the wheel to turn.
6. Assembly of rear wheels. To assemble rear wheels, slide the hub on the axis (1) holding the protection
at the same time (2) until the wheel is blocked on the axis. Dismantle of rear wheels. Press and hold the
protection (2) and release the wheel from the hub.
7. Rear wheel brake. To block the rear wheel stamp on the brake (1). By moving the brake upwards you
release the brake.
8. Carrycot. Remove the mattress and the metal enhancers(1), next (2) move them into the guides until loc-
ked. Make sure they have been properly locked.
9. Assembly of a carrycot backrest regulation. Place the metal rod (1) into the slot in a regulation mechanism
(2).
10. Decide on the height of the seat (3), place the mattress. Unfold the hood.
11. To fold the hood press and hold the buttons (1) and fold the hood. Placing the carrycot liner. To attach the
carrycot liner, place it on the carrycot (2) and press the side buttons (3).
12. Assembly of carrycot/seat unit. To put the carrycot on the chassis place it in appropriate mounts (1) on
each side of the pram (1). The carrycot will block automatically.
13. Release of carrycot/seat unit. To release the carrycot push the buttons (1). Repeat on the other side of the
pram. Next move the carrycot/seat unit upwards and remove from the mounts.
14. Assembly/release of the car seat adapters. The car seat adapter allows to install the car seat on the chassis.
Place the adapters (1) appropriately on both sides of the pram. To release the adapters push the buttons
(2) on both sides of the car seat. The car seat with the adapters can be attached to the chassis according to
points 13,14 (assembly/disman- tle of carrycot/seat unit). The car seat is an OPTION.
15. Handlebar. The handlebar can be attached by inserting the hooks (1) on both sides of the pram (2). To
remove the handlebar it needs to be unhooked. Remember to buckle up the harness every time you remo-
ve the handlebar.
16. Footrest. To adjust the footrest push the buttons simultaneously (1) and place the footrest in the desired
position.
17. 4 position seat unit. The back in a seat unit can be positioned by pulling up the lever and moving the back
into desired position (1).
18. Hood. To remove the hood press the buttons on both sides of the stroller (1) and pull it upwards. To assem-
ble the hood insert the hooks (2) on both sides of the stroller. To position the hood you push it back or pull
it to the front.
19. 5-point harness. To buckle up the harness you push the sides of the buckle (2) and slide it in the hook (1).
To open the harness you press the side of the buckle (3) (2) and slide it out of the hook (1).
Features: chassis, swivel wheels, carrycot with mattress and footmu , seat unit with footmu and handle bar , bag (attached to
the stroller handle), rain-cover, warranty and manual.
1
1
1
2
1
2
1
2
3
11
1
1
2
2
3
1
12
4
6
5
1
7
13
2
1
18
1
17
2
1
3
15
1
16
22
1
19
1
3
3
10
2
1
9
2
1
14
2
2
1
1
8
1
 Loading...