Do you have a question about the Canon II B and is the answer not in the manual?
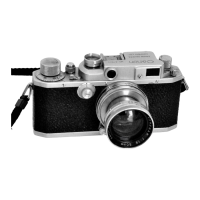
Introduces the numbered identification and description of camera controls and features.
Provides important guidance regarding the use of the range-view finder and parallax.
The Canon Model II B is a precision miniature camera designed for excellent service and perfect photographic results. This manual provides comprehensive instructions for its proper and careful handling, emphasizing the importance of studying the mechanical movements before attempting to use the camera with film. It is recommended to practice handling the camera without film initially.
The camera features a WINDING KNOB (1) that advances the film and winds the shutter simultaneously. It should be turned until it reaches a stop, as indicated by an arrow. An AUTOMATIC EXPOSURE COUNTER (2) keeps track of exposures. The SHUTTER BUTTON (3) is used to make an exposure by gently pressing it.
For controlling exposure, the camera has a MAIN SHUTTER SPEED DIAL (4) for high speeds ranging from 1/20 to 1/500 seconds. To set this, first turn the winding knob, then lift and turn the dial so the index arrow points to the desired speed. An ADDITIONAL SHUTTER SPEED DIAL (5) is provided for slow speeds, from 1 full second to 1/20 second.
The lens features an IRIS DIAPHRAGM SCALE (6) which controls the light transmitting capacity of the photographic lens. The LENS FOCUSING LEVER (7) includes an infinity catch. To release the catch and fix the lens for focusing up to 3.5 feet, press the knob on the end of the lever. The DISTANCE SCALE (8) allows users to read off the distance by aligning the figure nearest the index marks. A DEPTH OF FIELD SCALE (9), symmetrically engraved on both sides of the distance scale index, assists in understanding the range of acceptable focus.
For viewing and focusing, the camera is equipped with an EYE-PIECE OF THE RANGE FINDER (10) combined with the view finder, and a WINDOW OF THE RANGE FINDER (11) also combined with the view finder. A REVERSING LEVER (12) is used for film handling: set to 'R' when rewinding film and 'A' (Advances) before loading the film again. The REWINDING KNOB (13) is used to lift and wind the exposed film back into the magazine or film cartridge. An ACCESSORY CLIP (14) is available to hold special viewfinders or universal viewfinders.
The RANGE FINDER MAGNIFICATION CHANGING LEVER (15) allows adjustment of the viewfinder magnification: 'F' for standard lens finder, '1x' for 1.0x magnification, and '1.5x' for 1.5x magnification. When using the range-view finder, it is crucial to keep your eye close to the eyepiece and ensure the reflected image circle is at the center of the field of vision to achieve exact focus. Failure to do so will result in inaccurate focus and a discrepancy between the finder's eyesight and the lens's view.
The manual illustrates variations in the actual field of vision for different lenses and range-finder settings. For a standard lens (50mm F:3.5 or F:1.9) with the range-finder focusing lever set at 'F', the field of vision of the lens, finder at infinity, finder at 12 feet, and finder at 3.5 feet are shown. For a 100mm F:4 Telephoto lens with the range-finder focusing lever set at '1x', similar variations are depicted. It is advised to use a separate view finder or Vidom Universal View Finder for near objects under 13 feet. Similarly, for a 135mm F:4 Telephoto lens with the range-finder focusing lever set at '1.5x', the field of vision variations are shown, with a recommendation to use a separate view finder or Vidom Universal View Finder for near objects under 14 feet.
To load the camera, open the baseplate by turning the opening knob half a turn from 'S' to 'O', then remove the take-up spool. Slide the ready-cut leading end of the unexposed film under the tongue of the take-up spool. This film can be from a standard 35mm cartridge or a Canon film magazine.
Hold the film magazine in your left hand and the take-up spool in your right, then gently insert them into the camera, ensuring the emulsion side of the film faces the lens. Slightly turn the film winding knob to ensure the sprocket catches the film perforations; this step is critical. After confirming the film is properly caught, replace the baseplate and turn the knob half a turn from 'O' to 'S'.
Before making pictures, ensure the reversing lever, located between the winding knob and the shutter speed dial, is set to 'A' (advance). After all exposures are made and the film needs to be rewound, this lever is moved to 'R'. Turn the winding knob and click the shutter twice to advance past any film exposed to light during loading. Then, set the counting dial to zero. The camera is now ready for use. A helpful note: when film is in the camera, the rewinding knob will turn counterclockwise each time the shutter winding knob is turned, indicating proper film advancement. If this does not happen, the film leader should be rewound off the take-up spool, and the film reloaded.
Continue taking pictures until the entire roll is used. If the shutter winding knob no longer turns, do not force it. Instead, move the reversing lever to 'R' and rewind the film back into the original film magazine. During this process, the base of the shutter button will turn and stop when the film pulls away from the take-up spool. Once winding is complete and the reversing lever is moved back to 'A', the film magazine can be removed.
The standard Canon Film Magazine is designed to hold approximately 5-1/4 feet of 35mm film, sufficient for up to 36 double frame exposures (24x36mm). This cylindrical magazine consists of three parts: an outer shell, an inner shell, and a center spool. A button on top of the inner shell aids in opening and closing the magazine.
To assemble the magazine, first insert the center spool into the inner shell, ensuring the tip of the film is in the slot of the spool. Next, introduce the inner shell with the spool into the outer shell, aligning both rectangular openings. Once the inner shell stops, turn it to the left or anti-clockwise until the safety spring clicks into a locked position. Before closing the chamber, pull the leading end of the film out several inches. This entire procedure should be performed in a darkroom.
Proper care of lenses is essential for optimal performance. All lenses are manufactured with high accuracy. The lens surface should be kept absolutely clean and accurately spherical. The primary rule is to keep the lens surface free from dust and other impurities.
Always cover the lens with the lens cap when the camera is not in use. If dust or other impurities appear on the lens surface, do not attempt to remove them by rubbing with your fingers. Instead, use a piece of lens cloth to wipe the surface very gently and in a circular motion. This is imperative to prevent damage to the lens.
| Camera Type | Rangefinder |
|---|---|
| Film Format | 35mm |
| Shutter | Focal-plane shutter |
| Shutter Speeds | Bulb |
| Film Advance | Manual |