13
Terminal board connections
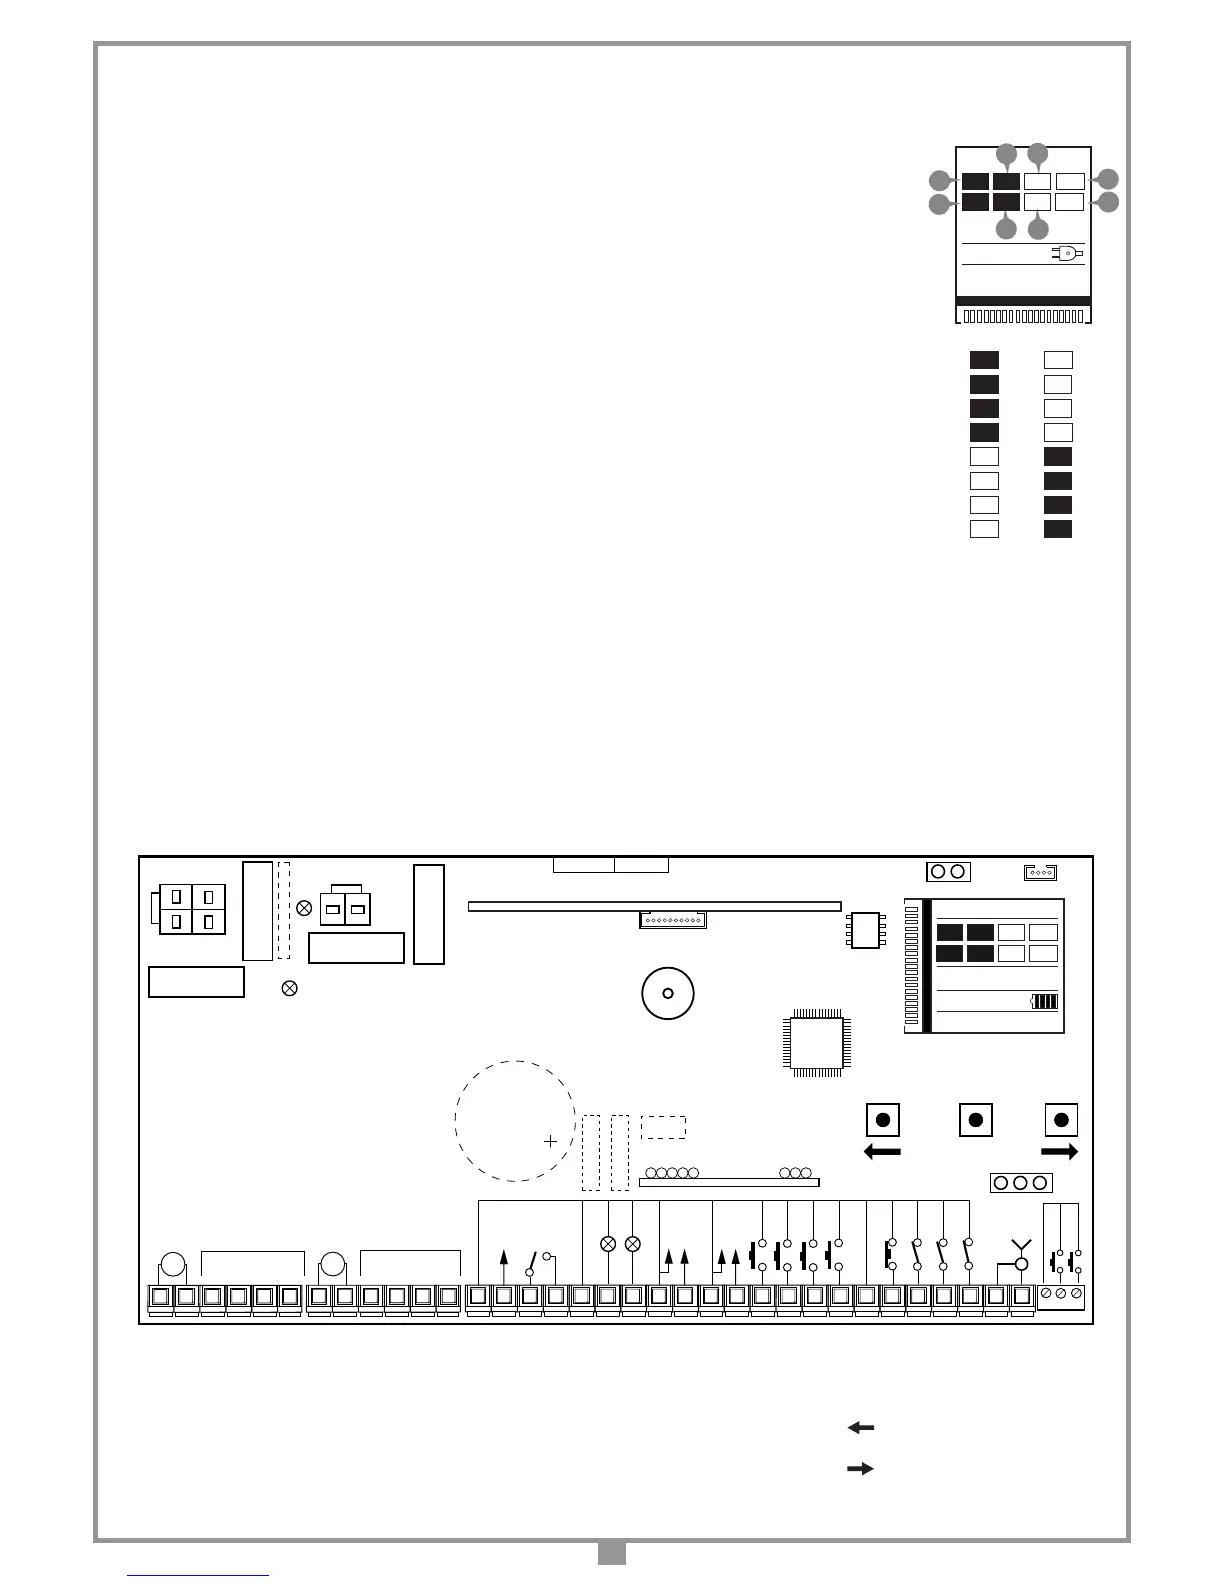
7 CMN common for all inputs and outputs.
8 ELS electric lock output (fed continuously) 12 Vdc - 15 W.
9-10 LC-CH2 Potential free contact for the activation of the courtesy light
(separate power supply Vmax=30 Vac/dc: Imax=1A) or the second radio
channel. Selection is carried out in the "options" menu.
11 CMN common for all inputs and outputs.
12 LP 24 Vdc 25 W output for warning lights intermittent activation (50%),
12,5 W continuous activation.
13 LS 24 Vdc 3 W output for an indicator light.
14 CMN common for all inputs and outputs.
15 24 Vdc controlled output, powering external loads
(1)
.
16 CMN common for all inputs and outputs.
17 24 Vdc output, powering external loads
(1)
.
18 TA (NO contact) opening button input.
19 TC (NO contact) closing button input.
20 TAL (NO contact) limited opening button input.
21 TD (NO contact) dynamic button input.
22 CMN common for all inputs and outputs.
23 TB (
N.C./8.2 kΩ
contact) stop button input (The opening of this contact
interrupts the cycle until a new movement command is given).
24 CP
(N.C./8.2 kΩ
contact) safety edge input. Opening this contact will
provoke a travel direction inversion during the closing stage and during
the opening stage.
25 FS (
N.C./8.2 kΩ
contact) The opening of this contact will block all move-
ment, until the obstruction has been removed and the pause time has
elapsed, due to the safety device cutting in, the door will then continue
moving in the closing direction (only with automatic reclosing enabled).
26 FI (
N.C./8.2 kΩ
contact) safety and control devices in input (photocells
invert the travel direction when an obstruction is detected). Opening this
contact will provoke a travel direction inversion during closure due to the
cutting in of the safety device.
27 Outer conductor for radio receiver antenna.
28 Inner conductor for radio receiver antenna (if an external antenna is tted
use a coaxial type cable RG58 with an impedance of 50Ω).
29 CMN common for the emergency buttons.
31 EMRG1 (NO) emergency manoeuvre input 1.
30 EMRG2 (NO) emergency manoeuvre input 2.
Note
(1)
The total of the 2 external device outputs must not exceed 10 W.
ALL UNUSED NC CONTACTS MUST BE JUMPED and consequently the
security device test (FI , FS ) must also be deactivated. If you want to activate
the FI, FS test both the transmission and receiver parts of the security devices
must be connected to the binding post marked "CTRL 24 Vdc".
If the test is active there will be a 1 second
delay between the command transmission
and movement of the gate/s.
• Switch on the power and make sure that the
indicator LEDs are in the following condition.
- L1 Power on ON
- L2 Wrong battery connection OFF
(2)
Indications on the display at rest activated
- S1 Indicator for the blocking button
TB
(3)
TB
- S2 Indicator for the inverting photoelectric cells
FI
(3)
FI
- S3 Indicator for the stop photoelectric cells
FS
(3)
FS
- S4 Indicator for the safety edge
CP
(3)
CP
- S5 Indicator for the opening button
TA
TA
- S6 Indicator for the closing button
TC
TC
- S7 Indicator for the sequential command
TD
TD
- S8 Indicator for the limited opening button
TAL
TAL
Note
(2)
: If this LED is "ON" disconnect the battery power cables
immediately.
Note
(3)
: If the security device has not been activated the indications on
the display are at rest. Make sure that when the security device
is activated the status is inverted (black characters on a white
background).
If the green power on LED "L1" doesn't light up check the condition of the
fuses and the power cable connection at the transformer primary.
If one or more of the safety indications "S1, S2, S3, S4" are active (black
characters on a white background) check the contacts of the relative security
devices and check that the unused safety device contacts have been bridged.
The indications "S5, S6, S7, S8" change status on the display when the
relative command is activated, eg. pressing the button "TA" will change the
status from 'at rest' to 'active' (white characters on a black background).
B1 Signal buzzer "via radio" mode
F1 4A blade fuse
(4)
(24V circuit protection)
F2 4A blade fuse
(4)
(24V circuit protection during battery operation)
F3 10A blade fuse
(4)
(motor power protection)
F4 10A blade fuse
(4)
(motor protection during battery operation)
J1 Display orientation selection
J2 Serial connection CSER (not connected)
J3 Battery connection
J4 Battery charger slot
J5 Transformer secondary connection
J6 Emergency enable jumper
LCD1 LCD Display
M1 Transmitter code memory module
P1 Menu navigation button ( )
P2 Programming and conrm button (PROG./OK)
P3 Menu navigation button ( )
R1 Radio frequency module, 433 MHz (868 MHz on request)
Note
(4)
: These are automotive type blade fuses (max. voltage 58 V)


 To Next Page
 Loading...