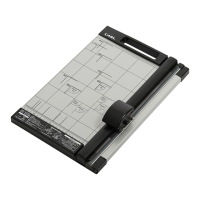
DÉCOUPE
Support de bande de coupe
Presse
Presse
Planche de découpe
Bande de coupe
Support de lame
Placez la réglette à une extrémité du rail.
Placez les feuilles à couper.
Faites glisser la réglette tout en appuyant.
Bande de coupe X 1 pièce
Lame droite K-28 X 1 pièce
Étui de remplacement
de lame X 1 pièce
Risque d'endommagement ou de dysfonc�onnement de la lame
Le non-respect des précau�ons suivantes peut entraîner des blessures
FRANÇAIS
Ne mettez pas votre main sous le rail de coupe.
N'essayez pas de modifier, désassembler ou réparer
l'appareil.
N'utilisez pas le massicot sur une surface non stable.
Lors du remplacement de la lame, ne touchez pas le
tranchant de la lame.
Une bande de coupe doit être installée lors de la découpe.
Ne coupez pas d'agrafes, de trombones ou autres objets
métalliques.
Ne coupez pas de films métalliques ou en verre.
N'essayez pas de modifier, désassembler ou réparer
l'appareil.
Ne dépassez pas la quantité recommandée de feuilles à
découper.
Pour éviter d'endommager la lame, ne coupez pas d'objets métalliques
(comme des agrafes ou des trombones).
Nous vous remercions d'avoir choisi le massicot CARL DC-200N/ DC-2A3N. Veuillez lire
attentivement ce mode d'emploi avant toute utilisation.
Il est recommandé de conserver ces instructions pour vous y reporter en cas de besoin.
Ne coupez pas de papier adhésif sans la lame fluorine
(K-18).
PRÉCAUTIONS
SCHÉMADESPIÈCES
(fixés sur le produit)
Rail
Réglette
MODE D'EMPLOI
Accessoires standard
Ouvrez un nouvel étui de remplacement de lame, fixez le boulon hexagonal du support
dans la fente hexagonale de la lame. Faites glisser l'étui de remplacement de la lame
vers le bas tout en appuyant contre le support. ( Voir )
Support
Vis
Support
Lame
Boulon hexagonal
Tiroir de stockage de lame
A
Support
A
Bande de coupe
Rainure
REMPLACEMENTDELABANDEDECOUPE
Tirez le support de bande de coupe et extrayez la bande de coupe.
Insérez une nouvelle bande de coupe dans la rainure et refermez le support de bande. La
bande de coupe peut être utilisée sur ses 4 faces (deux côtés, une devant et une derrière).
Remplacez la bande de coupe par une nouvelle lorsque les 4 faces ont été utilisées.
REMPLACEMENTDELALAME
Placez l'ancienne lame dans l'étui de remplacement situé dans le tiroir de stockage.
Ne touchez pas le tranchant de la lame.
Si vous touchez le tranchant de la lame, vous risquez de vous blesser.
Direction de la lame lors de l'installation
Stockage de l'étui de remplacement de la lame
SPÉCIFICATIONS
Capacité
decoupe
1.1kg
L265xl388xH70
310mm(A4,bordlong)
10feuilles(papierPPC,64~80g/m²,faireglisserunaller-retour)
Lamedroite
Longueurdecoupe
Tailledel'unité
Poids
3feuilles(papierPPC,64g~80/m²)Coupedansunedirection*2
462mm(A3,bordlong)
L265xl540xH70
1.6kg
PIÈCEDEREMPLACEMENT
Modèle
Bandedecoupe
Lamededécoupe
DC210/212M/RM-12/2(2pièces)
DC218M/RM-18/2(2pièces)
LamedroiteK-28(2pièces)/LamedroitefluorineK-18(1pièce)/LamedeperforationK-29(1pièce)
Déplacez la réglette au centre du rail, retirez les vis et le support de la lame.
B
Serrez les vis pour fixer le support.
※1 Lorsque vous coupez à l'aide d'une lame de perforation, la coupe sera plus précise si vous utilisez une nouvelle
face de la bande de coupe ou si vous remplacez la bande de coupe.
La lame de perforation n'est pas incluse avec le produit. (En option)
※2Lorsque vous coupez à l'aide d'une lame de perforation, le fait de passer la réglette en aller-retour coupera le papier.
Lespiècesderemplacementsontdisponiblesdanslesmagasinsdepapeterieoudanslasectionpapeteriedes
grandessurfaces.Pourensavoirplussurlespiècesderemplacement,veuillezvousreporterausiteWebCARL.
Placez la lame avec l'inscription CARL vers l'extérieur. ( Voir )
Si la lame n'est pas gravée, fixez la lame puis faites un test sur 10 feuilles.
Si cela produit des petits morceaux, retournez la lame dans l'autre sens.
Placez l'étui vide dans le tiroir de stockage à l'arrière
du produit.
Lamedeperforation
Les caractéristiques et l'aspect du produit sont susceptibles d'être modifiés sans préavis.
B
Canada, Mexique et États-Unis
Autre Pays (Sauf le Japon)
( 日本語/ENGLISH / FRANÇAIS / ITALIANO /
DEUTSCH / ESPAÑOL / 中文)
10
sheets
ネジ
刃
A
B
刃の先端をスリットの
奥まで差し込みます。
日本語
替刃ケース
(1個)
Presser
Presser
Holder
Screws
Holder
Blade
Hexagonal stud
Blade storage tray
A
Holder
Insert the blade edge deep into
the groove inside the case.
A
Cutting Mat
Groove
Cutting Board
Cutting Mat
Blade Holder
Set the slider to either end of the rail.
Set materials to be cut in position.
Slide the slider while pressing it down.
Cutting Mat X 1pc
Straight Blade K-28 X 1pc
Blade Replacement Case
X 1pc
Risk of Blade Damage or Malfunc�on
Disregarding the following cau�ons can result in injury
ENGLISH
Do not place your hand under the cutting rail. Do not attempt to modify, disassemble or repair.
Do not use on an unstable surface.
When replacing the blade, do not touch the sharp edge of
the blade.
A cutting mat must be installed when cutting.
Do not cut staples, paper clips or other metallic objects.
Do not cut metallic or glass impregnated films.
Do not attempt to modify, disassemble or repair.
Do not attempt to cut paper in excess of specification.
Do not cut any metallic objects (e.g. staples and clips) to avoid blade damage.
CUTTINGMATREPLACEMENT
Cutting mat is a replaceable part. When the mat becomes deeply grooved and the
cutting performance deteriorates, the mat should be replaced.
Pull forward the cutting mat holder and pull out the cutting mat.
Insert a new cutting mat into the groove and close the mat holder. By changing orientation
of the cutting mat, 4 surfaces can be used, two surfaces per side on front and back.
Replace a new cutting mat when all 4 surfaces are used.
BLADEREPLACEMENT
Place the old blade in the empty blade replacement case located in the storage tray.
Do not touch the sharp edge of the blade.
Touching the sharp edge of the blade can result in injury.
About Direction of the Blade when Installation
About Storage of the Blade Replacement Case
SPECIFICATION
Cutting
Capacity
1.1kg
W265×L388×H70
310mm(A4Size,longedge)
10sheets(basedonPPCpaper,64~80g/m2paper,slidebackandforthonceStraightBlade
CuttingLength
UnitSize
Weight
3sheets(basedonPPCpaper,64~80g/m2paper)Cutinonedirection※2
462mm(A3Size,longedge)
W265×L540×H70
1.6kg
REPLACEMENTPART
Continueduseofdamagedreplacementparts(consumables)maycausemalfunction.Pleasereplacepartsregularly.
Model
CuttingMat
CuttingBlade
DC210/212M(2pcs) DC218M(2pcs)
StraightBladeK-28(2pcs)/Fluorine-coatedStraightBladeK-18(1pc)/PerforationBladeK-29(1pc)
Move the slider to the center of the rail, remove the screws and take off the holder.
B
Tighten the screws to fix the holder.
※1When cutting with a perforation blade, the cut will be cleaner if you use an unused section of cutter mat or replace with a new cutter mat.
Perforation blade is not included.( Optional )
※2When cutting with a perforation blade, moving the slider back and forth will cut the paper away.
Replacementpartsareavailableatlocalstationerystores,orstationerysectionofstores.Fordetailsonthe
replacementparts,pleaserefertoCARLwebsite.
Attach the blade with “CARL” engraved facing outside. ( See )
When using a blade without the engraving, set the blade and then make a test cut on 10
sheets. If this produces small fragments, change the front and back of the blade.
Retain the empty blade replacement case in the
storage tray at the back of the product.
PerforationBlade
Thank you for purchasing CARL Paper Trimmer DC-200N/ DC-2A3N. Please carefully read the
enclosed manual prior to use. It is advisable to retain this manual for future reference.
Do not cut paper with adhesive when fluorine-coated
blade (K-18) is not being used.
CAUTION
PARTDIAGRAM
CUTTING
Specifications and appearance are subject to change without notice.
(installed in the product)
Rail
Slider
Blade is a replaceable part and increasingly poor cutting performance indicates
that the blade needs replacement
B
Canada, Mexico and USA
Other Countries (Except Japan)
Open a new blade replacement case, fit the hexagonal stud on the holder into the
hexagonal hole on the blade. Slide the blade replacement case down while pushing
against the holder. ( See )