T--298
3-1
SECTION 3
SERVICE AND MAINTENANCE
3.1 PREVENTATIVE MAINTENANCE
Cleaning--Clean evaporator coil and condenser coil.
Hold flashlight behind coil to see if all spaces are clear.
Dust accumulation obstructs or reduces airflow and
results in loss of cooling capacity. Both coils may be
vacuumed when dry. Coils may also be brushed with a
stiff brush and then blown out with compressed air.
Thoroughly clean base pan, motors, fan wheels, and
other components.
Clean cover and ceiling grill. Mild detergents reduce
electrostatic charges on plastic sections of the grill and
are good cleaners.
CAUTION
Do not use carbon tetrachloride, solvents,
or waxes containing solvents to clean plas-
tic sections.
Painting--Paint any parts that show evidence of rust
with a good rust--prevention paint.
Wiring -- Check all wiring for deterioration and all
electrical contacts for tightness or corrosion.
Mounting--Make sure unit is secure on roof according
to installation instructions provided in Owner’s Guide.
Checkfanstoinsurethattheyarecorrectly positionedin
the center of the orifice, and tight on the shaft.
Leaks--Check any connections that show evidence of
oil or leaks. When unit is properly installed (refer to
Owner’sGuide) check gaskets for possible air leakage.
Controls--Check unit to ensure all controls are
functioning correctly and unit operation is normal.
Vibrations can cause unwanted noise.
NOTE
Check to ensure that piping is not vibrating
against side of the unit.
NOTE
For proper cleaning and flushing, use a UL
approved refrigerant recovery/recycling
system.
NOTE
Refrigerant removal must always include
recovering therefrigerant, notallowing itto
escape to the atmosphere.
3.2 SER VICE -- GENERAL
General Notes—These Service Instructions are
provided to assist the trained and qualified Carrier
servicetechnicianin repairing or replacingcomponents
of the AirV units.
WARNING
Before working on the unit be sure to first
disconnect all electric power to the unit to
avoid thepossibilityof electricalshockand
personal injury. Before disconnecting, dis -
charge capacitors by shorting across the
capacitors terminals (Refer to paragraph
3.5.8)
WARNING
Shield coils with cardboard to protect
hands against injury from sharp metal
edgeswhen removing compressorandoth-
er components.
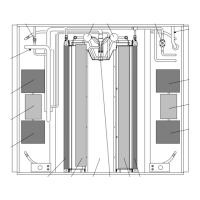
3.3 CEILING UNIT -- FREE BLOW SYSTEMS
3.3.1 Filter Removal
The filters (Figure 3-1) are located in the ceiling grill. To
remove the filters, do the following:
a. Grasp theedge of thefilterat recessin theend of the
ceiling grill.
b. Pull filter completely out of the filter slot.
c. Vacuum filter or wash filter in luke--warm water.
Shake off excess water and dry thoroughly.
d. Replace filter by sliding the filter into the filter slot in
the ceiling grilluntil thefilterframeis flush with thein-
terior grill.
Filters
Figure 3 -1 Filter Removal -- Free Blow
3.3.2 Ceiling Grill Removal
To remove the ceiling grill (Figure 3-2) do the following:
a. Before working on unit placethe master switch in the
OFF position and disconnect all electrical power.
b. Remove 4 screws located on the ceiling grill, making
sure to support the weight of the grill.
c. Lower the ceiling grill from the ceiling panel.
 Loading...