T--298
3-2
d. To replace the grill, place the grill up against the ceil-
ingpanelandalignthescrew holesinthe grill withthe
ceiling panel.
e. Replace 4 screws.
Mounting
Screws
Figure 3 -2 Ceiling Grill -- Free Blow
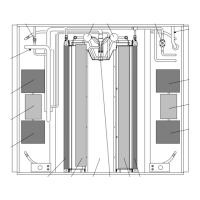
3.3.3 Ceiling Panel Removal
To remove the ceiling panel (Figure 3-3) do the
following:
a. Remove the ceiling grill. (Refer to paragraph 3.3.2.)
b. Remove 5 screws securing the duct plate to the ceil-
ing panel.
c. Remove 4 mountingbolts makingsure tosupport the
weight of the ceiling panel.
d. Disconnect the unit harnessesand main power wires
from the ceiling panel.
e. Lower the ceiling panel from theair conditioningunit.
f. Reverse above procedure for reassembly.
Junction Box
Duct Plate &
Mounting Holes
Serial/Model
Number Tag
Air Sweep Cam
Mounting Bolts
Figure 3 -3 Ceiling Panel Assembly
Heater Assembly
Option
Heat Strip
Connection
Figure 3 -4 Ceiling Panel With Heat Option
3.3.4 Master Control Switch
To remove the master control switch, do the following:
a. Remove ceiling grill. (Refer to paragraph 3.3.2.)
b. Remove 5 screws that secure the control assembly
(Item 2, Figure 1-3) to the control box cover.
c. Remove the master control switch knob by grabbing
the outside edge of the knob and pulling it off of the
switch stem.
d. Remove2 screws securingthe master control switch
to the control assembly.
e. Carefully disconnect wires from the master control
switch. Label wires to aid in reassembly.
f. Reverse above procedure for reassembly.
Air Sweep Switch
Master Control
Switch
Thermostat
Junction Box
With Cover
Figure 3-5 Control Box Assembly -- Free Blow
3.3.5 Air Sweep Switch Removal
To remove the air sweep switch, do the following:
a. Remove ceiling grill. (Refer to paragraph 3.3.2.)
b. Remove 5 screws securing the control assembly
(Item 2, Figure 1-3) to the control box cover.
c. Disconnect wires from the air sweep switch.
d. Pinchtabs on either end of theswitchandslide out of
lower control box cover.
e. Reverse above procedure for reassembly.
 Loading...