T--298
3-3
3.3.6 Indoor Thermostat Removal
To remove the indoor thermostat (Figure 3-6) do the
following:
a. Remove ceiling grille. (Refer to paragraph 3.3.2.)
b. Remove 5 screws securing the control assembly
(item 3, Figure 1-3) to the control box cover.
c. Remove the indoor thermostat knob by grabbing the
outside edge of the knob and pulling it off of the ther-
mostat stem.
d.Remove2screwsthatsecuretheindoorthermostatto
the lower control box cover .
e. Carefully disconnect the 2 wires from theindoorther-
mostat.
f. Remove the sensing bulb from the plastic clip.
g. Carefully slide the sensing bulb through the rubber
grommet.
h. Remove the thermostat from the control assembly.
i. Reverse above procedure for reassembly.
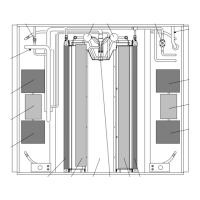
Thermostat
Sensing Bulb
Figure 3 -6 Indoor Thermostat
3.3.7 Air Sweep Removal
To remove the air sweep, do the following:
a. Remove ceiling grille. (Refer to paragraph 3.3.2.)
b. Remove cam (See Figure 3-3) from air sweep motor
shaft.
c. Remove 4 screws securing air sweep motor bracket
to the ceiling panel assembly.
d. Carefully disconnect air sweep motor wire termina-
tions.
e. Remove 2 screws securing air sweep motor
(Figure 3-7) to control box and remove motor.
f. Reverse above procedure for reassembly.
Air Sweep Motor
Figure 3 -7 Air sweep motor
3.3.8 Heat Strip Assembly Removal
To remove the heat strip assembly (Figure 3-8) do the
following:
a. Remove ceiling grille. (Refer to paragraph 3.3.2.)
b. Unplug electrical connection at air sweep motor as-
sembly.
c. Remove two screws securing heat strip assembly to
the ceiling panel assembly.
d. Slideheat strip assembly away from air sweepmotor
assembly and pull down, easing the the electrical
connection through the access hole.
e. Reverse the procedures for reassembly.
Heat Strip
Figure 3-8 Heat Strip Assembly
 Loading...