T--298
3-7
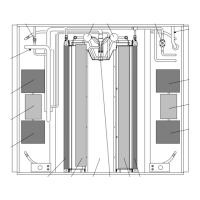
3.5.4 Upper Scroll Assembly Removal
a. Removeexterior coverassembly. Refer toparagraph
3.5.1.
b. Remove 4 screws securing upper scroll assembly to
the lower scroll assembly. (See Figure 3-18)
c. Gently pry 4 snap clips open and lift the upper scroll
assembly off of the lower scroll assembly.
d. Reverse above procedure for reassembly.
Screws
4 Places
Snap Clip
4 Places
Figure 3-18 Upper Scroll Assembly
3.5.5 Motor Assembly and Condenser Fan
Removal
a. Removeexterior coverassembly. Refer toparagraph
3.5.1.
b. Remove control box assembly. Refer to paragraph
3.5.3.
c. Remove upper scroll assembly. Refer to paragraph
3.5.4.
d. Remove 4 screws securing the condenser cover to
the condenser orifice. (See Figure 3-24.)
e. Carefully disconnect motor wire terminations from
within the control box.
f. Remove 1 screw securing the motor ground lead to
the motor bracket assembly. (See Figure 3-19)
g. Using flat--nosed pliers, depress the motor spring
clamp and slide it off of the condenser fan (See
Figure 3-20).
h. Liftandslidemotortowardsevaporatorcoil toremove
condenser fan from the motor shaft.
i. Remove condenser fan from motor shaft and lift fan
out through the top of the condenser orifice. (See
Figure 3-22)
j. Remove motor assembly.
k.Reverse above procedure for reassembly.
Motor Ground
Lead
Ground screw
Figure 3-19 Motor Assembly
Spring Clamp
Figure 3 -20 Spring Clamp Removal
Motor Clip
Figure 3 -21 Motor Clip Removal
 Loading...