HELPFUL HINTS
1) NO SOUND FROM AMP: The MUTE function has been inadvertently engaged, speakers
have been improperly connected or Effect Loop has been improperly connected.
2) NO HIGH FREQUENCIES: Tweeters or midrange drivers have been damaged from too
much power.
3) WEAK BASS: The speaker systems are wired out of phase to each other. To correct,
reverse the wires on one of the speaker connectors.
4) DIR XLR HUM: Try switching the rear GND LIFT switch IN or OUT. Check for noise from
external effects or bad cabling.
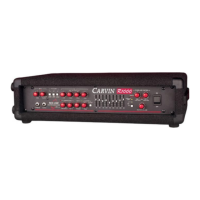
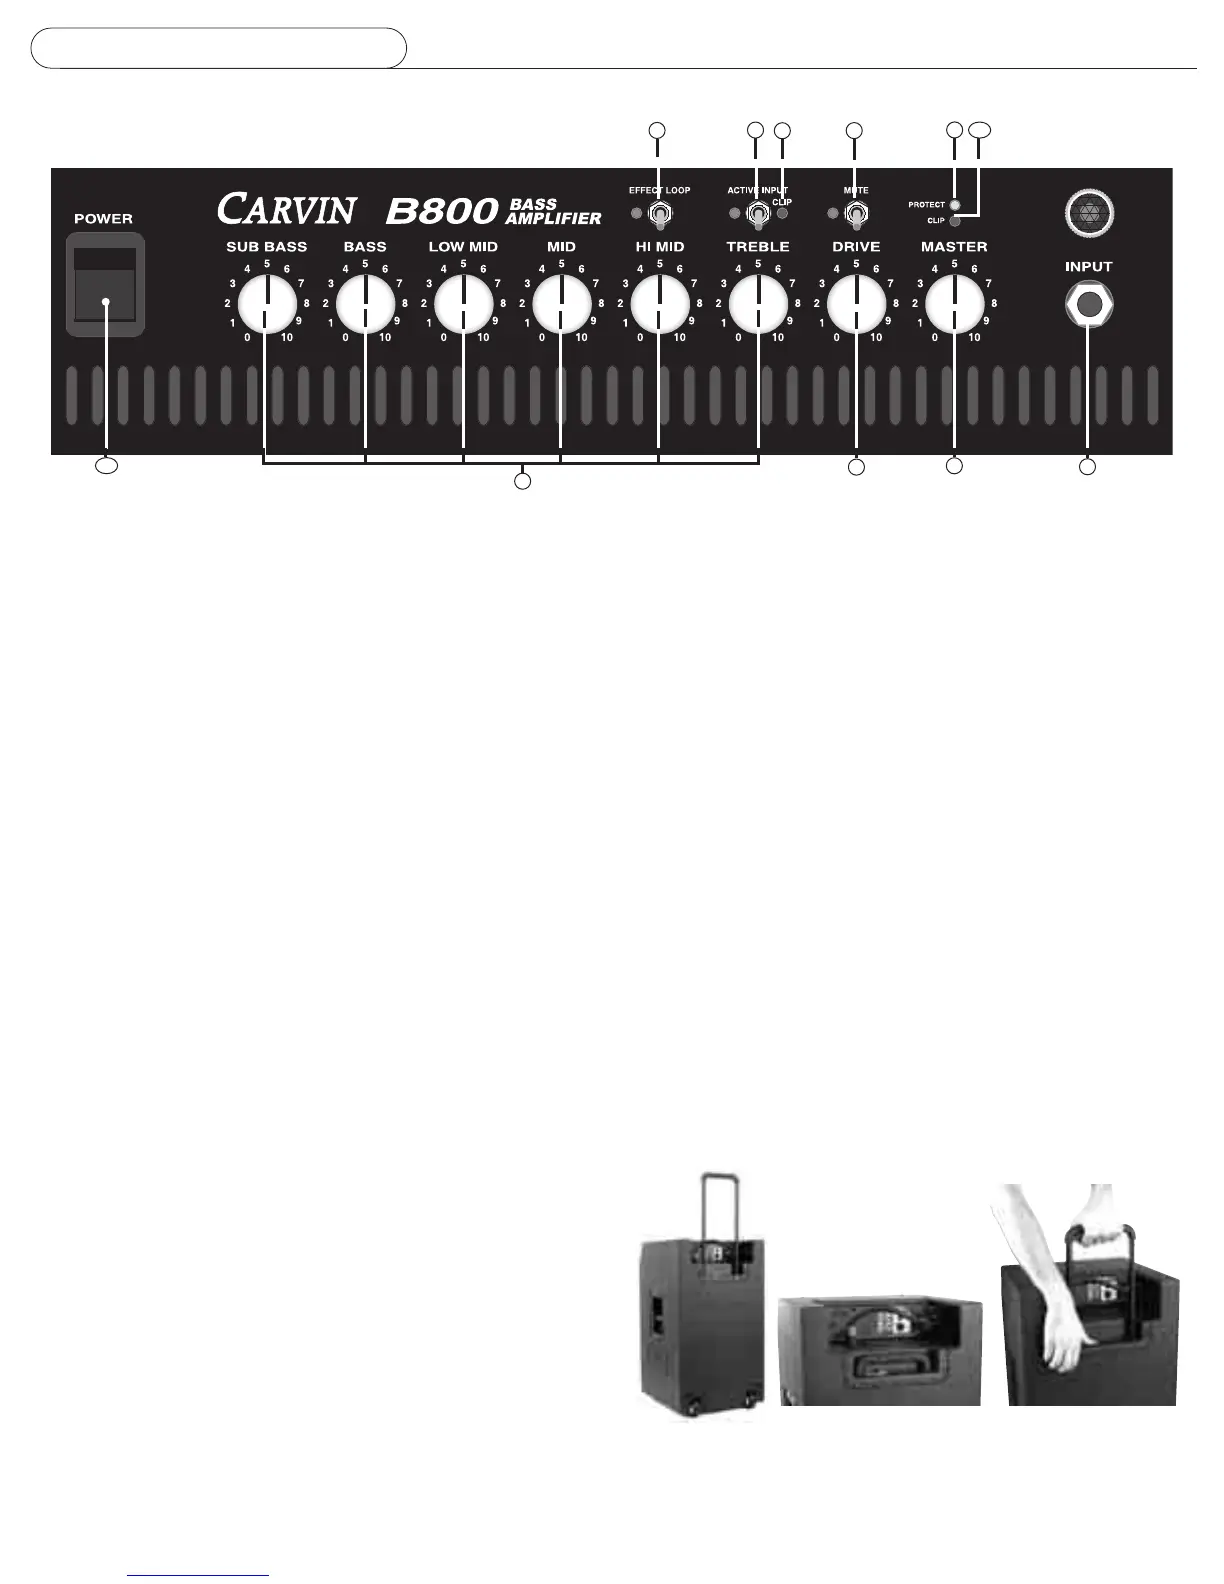
1. INPUT JACK
The 1/4” INPUT jack accommodates both passive and active instruments. The high
impedance
Class A
input stage offers enough headroom to perform without clipping even when
used with most active basses. Input gain is adjusted with the DRIVE control and the ACTIVE
INPUT switch.
2. VOLUME CONTROL
The VOLUME control adjusts the output level to the speakers. Adjusting the DRIVE control
can also change your speaker output level.
3. MUTE SWITCH AND LED
The MUTE switch will stop all output signals with the exception of the TUNER and EFFECT
SEND signals. The MUTE function can also be remotely controlled from the rear FOOTSWITCH
JACK using a Carvin FS-22 footswitch. The blue LED next to the MUTE switch will light
whenever the amp is muted. The footswitch will have no effect if the front panel MUTE switch
is in the UP position.
4. CLIP LED
The red CLIP LED indicates that the input is near clipping. Since the B800 preamp is designed
with several
Class A
input gain stages and the ability to be overdriven, the CLIP LED monitors
only the first input stage and will not indicate when the DRIVE control is set to overdrive the
preamp. The input stage offers enough headroom to perform without clipping even when used
with most active basses. To avoid input clipping, reduce the bass level or reduce the output
level of devices placed between the bass and the input jack.
5. ACTIVE INPUT SWITCH AND LED
The ACTIVE INPUT switch is used to match the input gain of the amp to instruments that
contain active electronics. If the preamp is being prematurely overdriven, flip the ACTIVE INPUT
switch to the ON position. If the output of your bass is low and you are not getting enough
volume from the speakers, be sure the ACTIVE INPUT switch is OFF and increase the DRIVE
control. The blue LED indicates ACTIVE INPUT mode is ON.
See also DRIVE control (#6).
6. DRIVE CONTROL
The DRIVE control adjusts the input gain to the preamp and the level of harmonics in the signal.
With the DRIVE control set low, both input gain and harmonics are at a minimum. Increasing
the DRIVE control causes the Class A gain stages to introduce more harmonics resulting in a
rich sound typical of vintage tube amps. With the DRIVE control set near maximum,
overdrive sounds can be produced. The DRIVE control can be used with the ACTIVE INPUT
switch to get the sound you want. To reduce preamp overdrive while retaining the harmonics
of a high DRIVE level setting, turn the ACTIVE INPUT switch ON or reduce the level on the bass
guitar. Turning the ACTIVE INPUT switch OFF will make preamp overdrive easier.
See also ACTIVE INPUT switch (#5).
7. TONE CONTROLS
The six TONE CONTROLS on the B800 are designed with the center frequencies most requested
by professional bass players. This EQ is very effective for getting the sounds you desire out
of each instrument.
8. EFFECT LOOP SWITCH AND LED
The EFFECT LOOP switch engages the rear effects loop connections. The effects loop can be
turned on with the EFFECT LOOP switch on the front panel or by using the optional FS22
footswitch. When the front panel switch is in the UP position, the loop is engaged regardless
of the footswitch. The status of the effects loop is indicated on the front panel by the BLUE
LED next to the EFFECT LOOP switch.
See also EFFECT LOOP SEND/RETURN jacks (#5).
9. AMP CLIP LED
The AMP CLIP LED indicates that the power amp is being driven too hard.
10. PROTECT LED
The PROTECT LED indicates that the power amp has gone into one of it’s protect modes.
11. POWER SWITCH / (PROTECT RESET)
Push the upper portion of the POWER SWITCH to turn the amplifier on. If the large blue power
indicator is on but no sound is coming out of the speakers, the amp may have gone into one
of its protection modes. To reset the amp, turn the power off for 30 seconds and then turn
the amp back on. If the problem persists, check for; a) The speaker impedance is too low for
the amp, b) bad speaker cable, c) damaged speaker or, d) blocked rear fan intake.
1
FRONT PANEL CONTROLS
2
3
4
5
6
7
8
9
10
11
rear view/built-in
casters
BRX212
rear view close-up
BRX212
handle release button
BRX212
 Loading...