Use the knob M to select the cutting current.
Art. 359:
With nozzle ø 1,2 and 45 to 60 A currents use the two
faces spacer Art. 1404.
Art 361:
use nozzle ø 1.2 up to 60 A and 1.4 from 60 to 100A.
With nozzle ø1.2, and without its protection, a contact
cutting can be made; the recommended voltage of 45 A
should not be exceeded to avoid damaging the nozzle
hole because this would produce a very poor quality cut.
With nozzle ø 1.4 and 60 to 100 A currents use the 2-
point spacer Art. 1701 or spring Art. 1620.
Make sure that the grounding clamp and workpiece have
a good electrical contact, especially with painted, oxidi-
zed or insulated sheet metal.
Do not connect the grounding clamp to the part of the
material that is to be removed.
Press the torch trigger to strike the pilot arc.
If cutting does not begin within 2 seconds, the pilot arc
goes out; press the trigger again to re-strike it.
Hold the torch upright while cutting.
When you have finished cutting and released the trigger,
air will continue to leave the torch for approximately 100
seconds to allow the torch to cool down.
It is best not to turn the machine off until this cool-
down period is complete.
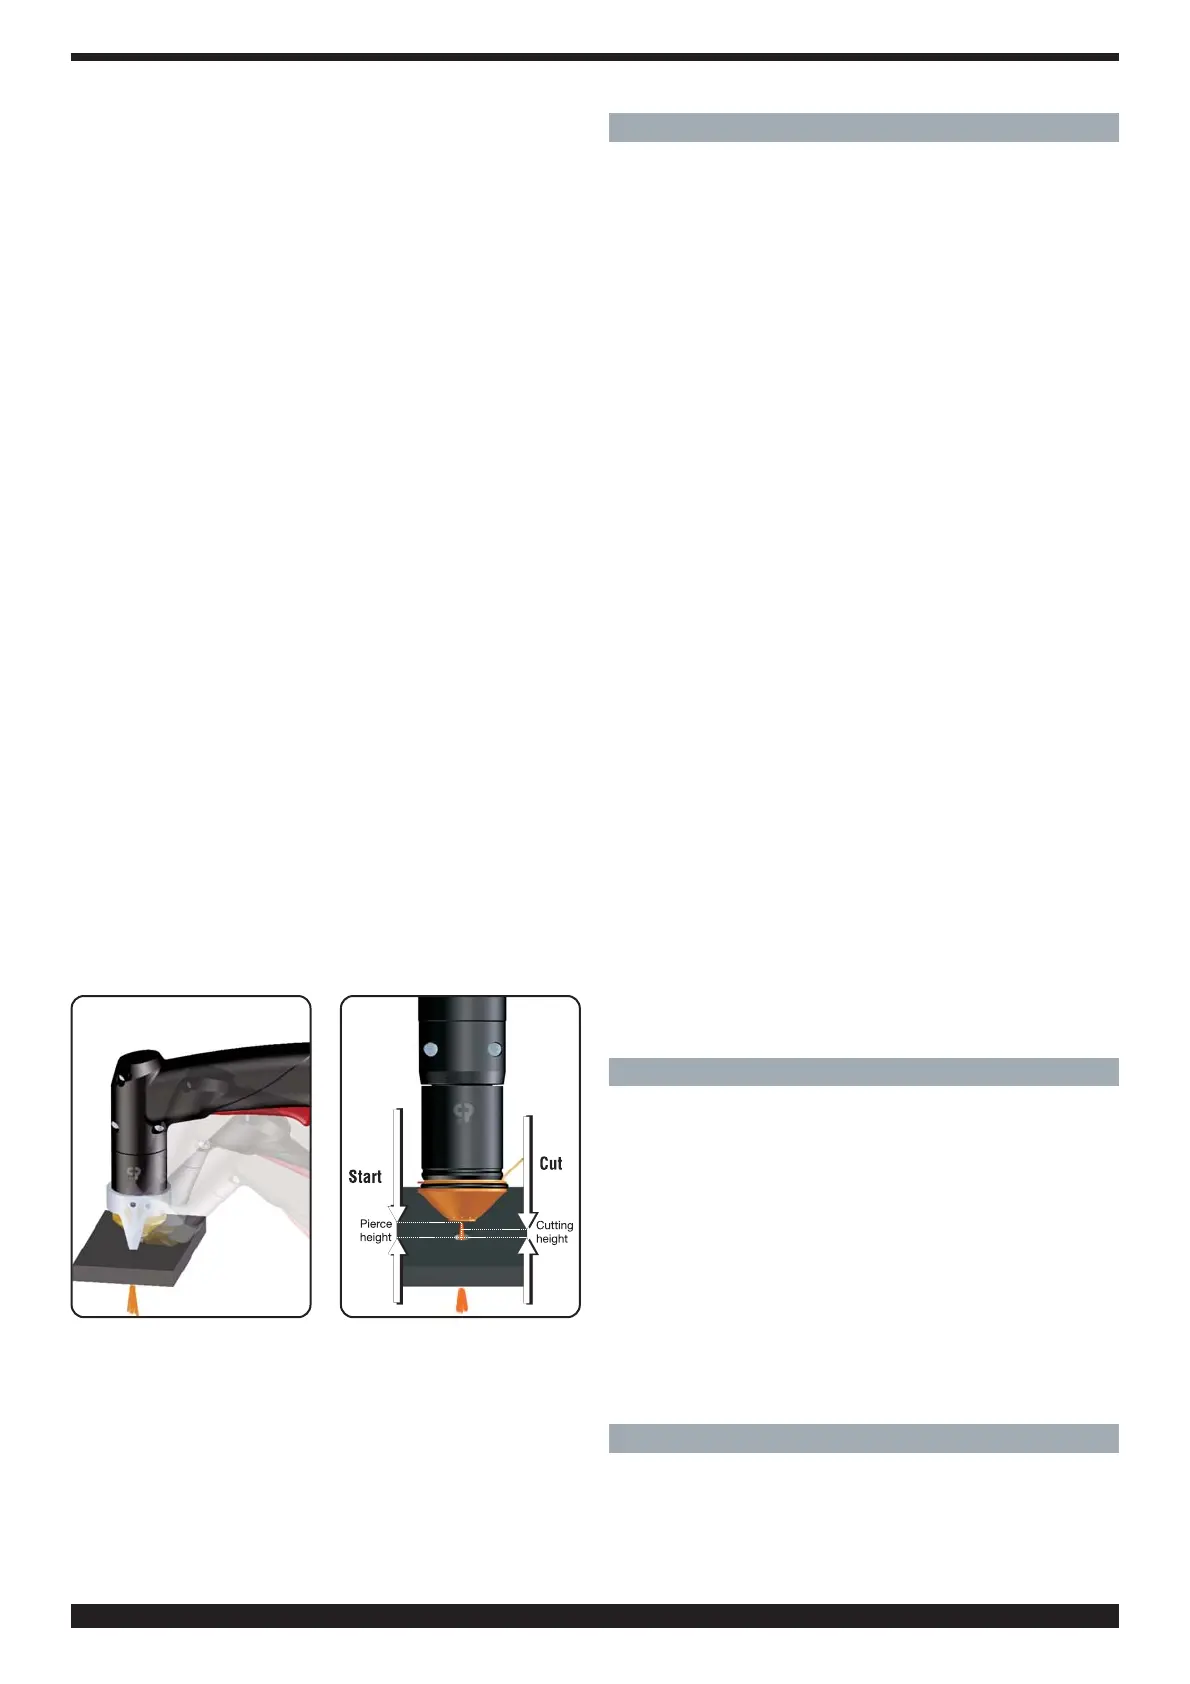
Should you need to make holes or begin cutting from the
center of the workpiece, you must hold the torch at an
angle and slowly straighten it so that the nozzle does not
spray molten metal (see fig. 2). This must be done when
making holes in pieces more than 3 mm thick.
In the automatic mode strictly follow the cutting tables.
When making circular cuts, we recommend using the
special compass available upon request. It is important to
remember that use of the compass may make it neces-
sary to use the starting technique described above (fig.2).
Do not keep the pilot arc lit in the air when not needed, to
avoid unnecessary consumption of the electrode, swirl
ring or nozzle.
Turn the machine off when the task is completed.
To cut perforated or grid metal, activate the "Pilot self
restart" function using the push-button T (LED U lit).
When you have finished cutting, holding this push-button
down will cause the pilot arc to restart automatically.
Use this function only if necessary to avoid unneces-
sary wear on the electrode and nozzle.
4 CUTTING ERRORS
4.1 INSUFFICIENT PENETRATION
This error may be caused by the following:
• high speed. Always make sure that the arc fully pene-
trates the workpiece and is never held at a forward angle
of more than 10 -15°. This will avoid incorrect consump-
tion of the nozzle and burns to the nozzle holder.
• Excessively thick workpiece.
• Grounding clamp not in good electrical contact with the
workpiece.
• Worn nozzle and electrode.
• Cutting current too low.
NOTE: When the arc does not penetrate, the molten
metal scraps obstruct the nozzle.
4.2 THE CUTTING ARC GOES OFF
This error may be caused by:
• worn nozzle, electrode or swirl ring
• air pressure too high
• supply voltage too low
4.3 SLANTED CUT
If the cut appears slanted, turn the machine off and repla-
ce the nozzle.
When the cutting current is above 45 A, prevent the nozz
le from coming into electrical contact with the workpiece
(even through scraps of molten metal), this condition cau-
ses rapid and at times instantaneous destruction of the
nozzle hole, leading to poor quality cutting.
4.4 EXCESSIVE WEAR ON CONSUMABLEE PARTS
This problem may be caused by:
a) air pressure too low compared to the recommended
level.
b) excessive burns on the end of the nozzle holder.
5 HELPFUL HINTS
• If the system air contains considerable amounts of moi-
sture and oil, it is best to use a drying filter to avoid
excessive oxidation and wear on consumer parts, dama-
ge to the torch and a reduction in the speed and quality
of the cutting.
• The impurities in the air encourage oxidation of the elec-
trode and nozzle, and may make it difficult to strike the
pilot arc. If this occurs, use fine sandpaper to clean the
end of the electrode and the interior of the nozzle.
• Make sure that the new electrode and nozzle to be
mounted are thoroughly clean and degreased.
• Always use original spare parts to avoid damaging
the torch.
6 MAINTENANCE
Always cut off the power supply to the machine befo-
re any operation, which must always be carried out by
qualified personnel.
fig. 2
fig. 3
10
 Loading...