- 3 -
HOW TO USE
Read and follow instructions and warnings prior to using this product.
1. Read all of the instructions below before using the Chard Grain Mill.
2. Keep the Grain Mill out of reach of children.
3. Never put your ngers or hands into the Grain Mill, as this may cause serious injury.
4. Eye protection should be worn while operating the Grain Mill.
Cleaning
1. Before using for the rst time, disassemble and thoroughly clean all parts with hot soapy water. Rinse
with hot water and towel dry thoroughly, do not allow any parts to air dry as this can lead to corrosion.
2. The Chard Grain Mill is not dishwasher safe, placing the product in the dishwasher will cause damage.
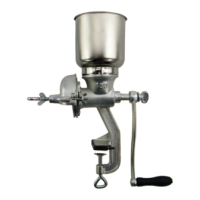
Assembly
1. Clamp the Grain Mill body (#9) to a sturdy bench or table with the rubber protective pad (#8) placed
between the body and bench or the table top.
2. Insert the auger (#5) and adjustable grinding plate (#6) into Grain Mill body (#9).
3. Install the shield (#3) with grinding plate pressure screw (#1) onto Grain Mill body (#9).
4. Align the rotating thumbscrews (#4) into the slots in the Grain Mill body (#9) and tighten securely.
5. Set adjustable grinding plate pressure screw (#1) and then tighten the locking wing nut (#2) against
the shield (#3).
6. Place the handle (#11) on end of auger post (#5) and secure using the thumbscrew (#12).
7. Install hopper (#10) on top of Grain Mill body (#9) and twist slightly to lock into place.
Milling Instructions
1. Fill hopper (#10) with product to be ground or milled.
2. Position a bowl under grinding plates to catch millings as it they are being ground.
3. Slowly turn the handle (#11) clockwise.
Adjusting the Coarseness of the grind: Loosen the wing nut (#2) and turn pressure screw (#1)
counter clockwise to produce a more course grind or clockwise to produce a ner grind. When the right
setting is adjusted, tighten the locking wing nut (#2) to securely set position.
TIP: Whatever is being milled or ground should be dry to prevent caking and ensure a consistent grind.
If the mill jams, turn the handle (#11) counter-clockwise to clear jam and then resume (do not use hands
to clear jam). For best results turn handle at a constant speed.
WARNING
Indicates a potentially hazardous situation which, if not avoided, could result in death or serious injury.
 Loading...