EN
0605
EN
Installation and connection
When not connected to AC power supply:
When connected to AC power supply:
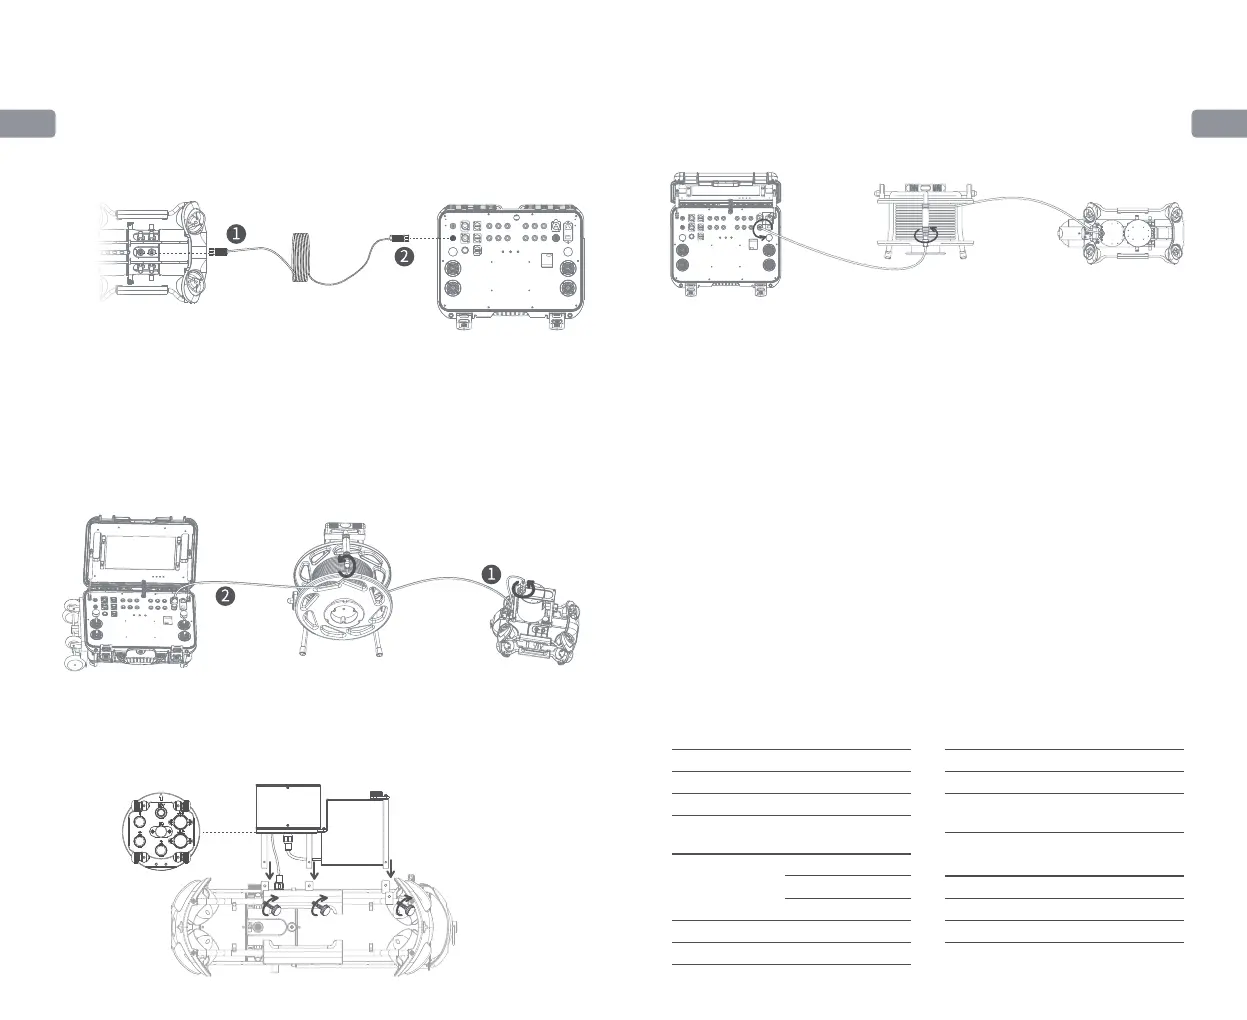
① Connect one side of the tether to the 4-pin port (next to the SD card slot) on the
upper part of the ROV module and tighten the fastening nuts. ② Connect the
opposite end of the tether to the standard port on the control console and tighten
the fastening nuts.
① Connect one side of the AC tether to the AC tether port on the upper part of the
AC power module. Connect the 4-pin cable on the lower part of the AC power
module to the 4-pin port on the ROV, and then tighten the fastening nuts.
② Connect the opposite end of the AC tether to the port 21 for AC power supply
output on the control console and tighten the fastening nuts to complete the
connection.
① Connect the 4-pin cable on the lower part of the AC power module to the “RC”
port in the middle of the docking station. Use the tether to connect the “ROV” port
on the upper part of the docking station and the 4-pin port on the ROV, and then
tighten the fastening nuts.
(I) When the ROV is not docked
(II) When the ROV is docked
② Connect one side of the AC tether into the AC tether port on the upper part of the
AC power module. Then connect the other side of the AC tether to the port
21 for AC power supply output on the control console, and tighten the fastening
nuts to complete the connection.
·
Not using AC power supply
Power ON
Long press the power switch ① in the upper left corner of the control console
panel for one second, then the ROV will power on with a self-test sound, while
the control console’s touch screen lights up, wait until the touch screen is fully
activated, find the CHASING GO1 App, click it to enter the App control interface,
then you can get the real-time image and control the ROV.
· Using AC power supply
Press the power button 23 to “I” status to power on, then follows the steps
3.1 “Not using AC power supply”.When using the AC power feature, you should
enable the AC power option in the ROV App settings after connecting the ROV to
the App.
*Note: For AC power supply system installation and operations, see the User
Manual and tutorial of the AC power supply system on the website.
Specifications
SIZE
WEIGHT
OPERATING TEMP
Control Console Screen
484×375×178mm
11 Kg
-10℃~45℃
SIZE
RESOLUTION
DISPLAY
BRIGHTNESS
13.3 Inch
1920×1080
1000 cd/㎡
INTERFACE
AC INPUT
AC OUTPUT
Interface
Battery
RJ45 × 2
USB 2.0 Host × 2
QC 3.0 USB ×1
200 V ~ 240 V
200 V ~ 240 V
RUNTIME
BATTERY
CHARGE TIME
8 hours maximum
226.8Wh
8A charger: 2.5 hours
 Loading...