P.7
LOCKLOCK
OFF-SETOFF-SET
TIME SETTIME SET
CALENDARCALENDAR
ZONE/DSTZONE/DST
ONONOFFOFF
AL.SETAL.SET
Fig.15 To change display units C / F
MODE switch
at LOCK position
C / F button
Press the third from the left YEAR button until the correct year is displayed.
Slide the bottom left button back to the LOCK position.
- To Select Celsius or Fahrenheit ( C / F)
LOCKLOCK
OFF-SETOFF-SET
TIME SETTIME SET
CALENDARCALENDAR
ZONE/DSTZONE/DST
ONONOFFOFF
AL.SETAL.SET
MODE switch
at CALENDAR position
Set day
Set year
Set month
Fig.14. Calendar set
After setting is done, put Mode switch back to LOCK position
The thermometer display reading can be changed to read the temperature, either
Celsius ( C) or Fahrenheit ( F ). With the bottom left button in the LOCK
position, press the C/ F select button once, (top left button). This will switch
the display to read one or the other.
Press the second from the left DAY button until the correct day is displayed.
- To Set Month, Day and Year.
Slide bottom left button from the LOCK position(one notch) to the CALENDAR
position.
Press the upper left MONTH button until the correct month is displayed on the
front of the clock.
- To Set Daylight Saving/Standard Time
The clock will automatically adjust itself between Daylight Saving/Standard
Time, when needed. To adjust manually, simply set the clock to the correct time.
LOCKLOCK
OFF-SETOFF-SET
TIME SETTIME SET
CALENDARCALENDAR
ZONE/DSTZONE/DST
ONONOFFOFF
AL.SETAL.SET
MODE switch
at Zone/DST
Time zone
select
Daylight saving/standard time change
Time zone
Indicator on/off
Fig.13. Time zone/daylight saving standard time select
After setting is done, put Mode switch back to LOCK position
- To Manually Set the Clock
Slide the bottom left switch from the LOCK position to TIME SET position.
Press the second from the left button until the desired hour is shown.
Press the third from the left button until the desired minute is shown.
Make sure to set the time correctly to AM or PM. If using the 24 hour clock function
(also referred to sometimes as the military time ), follow the next step below.
- To Switch between 12HR 24HR Display
The 24 hour clock function (also referred to sometimes as the military time ).
To switch between the 12 hour, (AM/PM) and 24 hour modes, set the bottom left
switch to TIME SET position and press the upper left button to select the display
to the 12 or 24 hour desired setting. When finished, please make sure to slide
back the bottom left switch, back to the LOCK position.
P.6
The clock can be forced to attempt to synchronize at any time. With the bottom
left switch in the LOCK position, press in the second button from the left,
in the top row. Synchronization may not be immediate, so please allow some
time for the clock to "synch".
D) Manual Setting
If you are out of the receiving range of the radio control signal, or if you prefer,
the clock can be manually set. Once it is manually set the clock will attempt to
synchronize for few days. If all attempts fail, the receiver circuit is put into the
sleep mode to conserve power. The clock then functions as a quartz clock until
Forced Synchronization is attempted. (See C above).
C) Setting the Time and Date Using Forced Synchronization
LOCKLOCK
OFF-SETOFF-SET
TIME SETTIME SET
CALENDARCALENDAR
ZONE/DSTZONE/DST
ONONOFFOFF
AL.SETAL.SET
MODE switch
at LOCK position
Fig. 11. Forced Synchronization
RCC activation button
LOCKLOCK
OFF-SETOFF-SET
TIME SETTIME SET
CALENDARCALENDAR
ZONE/DSTZONE/DST
ONONOFFOFF
AL.SETAL.SET
MODE switch
at TIME SET position
Select 12 or 24 hour
display
Set hour
Set minute
Fig.12.12-24 Hour display select and time set
After setting is done, put Mode switch back to LOCK position
P.5
If unable to synchronize, it will attempt synchronization at the beginning of
each hour, for the first 24 hours. If an attempt is successful, the clock will enter
normal daily auto synchronization mode.
B) Setting the Time Zone
The clock as a default will set itself on Mountain Time. If this is not where you
are located, set the clock to your Time Zone following the instructions listed
below:
If at any time it is necessary to manually set the clock, you can do so, by pressing
the snooze button and following the Manual Setting Instructions .
Fig.10 Set time Zone/DST
LOCKLOCK
OFF-SETOFF-SET
TIME SETTIME SET
CALENDARCALENDAR
ZONE/DSTZONE/DST
ONONOFFOFF
AL.SETAL.SET
Zone button
MODE switch
at Zone/DST position
DST button
Slide bottom left button, from the LOCK position (one notch) to the ZONE/DST
position.
Press the upper left ZONE button until the correct time zone you are in is
displayed on the front of the clock.
Slide the bottom left button back to the LOCK position.
Keep the clock away from TV's,phones,computers or other electrical appliances,
which may interfere with the signal. Buildings with heavy steel construction or
below ground locations,may not receive adequate signal strength to synchronize.
A properly synchronized clock shows the antenna tower blinking on the display,
with a radiating beacon.
*POINT of INTEREST
After setting is done, put Mode switch back to LOCK position
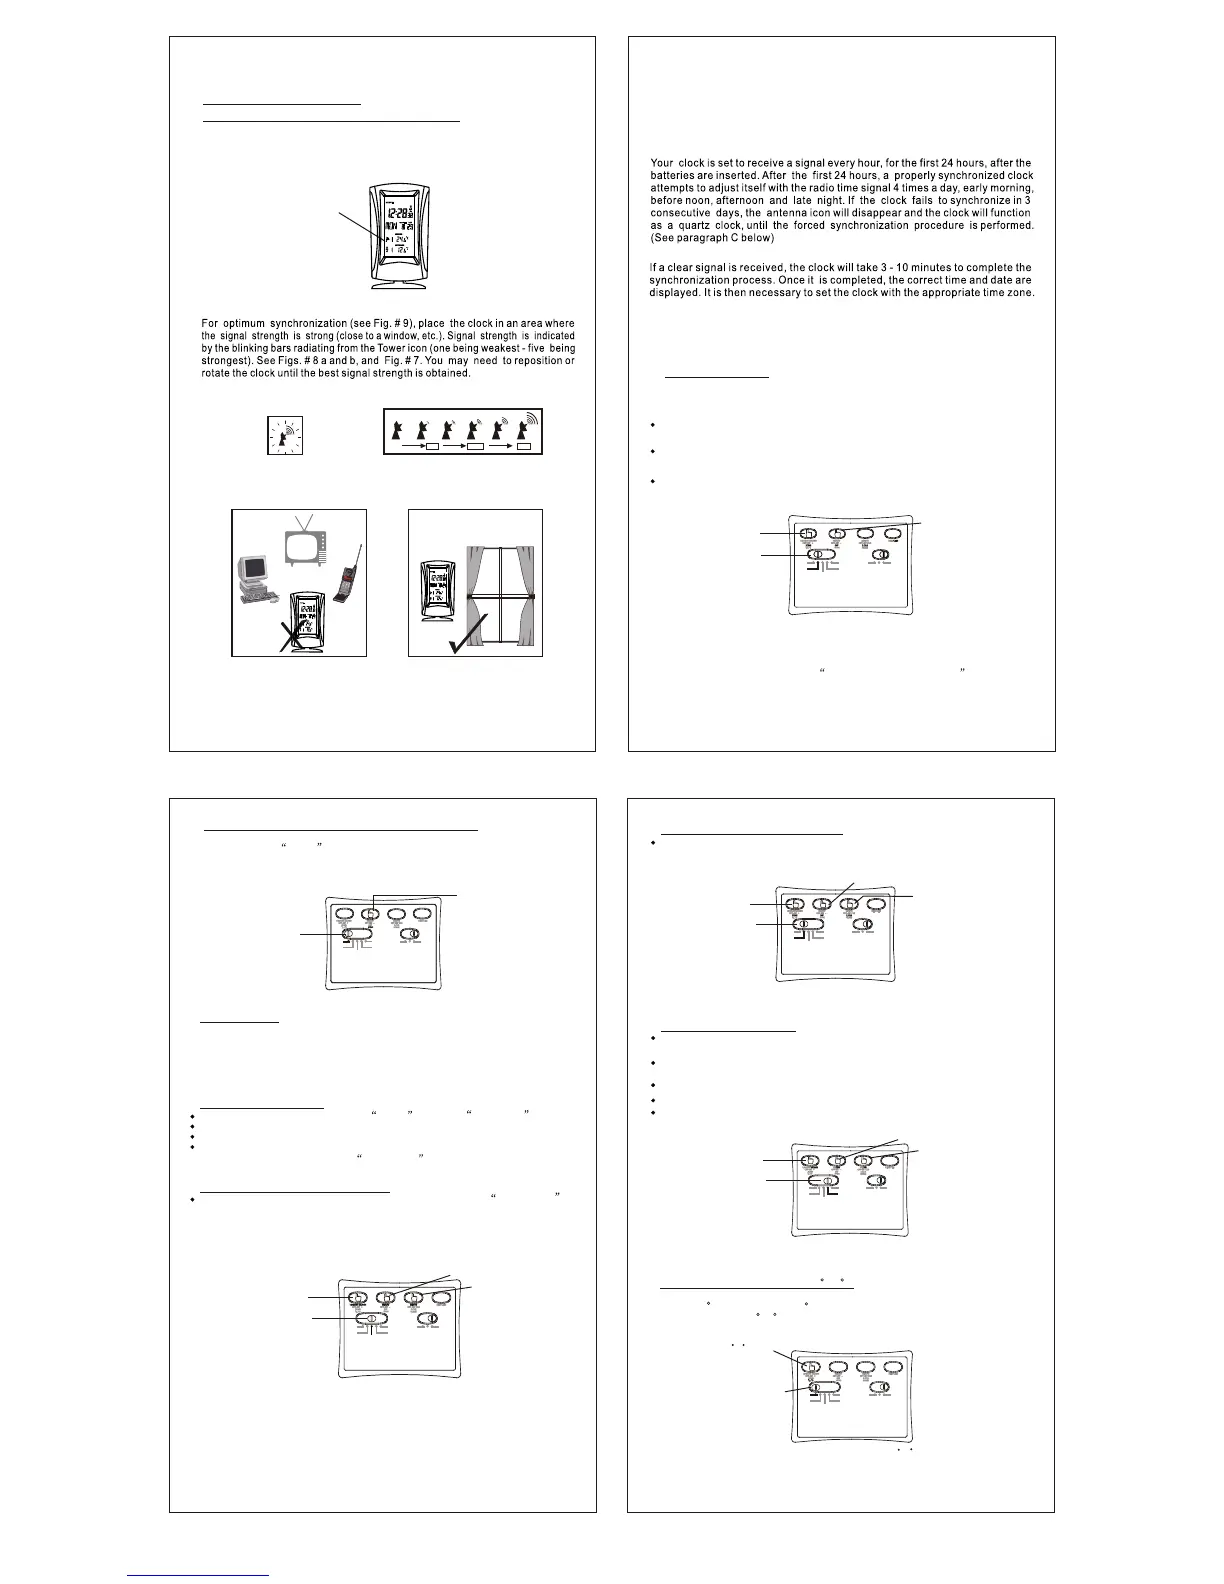
For the best visual quality on the display screen, avoid locations where there is a
strong glare or reflection on the display lens.
2. SETTING THE TIME AND DATE
A) Setting the Time and Date Through Synchronization
After the batteries are installed the clock will automatically enter the synchronization
mode. This is indicated by the radiating Tower symbol, blinking on the display.
At this point, DO NOT press any buttons, as this may disturb the synchronization
process.
Fig. 8b Synchronization & radio
signal strength indication
Very
Weak / No
Weak
Medium
Strong
Fig. 8a Blinking antenna Icon
(clock attempting to synchronize)
Signal
Strength
Fig.9 How to position the clock for the best signal reception
113434
6868 3535
113434
6868 3535
Fig.7 Example of synchronized clock
Radiating
beacon
symbol
113434
6868 3535
P.4
 Loading...