12
• Use the baby carrier only when
standing or walking.
• Keep in mind that the child
transported in the baby carrier
will react to any climate changes
differently to the person carrying
the child before.
• Before use, check that the straps are
fitted and adjusted correctly, and
that the buckles are safely fastened
into position.
• Do not place more than one child
at a time in the baby carrier.
• Always ensure that the child has
sufficient space around their face
to breath properly.
• Do not use the baby carrier if any
parts are damaged, torn or missing.
• Do not t to the baby carrier
any accessories, spare parts or
components not supplied or
approved by the manufacturer.
• This baby carrier must only be used
by an adult.
• Do not use the baby carrier to
transport the child in the car.
• Do not use the baby carrier while
driving or on a motorcycle.
• Do not use the baby carrier while
cooking or cleaning to avoid
exposure to sources of heat or
chemicals.
PARENT FACING USE AND USE
ON SIDE
• WARNING: Take care when bending
or leaning forward or sideways.
Ensure that you are holding your
child safely in your arms.
• It is recommended that you place
and remove the child from the
baby carrier while sitting.
THIRD POSITION (ON THE
PARENT'S BACK)
• Do not carry children less than 6
months on your back or who are not
able to sit up alone.
• Regularly check that the child is
comfortable and safe, especially if
carried on your back.
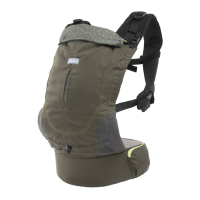
BABY CARRIER COMPONENTS (Figure SIDE A and g.
SIDE B)
A. Baby carrier backrest
B. Shoulder straps
C. Baby carrier seat
D. Baby carrier reducer cushion buttons (if included)
E. Padded saddle
F. Belly belt adjusting strap
G. Buckle with belly belt adjusting strap
H. Buckle fastening elastic
I. Holes and snaps to adjust the padded saddle
J. Buckles with shoulder adjusting strap
K. Breastbone/scapular buckle with elastic strap
L. Holes for fastening reducer cushion (if included)
M. Self-adjusting bellows
TIPS FOR CLEANING AND MAINTENANCE
CLEANING
Please refer to the care label. After each washing check that
the fabric and seams are not worn or damaged.
Hand wash
Do not bleach
Do not tumble dry
Do not iron
Do not dry clean
MAINTENANCE
Check the seams and baby carrier regularly to ensure that
they are not worn or damaged and that no part is missing. If
any part is worn or missing, do not use the product.
FRONT TRANSPORT - PARENT FACING
WARNING: Always fit the baby carrier onto your shoulders
before putting your child in.
HOW TO WEAR THE BABY CARRIER
1. Fasten the belly belt F (Figure 1A) and adjust the width
acting on buckle G (Figure 1B).
WARNING: Fasten the buckle by passing it inside the
elastic H (Figure 1C).
2. Fasten both straps by acting on the buckles J (Figure 2).
HOW TO PLACE THE CHILD INSIDE THE BABY CARRIER
WARNING: We recommend carrying out placing the child
into the baby carrier when seated or using a flat, level
surface so that you are able to control sudden movements
of the child.
WARNING: Hold your child safely while carrying out this
operation.
WARNING: Before fitting the child in the baby carrier, make
sure that you have completed the previous steps correctly.
3. Lie the child on the seat (Figure 3A) and fasten the padded
saddle using the appropriate buttons F, and adjust to the
position best suited to the child's body, so that the same
is never too broad nor too narrow (Figure 3B).
4. Put on the baby carrier starting from the shoulder straps B
(fig. 4A), then fasten and adjust the breastbone/scapular
buckle (Figure 4B) and complete putting the baby
carrier on by adjusting the shoulder straps (Figure 4C).
The excess length of strap can be shortened by rolling
it and fastening through the relevant elastic (Figure 4D).
As an alternative, it is possible to fasten the breastbone/
shoulder buckle before putting on the shoulder straps
(g. 4E) and then put on the shoulder straps making the
breastbone/shoulder buckle pass behind your head (fig.
4F) and then adjust it.
WARNING: Make sure that the child's legs are astride the
seat and inserted inside the padded saddle.
HOW TO REMOVE THE CHILD FROM THE BABY
CARRIER
WARNING: it is a good idea to sit down to remove your the
child from the baby carrier.
5. While supporting the child securely, fasten the
breastbone/scapular buckle K (Figure 5A), remove
the shoulder straps B (fig. 5B) and open the buttons of
the padded saddle from the slots (Figure 5C) before
removing the child. Open the belly buckle only once this
step is completed.
SIDE - HIP TRANSPORT
When the child is approximately of six months of age, they
should be able to keep both head straight and shoulders
in a vertical position, and can be carried on the side - hip.
The baby carrier can be positioned either on the parent’s
right or left side as they prefer.
The procedure for carrying the child on the right side is
illustrated below. Repeat the same steps in mirror-like
manner for the left side.
WARNING: Always fit the baby carrier onto your shoulders
before putting your child in.
HOW TO WEAR THE BABY CARRIER
6. Fasten the belly belt F (Figure 1A) and adjust the width
acting on buckle G (Figure 1B).
WARNING: Fasten the buckle by passing it inside the
elastic H (Figure 1C).
Turn the belly strap by positing the seat on the right side
(Figure 6).
7. Fasten the padded saddle by fastening the left button
(Figure 7) in the relevant hole leaving the other side free
to fit the child later on.
8. Fasten the left shoulder strap with the buckle of the right
strap (Figure 8A), crossing it. Pass your head through the
ring (Figure 8B) so that, once in final position, it rests on
the left shoulder (Figure 8C).

 Loading...