safety harness is correctly fastened.
• WARNING: To avoid burns and
the risk of open res, do not place
the highchair near electrical devic-
es, gas cookers or other sources
of heat. Keep the highchair away
from electrical cables.
• Do not place the highchair near
windows or walls, where strings,
curtains or other objects may be
used by the child to climb out of
the highchair or causing chocking
or strangling hazards.
• Do not place the highchair near
windows or walls, to prevent the
child from affecting the stability
of the highchair, making it top-
ple over, by pushing with its feet
against the wall.
• If the highchair is exposed to direct
sunlight for a long time, allow it
to cool down before placing your
child in it.
• Do not leave the highchair ex-
posed to sun for a long time: it may
change the colour of the materials
and fabric.
• WARNING: When not in use, the
highchair must be kept out of the
reach of children.
• WARNING! When not in use, keep
the tray out of the reach of children.
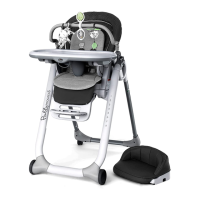
COMPONENTS
A. Seat
B. Backrest rear adjustment button
C. Side joint
D. Highchair opening/closing button
E. Seat height adjustment button
F. Armrest
G. Table and toybar adjustment holes
G1.Armrest adjustment button
H. Legrest
I. Legrest adjustment button
K. Cover with double padding
L. Safety harness
M. Snap hooks
N. Buckle
O. Safety harness forks
P. Fabric crotch strap
Q. D-rings
R. Tray
S. Tray insertion guides
T. Tray fastening button
U. Rigid crotch strap
V. Tray cover
W. Footrest
X. Front legs
Y. Front leg hook pins
Z. Turns
AA. Rear legs
BB. Booster cushion
CC. Toybar
DD. Basket
TIPS FOR CLEANING AND MAINTENANCE
The cleaning and maintenance operations shall only be carried out
by an adult.
CLEANING
Clean the fabric cover with a soft cloth soaked in water or a neutral
detergent. To remove the fabric cover from the highchair repeat the
operations, in reverse order, described to fix the fabric cover to the
structure.
Clean the plastic parts with a soft cloth soaked in water. Never use
abrasive detergents or solvents.
In case of contact with water, dry the metal parts to prevent rust
from forming.
MAINTENANCE
Keep the highchair in a dry place.
To avoid friction that may compromise the correct function of the
highchair, ensure that all the moving plastic parts located along the
metal frame are free from dust, dirt or sand.
If necessary, lubricate the moving parts with dry silicone
lubricant.
BOOSTER CUSHION
The booster cushion is made out of washable material; for fabric
care, read the washing instructions carefully:
Wash by hand in cold water
Do not bleach
Do not tumble dry
Do not iron
Do not dry clean
WARNING: Check that the fabric and stitching are in good condi-
tion each time you wash it.
WARNING: Prolonged exposure to direct sunlight can cause the
fabric to fade.
Outer cover: 100% polyester
Padding: 100% polyester.
HIGHCHAIR ASSEMBLY/OPENING
WARNING: when performing this operation, ensure that your child,
or other children, are at a safe distance. Make sure that during these
operations the movable parts of the highchair do not come into
contact with your child.
1. Fasten the legs to the highchair structure as shown in Figure 1.
WARNING: The front and rear leg connections are shaped different-
ly in order to prevent assembly mistakes.
Rear legs: keeping the two hook pins located at the end of the legs
pressed, insert the legs into the structure. The parts are correctly fas-
tened only when the two pins exit from the holes in the structure
and you hear the fastening clicks.
Front legs: keeping the two hook pins located at the base of the
structure pressed, insert the legs. The parts are correctly fastened
only when the two pins exit from the holes in the legs and you hear
the fastening clicks (Fig. 1A).
2. Stand behind the highchair and, gripping the two side joints,
press the opening/closing buttons (Fig. 2).
At the same time, and using your foot as an aid, widen the legs of
the highchair until you hear a click indicating that it is locked in an
open position (Fig. 2A).
3. Lift the seat: holding the backrest at the top, pull it upwards to the
desired height (Fig. 3). The highchair can be adjusted to 6 height
positions.
4. Use the adjustment buttons (Fig. 4) located on the side to rotate
the legrest to the open position (Fig. 5).
5. Lower the armrests by pressing the two buttons located below
them (Fig. 6).
WARNING: The armrests must always be kept in a horizontal posi-
tion. The armrests can only be put in a vertical position when clos-
ing the highchair.
6. Fasten the covers to the highchair structure:
COVERS
A. Place the cover on the highchair structure by inserting the safety
harness and the “D” rings through the relative openings (Fig. 7A).
B. Insert the upper padding on the highchair structure, inserting the
safety harness and the D” rings through the relative openings.
C. If you intend to use it in the reclined cradle position with smaller
children, the ergonomic soft reducer cushion can be fit on the seat,
passing the fastening belts through the provided holes (Fig. 7B).
D. Pass the waist strap through the “D” rings, pass the crotch strap
through the provided slot and insert the forks into the buckle
(Fig. 7C).
E. Fasten the snap hooks (Fig. 7D).
The highchair covers are padded, removable and washable.
To remove the fabric cover from the highchair repeat the opera-
tions, in reverse order, described to fix the fabric cover to the struc-
ture. The operations performed for the upper padding must also be
performed for the lower padding.
WARNING: Never use the highchair with only the upper cover or
with the paddings placed on the structure in the reverse direction.
7. Insert the footrest and turn it until it reaches its position of use,
then lock it (Fig. 8). The footrest can be adjusted to 3 positions.
You can now put your child in the highchair:
8. Fasten the crotch strap on the tray (Fig. 9).
9. WARNING: IMPORTANT FOR THE CHILD'S SAFETY - never place
the tray on the highchair without first fastening the rigid crotch
strap to it. Once fastened, it must never be removed.
The tray is now ready to be positioned on the highchair.
SAFETY HARNESS
The highchair has a 5-point safety harness
WARNING: The use of the safety harness and fabric crotch strap is
necessary to guarantee the safety of your child.
WARNING: the activity tray alone does not guarantee the safety of
your child. Always use the safety harness!
10. Release the safety harness (Fig. 10).
11. Put your child in the highchair and secure your child with the
harness (Fig. 11).
The safety harness can be adjusted to two height positions.
TRAY POSITIONING/ADJUSTMENT
The activity tray can be adjusted to 4 positions.
12. Pick up the tray (Fig. 12).
13. Insert the armrests in the guides below the tray, keeping the side
fastening buttons pressed at the same time (Fig.13).
14. Move the tray to the desired position and release the button. If
the tray is not automatically locked on the armrests, move the
tray until a click is heard, indicating that the tray is locked.
WARNING: Before use, always make sure that the tray is correctly
fastened on the armrests.
WARNING: The tray may only be adjusted to the 4 indicated po-
sitions .
WARNING: Never leave the tray fitted in a position in which the
danger signs are visible on the armrests: It is NOT safe!
15. To remove the tray, press the buttons located on its side. When
the tray is not in use, it can be fastened behind the structure.
(Fig. 14).
16. The highchair is equipped with a tray cover. It is fastened to and
removed from the tray by means of a pressure mechanism (Fig. 15).
 Loading...

