55
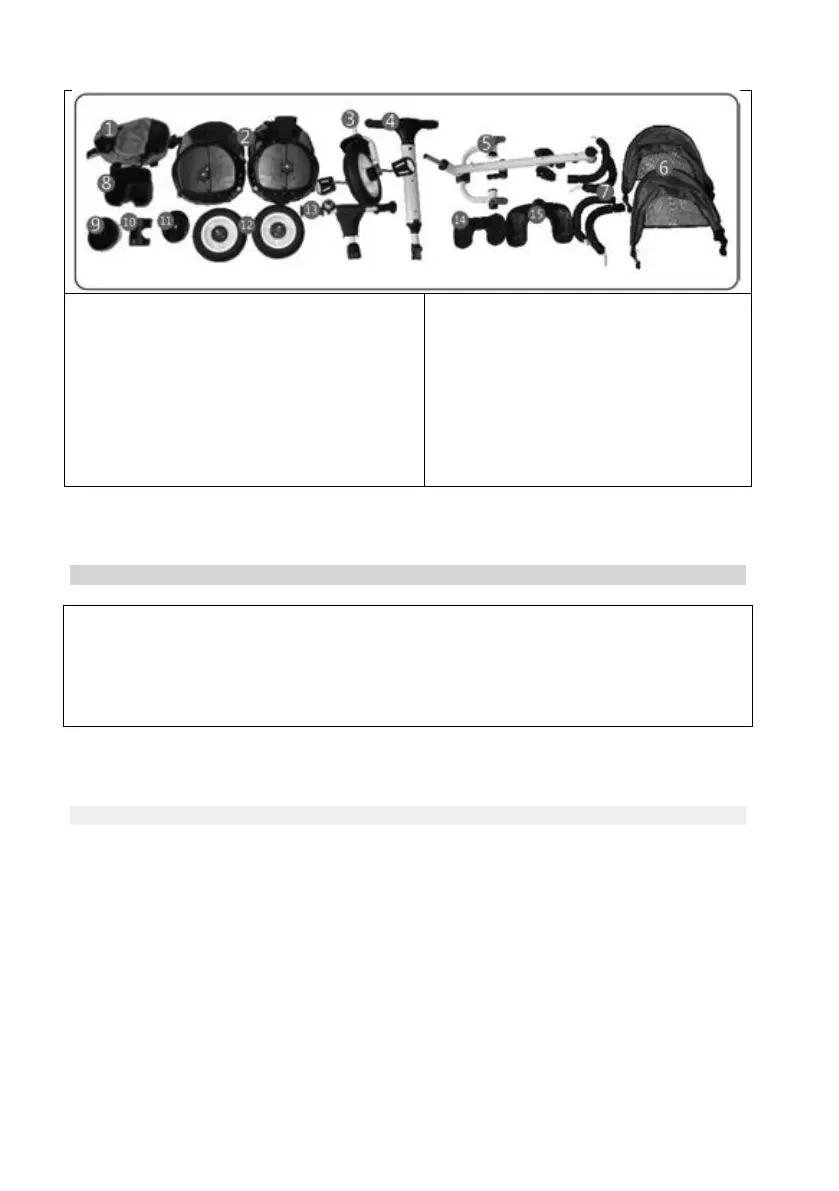
2- Set seat and backrest – 2 pcs
3- Front wheel – 1 pc
4- Push handle – 1 pc
5- Frame – 1 pc
6- Canopy set – 2 pcs
7- Front bumper set(2 parts) – 2 pcs
8- Front basket set – 1 pc
10- Ccup holder – 1 pc
11- Seat base – 1 pc
12- Rear wheel set – 2 pcs
13- Handlebar – 1 pc
14- Footrest – 1 pc
15- Fixed footrest – 1 pc
Please, make sure if these parts are in the package.
Note: Some of the parts may be pre-installed by the manufacturer.
ASSEMBLY INSTRUCTIONS
IMPORTANT! Follow exactly the instructions given and check the pictures. Keep your hands from
entrapment!
IMPORTANT! After each operation, make sure that you have followed the instructions correctly and the
fixing is stable!
CAUTION! The screws must be well ghtened so they will not become loose. If they are loose, this
may lead to dismantling of the tricycle and injury for the child.
No tools are needed for the assembly and installaon of the tricycle.
ASSEMBLY
1 - FRAME UNFOLDING.
2 - REAR WHEELS ASSEMBLY.
3 – FRONT WHEEL ASSEMBLY TO THE FRONT TUBE OF FRAME.
4 – FRONT BASKET ASSEMBLY
5 – HANDLEBAR ASSEMBLY
To remove the handlebar, press the release buon and pull out the handlebar.
6 – FIXED FOOTREST ASSEMBLY
7 – ASSEMBLY OF SEAT BASE
8 – ASSEMBLY OF SEAT TO THE FRAME
Insert the seats’ rods in the corresponding frame openings.
9 – FIXING THE SET TO THE FRAME (with plasc washer)
10 and 11 – FRONT BUMPER ASSEMBLY
12 – CANOPY ASSEMBLY
To remove canopy, pull out its two arms from the seat corresponding grooves.
 Loading...