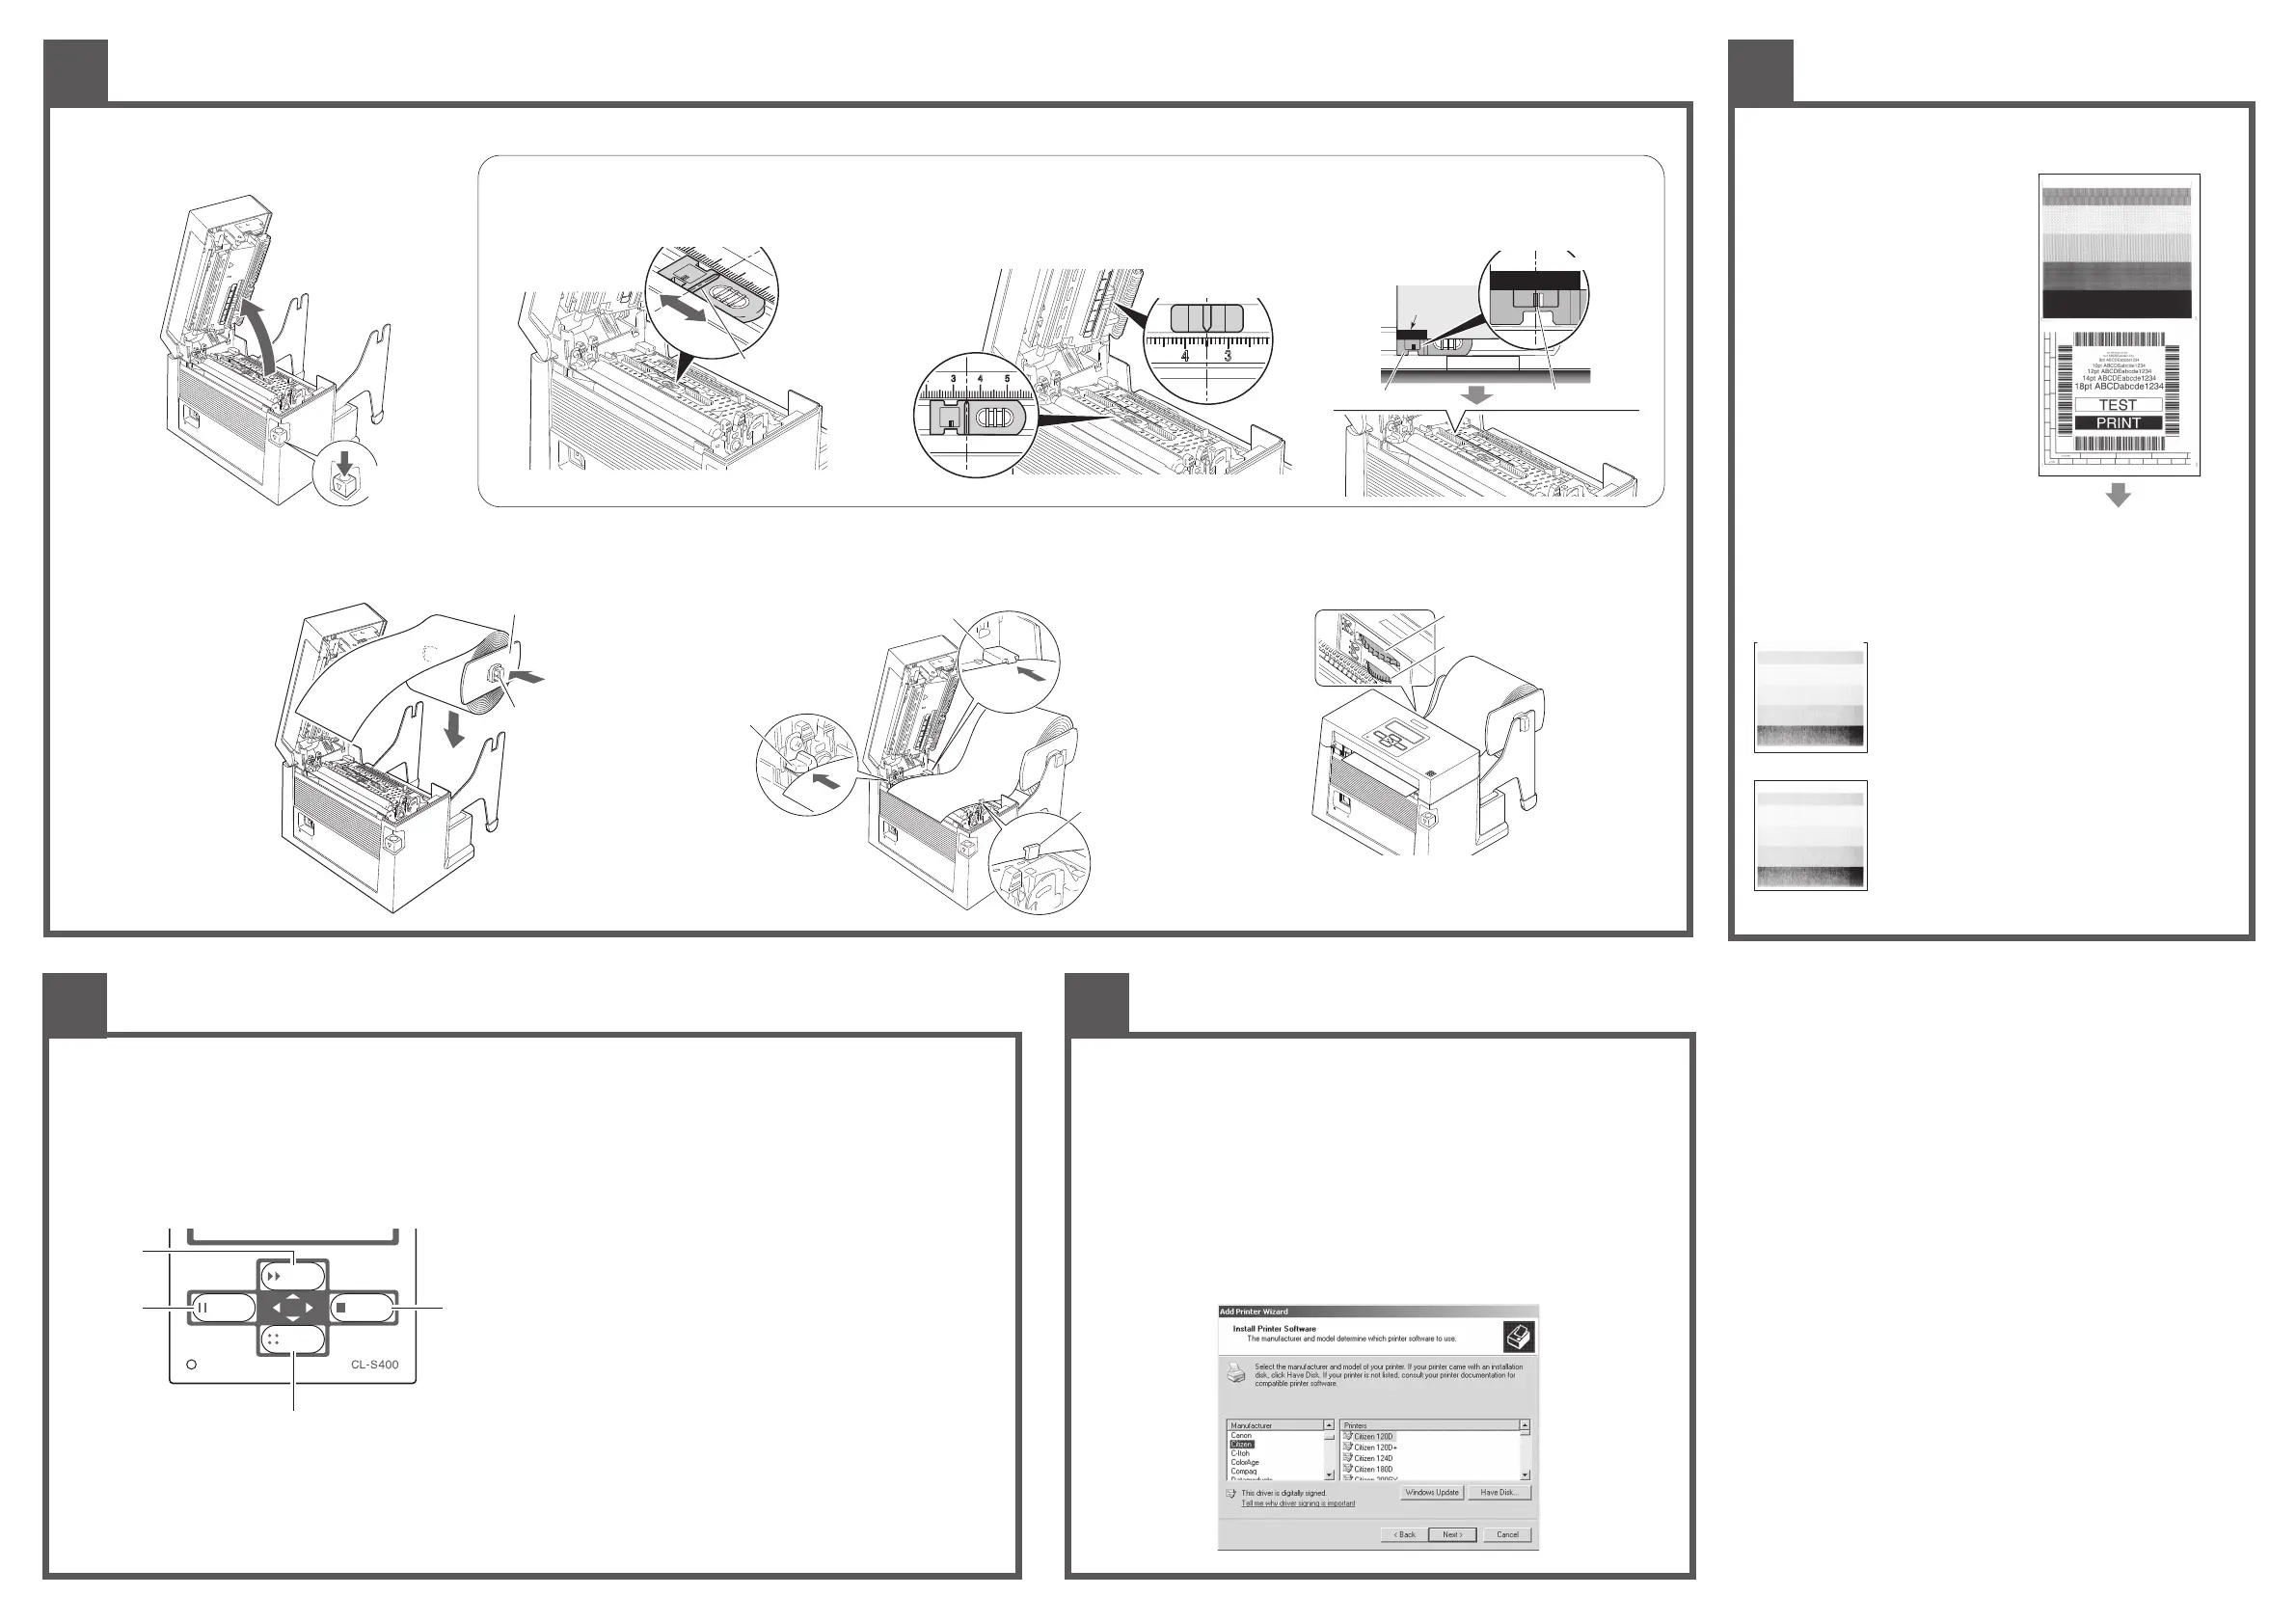
Media Installation
3
Self Tests
4
Printer Conguration
5
When using a reective sensor
Adjust the position of the sensor so that the reective
sensor marker of the bottom sensor is at the center of
the black mark of the
media as shown below.
Menu Setup Mode
If the MENU key is pressed while the printer is in the On Line Ready state, the printer enters menu setup mode. In this mode, the printer’s conguration can be
changed using the operation panel. During menu setting mode, the LCD indicates the current menu settings and the key function.
Functions of the keys
When you enter Menu Setup Mode, the LCD displays “Main Menu” on the top line and Page Setup below.
In the menu setup mode, the four keys become “cursor keys” to navigate the menu. Refer to the four small arrows in the centre of the keypad rather than the names
of the keys.
Printer Driver Installation
If the drivers are not included with the printer, you can download the latest version free-of-charge from
our web site, details of which are on the back of this Quick Start Guide.
Under the latest versions of Windows®, the computer will often automatically detect the presence of
the printer. Therefore it is advisable to download the drivers from our web site before installing the
printer so the les are ready for installation.
During installation of the printer driver, the computer may ask you to select the printer required.
You will need to click on the "Have Disk..." box then tell the computer the location of the driver les on
your CD ROM. You will usually need to look for the "Citizen.Inf" le.
Your supplier will assist you with the correct drivers and software which are compatible with your
particular computer system if you are not using Windows
®
.
Windows® is a trademark of Microsoft® Corporation.
3
Set the media on the printer. Firstly, slide the two black plastic parts of the media
holder assembly together. Ensure correct alignment of the guide with the bar as it
can only be installed in one direction.
4
Slide the roll of media over
the media bar. The media
guide must be on the right
side of the roll of media (as
viewed from the front of the
printer) with the ribbed
surface of the media guide
touching the media roll as
shown in the illustration.
5
Set the media roll and media
holder in to the printer as
shown above. It is advisable
to pull a length of media
forwards and through the
mechanism ready for later
positioning.
6
Move the media roll so it is touching the left side of the housing. Then slide the black
media guide so it is touching the media on the right side. Do not try to hold the
media too tightly with these guides as it will cause the printer to jam during printing.
7 Align the media with the left xed media
guides (2 places), and align the right
movable media guide with the media
width.
Note: Make sure to set the media
following the procedure as
indicated here. If not, it may jam.
Windows® Drivers
6
1
Push the cover open lever to release the printer cover.
It can be opened to the position shown below by
lifting the printer cover by hand.
2
Setting sensor positions.
2 Then, regulate the position of the upper sensor so that the upper sensor
marker scale indicates the same value as the scale of the bottom sensor
scale. When using media that is 4 inches wide, position the upper sensor
and the bottom sensor all the way to the right (cover open lever side).
When using a transparent sensor
1 Move the bottom sensor to the middle of the width of
the media.
8 Lower and lock the printer cover. Align it with the width of the media that has been
set, then set the media width and media thickness adjustment dials. See “Chapter 3
Printer Adjustments” of the full user’s manual on the CD-ROM supplied.
9 With the power switched on, push the FEED key to feed the media. It will halt at the
next print start position.
Self Print Mode
Performing a self test print is an easy way to
check on the conguration of the printer.
Install the media as explained elsewhere
and then operate the printer as follows.
For label media
Turn on printer power while pushing the
FEED key. When the LCD indicates "Self
Print Mode" and "Label Media", release
the FEED key.
For continuous media
Turn on printer power while pushing the
FEED key. When the LCD indicates "Self
Print Mode" and "Label Media", and then
changed to "Self Print Mode" and "Cont.
Media", release the FEED key.
The printer will produce the self test shown,
then it will stop. To repeat, press the FEED
key again. To exit, switch o the printer.
Using the Self Test Print shown above, you can make adjustments to the printer
settings such as media width and media thickness (printhead pressure). The location
of these two adjustments is explained in section 3 (step 8) and also shown on the
labels on the printer's mechanism.
The rst sample, left, shows an incorrectly set “media
thickness adjustment”. For standard label media, it is
recommended you set the blue dial to the “1” position.
The second sample, left, shows an incorrectly set “media
width adjustment”. For 4-inch or 102mm wide media, the
adjuster should be set to the “9” position on the blue dial.
FEED key (Shift/Change):
The key (FEED key) goes up the menu system or selects a higher value
MENU key (Shift/Change):
The key (MENU key) goes down the menu system or selects a lower
value
STOP key (Enter/Save):
The key (STOP key) selects or saves the item or enters a menu
PAUSE key (Exit):
The key (PAUSE key) exits the current item (goes back) and eventually
exits the menu system
The menu settings are stored temporarily in the printer’s memory. They are
only permanently stored in the printer setup when you exit the menu system
and say “Yes” to the “Save Settings” question.
<In case the position of the bottom sensor scale is 3.5>
Cover
open lever
Front
Reective sensor marker
Bottom sensor
Black mark
Black mark
Media
Align at the center
of the black mark
Movable
media guide
Fixed media guide
Fixed media
guide
PAUSE
FEED
STOP
MENU
POWER
Shift/Change
Shift/Change
Exit
Enter/Save
Media feed direction
Media width adjustment
Media thickness adjustment
Media holder guide
Media holder bar
Set it to the same value as
the bottom sensor scale.
Transparent sensor
marker
Adjust it to the middle of
the width of the media.
 Loading...