Materials list:
• 1floattubecover/shell
• 2flotationbladders
• 2foaminsertsforseat
• 1meshstrippingapronwithspreaderbarsleeve
• 3-piecespreaderbarforapron
• 1bladderrepairkit(contains:repairinstructions,glue,
twoPVCpatchesandadeflationtube)
• 1pairofshoulderstraps
How to inflate your float tube bladders
Floattubebladdersaredesignedtobeinflatedbyfootor
handpump.
YourCumberlandfloattubehas
BostonValvesforeasyinflation
anddeflation.TheBostonValveis
constructedinthreeparts:
A.Bladdervalvewithvalvelip
B.Middlevalvepart
C.Uppercap
To inflate:
Themiddlepart(B)mustbescrewedintightlytothe
bladdervalvepart(A).Theuppercap(C)mustberemoved
fromthemiddlevalveinordertoinflate.
Useapumptoinflatethefloattubejustenoughtohold
theirshape.
To Deflate:
DONOTREMOVECAP–Unscrewthemiddlevalve(B)from
thebladdervalvepart(A).Itisnotnecessarytounscrew
themiddlevalve/bottomvalvecompletelytodeflatethe
floattube.
Inflating and assembling your float tube
1. Placeyourfloattubeshellflatonthefloorwiththe
pocketsfacingupandyourbladderswiththe
valvesfaceup.
2. Unzipthehorizontal
accesszipper
runningalongthe
insideofthefloat
tube.
3. Inserttheright
bladderintothe
openpocketofthe
floattubeshell,starting
attheback.Besuretotuckthe
endsofthebladderallthewayintotheshell.
4. Aligntheinflatervalvewiththeinflateropeninginthe
shellofthefloattube.Completelysecurerip-and-gripstrip
(A)Fig.3.tothefloattubeshell.Repeatsteps3&4with
theleftbladder.
5. Securetherip-and
-gripstrips(B)fromthe
rightbladdertotheleft
bladderatthefrontofthe
floattube.
6. Pushtheinflatervalve
throughtheopeninflater
valveholeonthefloattubeshell.Makesuretheinflater
valvelipissecureontheoutsideofthefloattubeshell.
7. Zipthefloattubeshellclosed.
8. Insertthethickestfoam
insert(A)intothe
seatbottom
compartment.
(Itwillbeatight
fit.)
9. Insertthethinner
foaminsert(B)into
theseatbackwiththe
roundedendfirst.
10.Pulltheflapdownover
thefoaminsertsandsecure
thethreerip-and-gripstrips
undertheseatcushion.
11.Inflatethetwofloattubebladdersabout30%—just
enoughtoholdtheirshape.
12.Checkthebladdersbyunzippingthefloattubeshell.The
bladdersshouldlieflat,untwistedandcenteredunderneath
theshellpockets.Makesuretherip-and-griptabsthat
attachthebladdertothefloattubecoveralign.
(Atwistedbladderwilldistortthecoverwhenyoublowitup.)
13.Finishinflatingbladdersuntilmostofthewrinklesareout
ofthecover.Ifanytwistsdevelopstop,deflatethebladder,
straightenitwithinitspocketandreinflate.Closethevalve
capstightly.
Youmayneedtoaddorreleasesomeairifyoutravel
betweenlowandhighelevationsorifthetemperature
changes.Alwaystakeoutsomeairbeforeleavingyour
floattubeinacar—theheatcanexpandtheairinthe
bladdersquiteabit.
14.Connectthethreespreaderbarpiecesbyinsertingthetwo
longtubesintotheshortercouplingtubewiththeangled
endsonbothlongtubeendsfacingthesamedirection.
Nowplacethemeshstrippingaprononthefloorwiththe
graphicsfacingup.Slipthespreaderbarwiththeangled
endsfacingdownintothefabricsleeveatoneendofthe
apron.
Sliptheendsoftheapronsleeveintothefabric
receptaclesonthetopandfrontoftheleftandright
pontoons.
15.Therearetwobackrestsupportstrapssewntotheseat
backrestwithasidereleasebuckleoneitherend.Besure
thesebucklesareclippedtotheircorrespondingparts
ontheinsidepontoon.Adjustthelengthofthestrapfor
acomfortableseatbackangle.
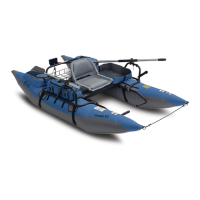
Instructions:TheCumberland
left
right
Back Front
TOP VIEW
BOTTOM VIEW
A
C
B
Float Tube Shell
A-SeatBottom
B-SeatBack
rightbladder
leftbladder
TOP VIEW
A
A
B
B
fig.3
fig.2
A
B