Page 1 PN: 399G228 Rev A 29 August, 2017
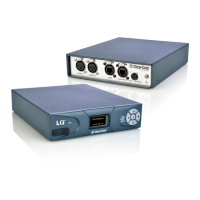
The following Quick Start Guide provides basic installation and configuration instructions for your LQ
system. LQ is a new IP interface for Clear-Com audio products. It offers LAN, WAN and Internet
connectivity for the distribution of audio and data.
• LQ-2W2 provides two channels of 2-wire analog partyline (2x XLR)
• LQ-4W2 provides two 4-wire analog interface ports (4x RJ45 etherCON)
• LQ-4WG2 provides two 4-wire + GPIO analog interface ports (4x DB-9)
• LQ-R2W4 provides four channels of 2-wire analog partyline with pass-through (8 XLRs)
• LQ-R4W8 provides eight 4-wire analog interface ports (8x RJ45 etherCON)
• LQ-R4WG8 provides eight 4-wire + GPIO analog interface ports (8x DB-9)
• LQ-R2W4-4W4 provides four channels of 2-wire (4x XLR) and four ports of 4-wire (4x RJ45 etherCON)
• LQ-2W4+4WG4 provides four channels of 2-wire (4x XLR) and four ports of 4-wire + GPIO (4x DB-9)
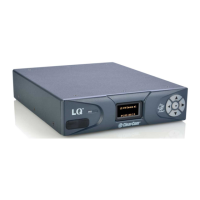
Powering and connecting the LQ units
1) Connect the LQ unit to a network using standard Ethernet cable and
apply power (use either the DC power supply cable provided or PoE).
The LQ-R variants have redundant power supplies.
2) Within a web browser's address field, enter the IP address displayed
on the front panel of the LQ.
3) Enter the default login credentials: Username – admin, Password –
admin.
Core Configuration Manager (CCM)
The CCM has five primary views.
• Overview – Status and state information for all devices and
endpoints in the Link-Group.
• Device – Configuration options associated with a specific device.
• Roles – Admin-defined configurations that Agent-IC can select.
• Assignments – Configuration of audio and data routes between
LQ interfaces.
• Accounts – Interconnectivity to other interfaces such as a SIP
server, Eclipse-HX IVC-32 card or hosting of Agent-IC clients.
Note: If your network does not support
DHCP you must assign a static IP
address to the LQ device:
1) Press the center button on the
LQ front panel keypad for 3-4
seconds.
2) Navigate to Networking >
Edit > DHCP and select
Disabled.
3) Backup one menu and select IP
Address.
4) Using the keypad, press the
center button to enable/disable
editing and the up/down arrow
buttons to
increment/decrement the IP
address values.
5) Select Save.
LQ™ Series 4.0 Quick Start
Guide