Do you have a question about the ClearClick Virtuoso 2.0 and is the answer not in the manual?
Guide on adjusting scanner date/time settings via main menu and playback button.
Instructions for cleaning the scanner's internal scanning area using the provided brush.
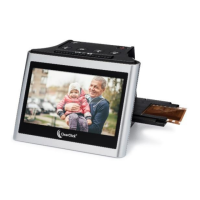
The ClearClick® Virtuoso® 2.0 22MP Film & Slide Scanner is a versatile device designed to digitize various types of film and slides, preserving old memories in a modern format. This scanner allows users to convert their physical film and slide collections into digital images, which can then be stored on an SD card, transferred to a computer, or viewed directly on a TV. The device is user-friendly, featuring a quick start guide to help users get up and running efficiently, and it comes with a 2-year warranty and free USA-based tech support from ClearClick®, a small business committed to customer satisfaction. Users can also extend their warranty by an additional year by registering their product online.
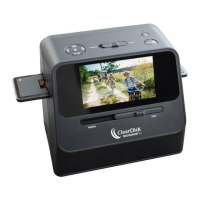
The primary function of the Virtuoso® 2.0 is to scan and convert 35mm slides, 35mm film negatives (color and black & white), 110 film, and 126 film into high-resolution digital images. It boasts a 22-megapixel sensor, ensuring detailed and clear digital reproductions of your original media. The scanner is equipped with a 5-inch all-angle color LCD display for previewing images before and after scanning, making it easy to frame and review your scans directly on the device.
To begin using the scanner, an SD memory card (up to 32 GB, Class 10 or higher, preferably a new SanDisk brand card) must be inserted into the slot on the back of the scanner. The device is powered by connecting it to a wall outlet using the included micro USB cable and power adapter. Once powered on, holding down the Power button will bring up the main menu, which includes options such as "Scan/Settings," "USB Transfer," "Gallery," and "Time/Date."
The "Scan/Settings" option is where the scanning process begins. Users can select the type of media they wish to scan: Slides, Color Negatives, or Black & White Negatives. If "Negative" is chosen, the device will prompt the user to specify the film type: 35mm, 110, or 126. The scanner comes with various adapters to accommodate these different film and slide types: a 35mm Slide Holder (which also serves as the main holder), a 35mm Film Adapter, a 110 Film Adapter, and a 126 Film Adapter.
For scanning slides, the user opens the main holder, inserts one slide, closes the holder, and then inserts the holder into the right side of the scanner. For negatives, the appropriate adapter (135/35mm, 126, or 110) is placed inside the main holder, the main holder is closed, and then inserted into the right side of the scanner. Film is then fed into the right side of the adapter.
Before scanning, users have the option to adjust the scanning resolution, brightness, and RGB color. The scanning resolution can be toggled between 14 or 22 Megapixels using a dedicated button, with the current setting displayed on the lower right of the preview screen. Brightness and RGB color adjustments are made using specific buttons and arrow controls, allowing for fine-tuning of the image quality. A "recover" icon is available to reset adjusted colors to their original default settings.
To initiate a scan, the user simply presses the OK/Scan button. The scanner then processes the image displayed on the LCD screen, saving it directly to the inserted SD memory card. The digital images are stored in the "DCIM"/"100" folder on the SD card.
Transferring scanned images to a computer is straightforward. The large USB end of the USB/power cable is unplugged from the power adapter and plugged into a computer instead. After turning on the scanner, the user navigates to the "USB" option in the main menu and presses OK. The scanner will then establish communication with the computer, and the SD card will appear as a removable external drive. Users can then drag and copy their photos from the "DCIM"/"100" folder to their computer's hard drive. Once done, the external drive should be closed or ejected from the computer. Pressing the "Home / P" button on the scanner exits the uploading mode and returns to the main menu.
Beyond scanning, the Virtuoso® 2.0 offers several other useful features. Users can view images already scanned and saved on the device by navigating to the "Photo Gallery" option from the main menu. Individual images can be selected and viewed, and a "Playback" button allows for a slideshow of all scanned images. The scanner can also be connected to a TV using an optional Mini-HDMI-to-HDMI cable, allowing users to view their scans on a larger screen.
The device also includes a "Time/Date" setting, accessible from the main menu, which allows users to set the current date and time. This can be useful for organizing scanned images by the date they were digitized.
Maintenance of the scanner is simple. A cleaning brush is included to clean the internal scanning area. To do this, the scanner should be turned off and disconnected from power. It is then laid on its side, and the brush is gently inserted into the slot where the film holder normally goes, allowing for gentle brushing of the internal components.
The ClearClick® Virtuoso® 2.0 is designed to be a comprehensive solution for digitizing various film and slide formats, offering ease of use, quality output, and robust support for a seamless user experience.
| Scanner Type | Film and Photo Scanner |
|---|---|
| Image Sensor | CMOS |
| Color Depth | 48-bit |
| Connectivity | USB 2.0 |
| Compatibility | Windows and macOS |
| Supported Film Formats | 35mm |
| Display | 2.4 inch LCD |
| Power Supply | USB Powered |
| Output Formats | JPEG, BMP |