Thank you for purchasing our Model E air quality sensor. The following guide will help you use it as
quickly as possible and get it connected to the co2.click portal.
Calibration
Your sensor CO2 level was already calibrated before leaving our offices, so there is no need to
perform a calibration cycle for now. We recommend checking the CO2 level calibration by placing the
sensor outside every 6 to 9 months. If it indicates CO2 levels between 415ppm and 450ppm then your
sensor is still properly calibrated.
The other sensors (temperature, humidity, barometric pressure and particulate matter) do not require
calibration.
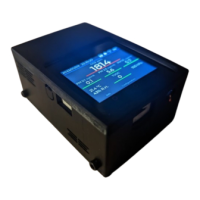
Sensor ports and physical buttons
STEP 1 - Get a co2.click portal account
If you have not done so already, follow these steps to create your co2.click portal account. If you
already have an account, you can skip to step 2
1. Go to https://www.co2.click/app
2. Click on “Create new account”
3. Enter a valid e-mail address for your account and click “Create”. You must have access to
this e-mail account, as you will receive an email to continue the registration process.
4. In the next minutes, you will receive an email with a password.
5. Use that password along with the e-mail address you used in step 3 to log in to the co2.click
portal
Your account is now registered. For security reason, it is recommended that you immediately change
your password by clicking on your name in the top right corner and selecting “Change password”
STEP 2 - Connect your sensor to your Wi-Fi network
The sensors need to have Internet access so that they can send the various readings to your co2.click
portal account. Follow these easy step to get your sensor connected to your Wi-Fi network:
1. Power your sensor with the provided AC-DC wall adapter.
2. Wait for the sensor to boot and display the sensor readings.
3. Tap on the red circle below “Configuration”. (These red circle are actually buttons.)
4. Enter the unlock password (2764) and press on the checkmark.
5. Press on the “Configure Wi-Fi” button
6. A “Wi-Fi configuration” screen will prompt you to connect to a “Capteur CO2 Sensor” Wi-Fi
network
7. Using a Wi-Fi enabled device (phone, tablet, laptop,...) go into your Wi-Fi settings and
connect to the Wi-Fi network named “Capteur CO2 Sensor”. If you are asked for a password
to connect, enter “co2sensor”
8. At this point:
a. For Android devices, you will be asked to click to sign in to the Wi-Fi network. This
should bring you to a captive portal named “WifiManager”
b. If you do not get the “WifiManager” page automatically, open your Internet browser
and go to http://neverssl.com
9. Click on “Configure Wi-Fi”
10. After a few seconds, you should see the list of available Wi-Fi networks. Select the one you
wish the sensor to connect to.
11. In the “Password” field, enter the WPA password for the Wi-Fi network you selected and
click “Save”
At this point the sensor should, in the next few seconds, connect to your Wi-Fi network and go back to
the main screen to show you the current time/date as well as the various readings.