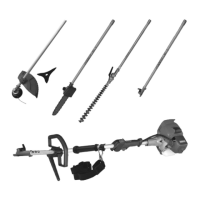
This document provides assembly and operating instructions for the Cobra MT270K / LRH270K multi-cutter, which includes an engine unit and various attachments: a brush cutter, pole pruner, and hedge trimmer.
Engine Unit
Function Description:
The engine unit serves as the powerhead for all attachments. It is a 2-cycle, air-cooled, vertical-cylinder gasoline engine designed to deliver superior performance and reliability. It features a centrifugal clutch with a bevel gear for power transmission.
Important Technical Specifications:
- Dry Weight (Without Bar/Chain): 5.9 kg
- Engine Type: 2-cycle, air-cooled, vertical-cylinder
- Bore x Stroke: 34x28 mm
- Displacement: 25.4 cm³
- Engine Speed at Idle: 3000 min⁻¹
- Maximum Engine Speed: 7500 min⁻¹
- Maximum Output: 0.7 kW @ 8500 min⁻¹
- Fuel/Oil Ratio: 25:1 with 2-cycle Engine Oil
- Fuel Tank Capacity: 600 ml
- Carburetor Type: Diaphragm type
- Ignition: Flywheel magneto CDI system
- Spark Plug: NGK
- Air Filter: Semi-wet, quick-remove/install
- Starting Method: Recoil
- Cooling System: Forced air
- Stopping Method: Slide switch
- Oil Tank Capacity: 400 ml
- Gearcase Ratio: 1.06:1
- Sound Pressure Level: 91 dB (A)
- Sound Power Level: 106 dB (A)
- Vibration Level (Idling Front/Rear): 2.32/2.78 m/s²
- Vibration Level (Racing Front/Rear): 3.64/3.89 m/s²
- Standard Equipment: Tool kit containing a spark plug wrench, 4mm allen wrench, 8mm x 10mm spanner, strap, chain cover, and phillips screwdriver.
Usage Features:
- Assembly: The powerhead is installed by loosening a tube clamp, pushing the lower tube towards it, rotating to engage splines, inserting the tube until it bottoms, aligning positioning holes, and fastening with clamp screws. The throttle cable connects to the carburetor, and switch wires are paired by color.
- Throttle Adjustment: The throttle cable free play should be adjusted to about 6mm. When correctly adjusted, the throttle will contact the stop on the throttle body at full throttle.
- Fuel Mixing: The engine operates on a 25:1 mixture of unleaded gasoline (87 octane or above) and 2-cycle mixing oil. Alcohol-based fuels exceeding 10% alcohol by volume should be avoided. Fuel should be fresh, and if stored for over 30 days, treated with a stabilizer.
- Starting (Cold Engine/After Refueling): Set the throttle trigger to "Fast idle" (depress and hold lockout lever, squeeze trigger, depress throttle button, release lockout lever and trigger). Slide the ignition switch to "I" (start). Prime the engine by depressing the primer bulb 4-5 times until fuel is visible. Choke the engine by moving the choke lever to the "closed" position.
- Starting (Warm Engine): Set throttle trigger to "fast idle," slide ignition switch to "I" (start), and move choke lever to "open" position.
- Cranking: Place the unit firmly on the ground, ensuring the cutting attachment is clear of objects. Hold the outer tube hand grip with the left hand and pull the starter rope handle with the right hand. Pull slowly until the starter engages, then quickly to start. Once the engine starts, open the choke by moving the lever down.
- Stopping: Allow the engine to idle for 2-3 minutes to cool, then slide the ignition switch to "O" or STOP.
- Carburetor Adjustment: Idle speed is adjustable to prevent the cutting attachment from rotating at idle. Standard idle speed is 3000 ± 200 rpm. The mixture of the carburetor is not adjustable on this unit.
Maintenance Features:
- Daily Maintenance: Remove dirt/debris, check cooling fins and air cleaner for clogging, clean as necessary. Inspect for loose/missing screws or components, ensure cutting attachment is securely fastened and free of debris. Check for fuel/grease leaks. Ensure nuts, bolts, and screws (except carburetor adjusting screws) are tight.
- 10-Hour Maintenance: Remove and thoroughly clean the air cleaner element with soap and water, rinse, dry, add a few drops of oil, and reassemble.
- 10/15-Hour Maintenance: Remove and clean the spark plug, adjust the electrode gap to 0.6-0.7mm, and replace if necessary. Clean the area around the spark plug before removal to prevent dirt ingress.
- 50-Hour Maintenance: Remove and clean the cylinder cover and cooling fins. Remove the sprocket cover, inspect the sprocket for wear, and replace if excessively worn. Remove the guide bar and clean its groove. Lubricate the gearcase by pumping lithium-base grease into the fitting until old grease purges. Extract and inspect the fuel filter element for contamination, replace if needed. Inspect the fuel line for damage.
- General Maintenance: Always turn off the engine and disconnect the spark plug wire before any maintenance. Use genuine parts and accessories. Do not modify the machine.
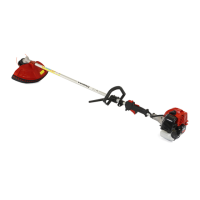
Brush Cutter Attachment
Function Description:
The brush cutter attachment is designed for cutting grass, shrubs, and tough weeds. It can be fitted with either a metal blade or a nylon cutter (optional).
Important Technical Specifications:
- Applied Blade: Metal blade or Nylon cutter
- Blade Rotation Direction: Counterclockwise (from operator's view)
- Outward Size (LWH): 2040 x 380 x 330 mm
- Weight: 6.5 kg (for both B250 and G250 models)
- Max. Cutting Width: 255mm (metal blade), 420mm (nylon cutter)
Usage Features:
- Safety: Always wear head, eye, and ear protection, thick work gloves, non-slip boots. Keep bystanders at least 15 meters away. Never operate when tired, ill, or under the influence of substances. Avoid running indoors. Do not use on slippery ground, at night, in heavy fog, or during storms.
- Handle Installation: Fix the handle with four bolts.
- Gearcase Installation: Loosen two clamp screws and remove one index screw. Push the pipe towards the gearcase, rotate to engage splines, insert until it bottoms, align positioning holes, replace index screw, and fasten clamp screws.
- Safety Guard Installation: Attach the safety guard to the gearcase with clamps and two bolts.
- Metal Blade Installation: Set the inner holder to the gear shaft, fix with an L-shaped bar. Place the blade on the inner holder, matching the hole to the projection. Set the outer holder. Secure with the attached bolt cover, bolt (left screw), spring washer, and washer.
- Nylon Cutter Installation (Option): Set the inner and outer holders to the gear shaft. Screw the attached bolt (M8 Left) into the gear shaft and secure with a spanner. Screw the nylon cutter into the bolt, fixing the inner holder with the L-shaped bar and tightening manually.
- Operation: Grip the handle firmly with both hands. Maintain a steady posture. Adjust engine speed according to the cutting object: middle speed for young grass, high speed for shrubs/tough weeds.
- Cutting Techniques: Guide the head from right to left. Metal blades cut best up to 1/3 from the edge for shrubs/tough weeds, and up to 2/3 for young grass. Nylon cutters use cord rotation; avoid cutting too much at once to maintain rotation speed.
- Kickback Safety: Clear the working area of obstacles. Do not grip parts other than handles.
Maintenance Features:
- Blade Maintenance: Sharpen each cutting edge, ensuring the bottom corner is rounded. Do not cool the blade with water during grinding to prevent cracks.
- Gearcase Maintenance: Supply multi-purpose grease every 25 hours. Remove cutter holders to allow old grease to exit.
- Before Storage: Brush off dirt, check for damage/slack, repair if needed. Extract fuel from the tank, run the engine until it stops. Remove the spark plug, add 1-2cc of 2-cycle oil, draw the starter rope 2-3 times, replace the plug. Apply anti-rust oil to metal parts, cover the blade, and store indoors.
Pole Pruner Attachment
Function Description:
The pole pruner attachment is designed for cutting branches, especially those that are difficult to reach. It features a guide bar and chain.
Important Technical Specifications:
- Cutter Attachment Weight: 1.8 kg
- Blade Length (Long Model): 560 mm / 22 in
- Blade Length (Short Model): 460 mm / 22 in
- Cutter Drive: Spur gear
- Gear Lubricant: Lithium based grease
- Tool Kit Contents: Combination wrench (13mm+19mm), sockets/flat blade screwdriver (4mm-hex), wrench (8mm+10mm spanner).
- Max. Cutting Width: 295mm
Usage Features:
- Strap Use: Hook the strap to the hanger on the outer pipe. Wear the strap so the hook stays on the right-hand side. Adjust length for comfortable operation.
- Emergency Release: Pull the white tab at the hook to release the machine.
- Safety: Never operate at an angle greater than 60 degrees to reduce the risk of falling objects. Always operate with both hands firmly gripping the machine. Maintain proper footing and balance. Keep bystanders at least 15 meters away.
- Assembly: Ensure all components are present and undamaged. The terms "left-hand," "right-hand," "front," and "rear" refer to directions as viewed by the operator.
- Use Without Upper Tube: If the lower tube assembly is long enough, the unit can be used without the upper tube. Remove the upper tube/coupler assembly from the gearcase, then assemble the gearcase onto the lower tube assembly.
- Chain Installation: Remove the sprocket cover nut and sprocket cover. Place the guide bar over the guide bar adjustment stud, aligning the chain tensioning pin with the hole in the guide bar. Install the chain loop over the drive links within the guide bar groove and align over the drive sprocket. Ensure cutters are properly oriented. Install the sprocket cover and finger-tighten the nut.
- Chain Adjustment: Loosen the sprocket cover nut. Lift the nose of the guide bar while turning the chain tensioning screw (clockwise to tighten, counterclockwise to loosen). Pull the chain by hand along the guide bar several times; it should feel snug but pull freely. Tighten the sprocket cover nut securely while lifting the tip of the guide bar.
- Oil Filler: Fill the oil reservoir with bar and chain oil. The reservoir has capacity for about 40 minutes of cutting time.
- Oil Flow Adjustment: The oil flow adjusting screw can be pressed in slightly and turned to adjust flow. Clockwise increases lubrication, counterclockwise decreases.
- Cutting Techniques:
- Standard Cut: Tool angle of 60 degrees or less.
- Above Obstacles: Use the long reach to prune branches over obstacles like rivers or lakes.
- On Work Platform: Enables cutting next to the trunk without damaging other branches.
- Relieving Cut: For thick branches, start with an undercut on the underside of the branch, then a cross-cut.
- Flush-cutting Thick Branches: For branches over 10cm (4"), perform an undercut and cross-cut 25cm (10") from the final cut, then perform the flush-cut starting with a relieving cut.
Maintenance Features:
- Chain Sharpening: Sharpen cutting edges with a 4.5mm round file at a 30-degree angle, ensuring 20% of the file diameter is above the cutter's top plate. Use a filing guide for consistency. After sharpening, use a depth gauge joiner to measure and lower depth gauges to 0.5mm with a flat file. Round the leading edge of each depth gauge to its original curvature and angle.
- Filing Problems: The manual provides visual guides to identify and correct issues like incorrect top plate angle, hook in side plate, high depth gauge, back slope on side plate, and low depth gauge.
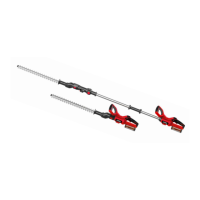
Hedge Trimmer Attachment
Function Description:
The articulated hedge trimmer attachment is designed for trimming hedges. Its articulated head allows for various cutting angles.
Important Technical Specifications:
- Max. Cutting Width: 620mm
Usage Features:
- Safety: The hedge trimmer is not insulated against electrical shock; keep at least 10 meters away from electrical lines. Always wear a hard hat, eye, and hearing protection, heavy-duty gloves, and sturdy footwear with non-slip soles. Keep bystanders at least 15 meters away. Never operate when tired, ill, or under the influence of substances.
- Transport: Ensure the blade cover is in place. Carry the trimmer with the blade in the transport position. Tie down securely in a vehicle.
- Output Shaft Installation: Remove the rubber sleeve. Insert the output shaft into the gearbox, align the hexagonal screws, and tighten.
- Working Head Rotation: Change the position of the head only when the engine is not operating. Pull back the lock collar and select the required working angle, rotating the side lever.
- Applications:
- Preparations: Use lopping shears to cut out thick branches first.
- Cutting Sequence: For a radial cut, make several passes.
- Vertical Cut: Swing the cutting blade up and down in an arc along the hedge.
- Horizontal Cut: Hold the cutting blade at an angle of 0-10 degrees, swinging the hedge trimmer horizontally. Swing the blade in an arc towards the outside of the hedge so cuttings are swept to the ground.
- Horizontal Cut (Low Shrubs): Cut close to the ground from a standing position.
- Overhead Cut: Hold the shaft upright with a 90-degree blade angle to cut an upper surface.
- Vertical Cut (Flowerbed): Cut without standing directly next to the hedge, e.g., between operator and flowerbed.
- Horizontal Cut (Reaching Over): Cut without standing directly in front of the hedge, e.g., reaching over a flowerbed.
Maintenance Features:
- Gearbox Grease: Grease the gearbox every 25 hours of run time. Use an injection pump at the designated gearbox nozzle points. Recommended grease: CEST LT2WEP.