EN-GB
Welcome
Congratulations on your purchase of a
Cochlear
™
Wireless TV Streamer.
Intended use
The Cochlear Wireless TV Streamer is intended to be a
wireless connection to a television or other audio device for a
compatible Cochlear sound processor.
Indications:
This accessory has no therapeutic indications in itself. It will
support the therapeutic indications of the Cochlear wireless
sound processor used with this accessory.
Clinical Benefit:
The Cochlear Wireless TV Streamer is intended to further
improve audibility when watching television or listening to
sound from other audio device.
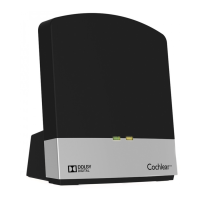
Key to device See figure
1
1. Micro-USB power socket
2. Pairing button
3. Mono/stereo switch
4. Analogue mini-jack audio input
5. Optical (Toslink) audio input
6. Coaxial audio input
7. Increase volume
8. Decrease volume
9. Power light (green)
10. Activity light (yellow)
11. Wall plug
12. Micro-USB plug
Introduction
The Cochlear Wireless TV Streamer will provide you with
high quality streamed audio from your TV, stereo, personal
computer or similar device directly to your sound processors.
Please read this manual carefully to fully benefit from
the Cochlear Wireless TV Streamer. Ask your hearing
care professional if you have any questions. For further
information and a full list of compatible sound processors
you can also visit the www.cochlear.com/compatibility
web site.
For your safety, carefully read the chapter “Important
Information”.
Warranty
The warranty does not cover defects or damage arising from,
associated with, or related to the use of this product with
any non-Cochlear processing unit and/or any non-Cochlear
implant. See “Cochlear Global Limited Warranty card” for
more details.
Key to symbols
The following symbols will be used throughout this
document.
Caution
CE-mark
Serial Number
Medical device
Unique device identifier
Date of manufacture
“Consult instructions for use”
or “Operating instructions”
This device includes a RF
transmitter that operates in
the range of 2.4 GHz – 2.48 GHz
Interference risk
ACMA (Australian
Communications and Media
Authority) compliant
Please ask your hearing care
professional concerning
disposal of this device.
Temperature limitation
Manufacturer
By prescription
Catalogue number
Radio compliance
certification for Korea
Radio compliance
certification for Japan
Radio compliance
certification for Taiwan
Getting Started
Installing the TV Streamer
Depending on your TV, stereo, computer or other audio
setup, the installation of the TV Streamer may be done in
several ways, which are described in the following section.
The following steps will guide you through the pairing and
connecting process. Start by connecting cables between the
TV Streamer and the audio source and finish by pairing the
TV Streamer to your sound processors.
Note: The TV Streamer supports both analogue and
digital audio input. Please read the following sections for
information about supported audio formats and how to
connect the TV Streamer to audio sources.
Connecting the TV Streamer to a digital
audio source (e.g. TV or stereo)
Note: The TV Streamer supports both analogue and
digital audio input. When using digital audio input the
following formats are supported:
Stereo PCM
- Sample rate: Up to 192 kHz
- Sample resolution: Up to 32 bit
Dolby Digital
- Channels: Max 5.1
- Bitrate: 32 kbs to 640 kbs
- Sample rate: 32, 44.1 and 48 kHz
Note: Dolby Digital Plus (requiring an HDMI interface),
Dolby TrueHD, Dolby Pro Logic, Dolby Digital EX, Dolby
Digital Surround EX, and AAC (Advanced Audio Coding)
are not supported.
Using the optical (Toslink) audio input
See figure
5
1. Connect the power supply to the wall socket and insert the
cable into the micro-USB socket on the TV Streamer.
2. Insert one of the plugs on the optical audio cable into
the optical audio input socket [no. 5 in figure 1] on the TV
Streamer.
Note: Most optical cables are delivered with a small
protective cap to protect the tip of the cable. Please remove
this protective cap before inserting the cable.
3. Plug the other end of the optical audio cable into the
“Digital Audio Out/Optical” on your audio source.
Using the coaxial audio input
See figure
6
1. Connect the power supply to the wall socket and insert the
cable into the micro-USB socket on the TV Streamer.
2. Connect one of the plugs on the coaxial audio cable to the
coaxial plug [no. 6 in figure 1] on the TV Streamer.
3. Plug the other end of the coaxial audio cable into the
“Digital Audio Out/Coaxial” on your audio source.
Connecting the TV Streamer to an analogue
audio source (e.g. TV or stereo):
See figure
2
1. Connect the power supply to the wall socket and insert the
cable into the micro-USB socket on the TV Streamer.
2. Insert the male stereo mini-jack on the audio cable into
the female stereo mini-jack input on the TV Streamer [no.
4 in figure 1].
3. Plug the other end audio cord into the “AUDIO OUT”
terminals on the audio source. The “AUDIO OUT” is usually
marked “L – R” for left and right, and can usually be found
on the back of the audio source.
Note: With this installation, most audio sources will send
sound to both sound processors and additional speakers
connected to the audio source simultaneously. On some
audio sources you can adjust the balance between the
AUDIO OUT and the speakers. Consult your audio source
manual for instructions.
Alternative analogue audio cable
installations:
If it is not possible to connect the TV Streamer to the AUDIO
OUTPUT of the audio source using the red and white plugs,
the following installation alternatives can be used:
Mini-jack adaptor:
See figure
3
1. Connect the power supply to the wall socket and insert the
cable into the micro-USB socket on the TV Streamer.
2. Insert the male stereo mini-jack on the audio cable into
the female stereo mini-jack input on the TV Streamer [no.
4 in figure 1].
3. Connect the stereo mini-jack adapter to the red and white
plugs at the other end of the audio cable.
4. Plug the stereo mini-jack adapter into the audio source’s
“HEADPHONE” output terminal or alternatively into your
computer’s audio terminal.
Note: The HEADPHONE output socket is usually located
on the side or front of the audio source. When using the
HEADPHONE socket, usually only the person wearing
the sound processors will hear the sound and audio
source speakers are muted. If muted speakers are not
desired, please refer to the first installation, or the one
in the following chapter. Your audio source may support
speakers and HEADPHONE being on simultaneously;
check your audio source manual for instructions.
Scart adapter:
See figure
4
1. Connect the power supply to the wall socket and insert the
cable into the micro-USB socket on the TV Streamer.
2. Insert the male stereo mini-jack on the audio cable into
the female stereo mini-jack input on the TV Streamer [no.
4 in figure 1].
3. Connect the scart adapter to the red and white plugs at the
other end of the audio cable.
4. Plug the scart adapter into the audio source’s scart
terminal. Note: The scart output terminal is usually
located on the back or side of the audio source.
Please consult your audio source’s manual if additional scart
output configuration is needed.
Pairing with your sound processors
You can pair up to three Cochlear streaming devices with
your Cochlear sound processor.
Select a separate channel for each device paired with the
sound processor.
Pairing flashing pattern
Pairing
button
pushes
LED blinking pattern Channel
1 1
2 2
3 3
Pairing the TV Streamer in channel 1
1. Make sure that the TV Streamer power supply is plugged
into a wall socket and that the green light indicator on
the front of the TV Streamer [no. 9 in figure 1] is ON. Your
sound processors must be OFF.
2. Press the pairing button on the TV Streamer [no. 2 in figure
1] once. The yellow indicator light on the front of the TV
Streamer [no. 10 in figure 1] will now flash once every 2
seconds to indicate that the TV Streamer is ready to be
paired in channel 1. Your TV Streamer will remain in pairing
mode for 20 seconds.
3. While pairing mode is active, turn on your sound processor.
Successful pairing will be indicated by either an audible
melody played in the sound processor, or by a flashing light
on the sound processor (depending on the type of sound
processor).
Pairing the TV Streamer in channel 2
1. Press the pairing button twice. The yellow indicator light on
the front of the TV Streamer will now flash twice every 2
seconds to indicate that it is ready to be paired in channel 2.
2. While pairing mode is active, turn on your sound processor.
Pairing the TV Streamer in channel 3
1. Press the pairing button three times. The yellow indicator
light on the front of the TV Streamer will now flash three
times every 2 seconds to indicate that it is ready to be
paired in channel 3.
2. While pairing mode is active, turn on your sound processor.
Streaming
Start streaming
Turn on the TV, stereo, computer or other audio device
connected to the TV Streamer. Make sure your sound
processors are turned on as well. Streaming may be started
in one of two ways:
Option A
1. Press and hold the wireless streaming button on your sound
processor for about three seconds.
2. An audible melody or a flashing light (depending on the
type of sound processor) will be followed by streamed
audio via the TV Streamer.
Option B
If you have a Cochlear Baha Remote Control** (optional),
simply press the streaming button [no. 3 in figure 7] on this
Baha Remote Control**. For more information, refer to the
Baha Remote Control** manual.
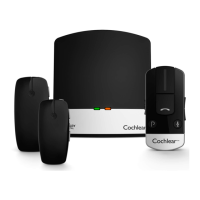
Start streaming on a 2nd or 3rd TV
Streamer unit See figure
7
If your sound processor is paired with more than one
streaming device, you can start streaming in two ways.
Option A
Press and hold the wireless streaming button on your sound
processor for about three seconds a 2nd or 3rd time to access
the 2nd or 3rd Cochlear streaming device.
Option B
Press the streaming button on a Baha Remote Control** a
2nd or 3rd time to access the 2nd or 3rd Cochlear streaming
device.
The Cochlear streaming device(s) are indicated by the letters
A, B or C, and the streaming device in use is shown on the
Baha Remote Control** display.
Stop streaming
• Briefly press the streaming button on your sound processor.
This will cancel streaming and return to the last program
used.
• To stop streaming with the Baha Remote Control** press
the “P” button, located in the center of the key pad.
• If you are using the telephone with Cochlear Wireless Phone
Clip, streaming from the TV Streamer will be temporarily
disrupted. When you have ended your phone call, streaming
will resume.
Note: If you move out of your TV Streamer range (>7m)
but return within the range before 5 minutes have passed,
your sound processor will automatically reconnect and
continue streaming.
Controls
Volume control
The TV Streamer is designed to provide a comfortable
listening level from the moment it is activated. However,
for some devices or listening environments, it may be
desirable to adjust the listening volume and doing so can be
accomplished in a variety of ways. Keep in mind that volume
adjustments on the TV Streamer apply to the streamed signal
only, not to the volume of normal environmental sounds. Use
the “+” and “-” keys [no. 7 and 8 in figure 1] to adjust volume
to a comfortable level. Make sure that your sound processors
are comfortably adjusted before you change the settings
with the volume control. In most cases this adjustment
should only be made once since the TV Streamer will store
the most recently set volume level. Use the Baha Remote
Control 2** (optional) to adjust both the streaming volume
level and the sound processor microphone volume level. Ask
your hearing care professional for more information about
this accessory. The volume can, in some cases, be further
adjusted at the signal source, for example by turning the TV
volume down. This will adjust the volume of the streamed
sound transmitted wirelessly to the sound processors.
Adjusting the TV volume will affect the listening volume in
the room as well.
Adjusting sound processor and streaming volume is only
possible with the Cochlear Baha Remote Control** and
Cochlear Baha Sound Processor.
Mono/stereo control
The two-position switch [no. 3 in figure 1] may be used to
set Stereo (two channels) or Mono (one channel) audio
streaming. For binaural fittings, the switch should preferably
be set to the Stereo position. For monaural fitting it should be
set to the Mono position.
Adjustable delay mode
In rare cases there may be a misalignment between the audio
streamed to the sound processors and the sound coming
from the TV speakers (echo) or even a misalignment between
the streamed audio and the TV picture (lip-sync). This may be
evident in more complex audio setups where the TV Streamer
is not connected directly to the TV (e.g. through a set-top
box or other auxiliary unit). To overcome such misalignments
the streaming delay from the TV Streamer can be adjusted
as follows:
1. Make sure that the TV Streamer is turned on and that your
sound processors are receiving the streamed audio.
2. Press and hold the pairing button [no. 2 in figure 1] for 3
seconds. The TV Streamer will then enter the adjustable
delay mode where the green indicator light on the front
of the TV Streamer will flash once every 2 seconds. The
yellow indicator light will be on whenever an audio signal
is present.
3. Use the “+” and “-” key [no. 7 and 8 in figure 1] on the top
of the TV Streamer to increase or decrease the delay of the
streamed signal in 10-ms steps. The streamed signal can be
delayed in the range of 0-250 ms.
4. When the optimal alignment between the audio streamed
to the sound processors and the sound coming from the
TV speakers or alignment between the streamed audio and
the TV picture has been reached, press and hold the paring
button for 3 seconds. Now the TV Streamer will resume
normal operation, indicated by the green indicator light
being constantly on.
The offset set in adjustable delay mode will be stored in the
TV Streamer. If you do not exit the adjustable delay mode by
pressing and holding the pairing button for 3 seconds, the TV
Streamer will automatically resume normal operation after
30 minutes. To reset the delay to 0 ms (factory setting), press
and hold the pairing button while simultaneously powering
on the TV Streamer.
Important Information
Maintenance and Care
• Clean the TV Streamer using a damp cloth. Never use
household cleaning products (washing powder, soap, etc.) or
alcohol to clean the device.
• When the TV Streamer is not being used for extended
periods, unplug the power supply from the wall socket.
General warnings
• Keep this device out of reach of children.
• The TV Streamer uses low-powered digitally coded
transmissions in order to communicate with other wireless
devices. Although unlikely, nearby electronic devices may be
affected. In such cases, move the TV Streamer away from
the affected electronic device.
• When using the TV Streamer and it is affected by
electromagnetic interference, move away from the source
of the interference.
Contains small parts that may present a choking
hazard.
Power supply warning
• Use the TV Streamer only with the power supply unit that
was supplied with the product.
• The use of other power suppliers may damage or destroy
the product and could be dangerous. Use of other power
suppliers may invalidate any approval or void the warranty.
• When you disconnect the power cord or any accessory,
grasp
and pull the plug, not the cord.
• Never use a power supply that is damaged.
• Do not attempt to disassemble the power supply because it
may expose you to a dangerous electric shock.
• Do not use the power supply outdoors or in damp areas.
General precautions
• Do not use this device in locations where the use electronic
devices are prohibited.
• X-ray radiation (e.g., CT/MRI scans) may adversely affect the
functioning of this device. Switch it off before undergoing
the procedure and keep it outside the room.
• Your sound processors and this device were given unique
communication codes during fitting. This ensures that the
device will not affect sound processors worn by others.
• High-powered electronic equipment, larger electronic
installations and metallic structures may impair and
significantly reduce the operating range.
• Use only original Cochlear accessories.
• Do not alter or modify this device.
• Opening the TV Streamer might damage it. If problems
occur that cannot be resolved, consult your hearing care
professional.
• The TV Streamer may only be repaired by an authorized
service centre.
• Do not use the TV Streamer in areas where RF transmission
is prohibited, e.g., in planes, etc.
• Only connect the TV Streamer to connections for which it is
explicitly intended.
Serious incidents
Serious incidents are rare, any serious incident in relation
to your device should be reported to your Cochlear
representative and to the medical device authority in your
country, if available.
Technical specifications
Operating range Up to 7 meters
Power supply External wall adapter
Wireless 2,4 GHz
Operating
temperature
0 to 55 °C
Storage
temperature
-20 to 60 °C
Temperature test, transport and storage
information
The product is subject to various tests in temperature and
damp heating cycling between -25 °C and +70 °C according
to internal and industry standards.
Wireless Accessory type designations
for models included in this User
Manual are:
Model: SAS-3
FCC ID: QZ3SAS-3
IC: 8039C-SAS3
MSIP-CRI-1CK-SAS-3
202-SMC098
CCAH15LP1740T5
CMIIT ID:2015DJ4572
Statement
This device complies with Part 15 of the FCC Rules.
Operation is subject to the following two conditions:
(1) this device may not cause harmful interference, and
(2) this device must accept any interference received,
including interference that may cause undesired
operation. Note: This equipment has been tested and
found to comply with the limits for a Class B digital device,
pursuant to part 15 of the FCC Rules. These limits are
designed to provide reasonable protection against harmful
interference in a residential installation. This equipment
generates, uses and can radiate radio frequency energy
and, if not installed and used in accordance with the
instructions, may cause harmful interference to radio
communications. However, there is no guarantee that
interference will not occur in a particular installation. If
this equipment does cause harmful interference to radio
or television reception, which can be determined by
turning the equipment off and on, the user is encouraged
to try to correct the interference by one or more of the
following measures:
• Reorient or relocate the receiving antenna.
• Increase the separation between the equipment and
receiver.
• Connect the equipment into an outlet on a circuit
different from that to which the receiver is connected.
• Consult the dealer or an experienced radio/TV technician
for help.
• Changes or modifications can void the user’s authority to
operate the equipment.
List of countries:
The products are in compliance with the following
regulatory requirements:
• IIn EU: the device conforms to the General Safety and
Performance Requirements according to Annex I of
Medical Device Regulation 2017/745 (MDR) and essential
requirements and other relevant provisions of Directive
2014/53/EU (RED). The declaration of conformity may be
consulted at www. cochlear.com
• Products with wireless functionality are intended for sale
in countries within the European Economic Area as well
as Switzerland. Specification of restrictions: You are not
allowed to operate the equipment within 20 km of the
centre of Ny Ålesund, Norway.
• In US: FCC CFR 47 Part 15, subpart C, section 15.249.
• Other identified applicable international regulatory
requirements in countries outside the EU and US. Please
refer to local country requirements for these areas.
• Products are in compliance with EN 300 328.
• In Canada the TV Streamer is certified under the
following certification number: IC:8039C-SAS3.
• This device complies with Industry Canada license
exempt RSS standard(s)
• This Class B digital apparatus complies with Canadian
ICES-003.
• Operation is subject to the following two conditions:
(1) this device may not cause interference, and (2)
this device must accept any interference, including
interference that may cause undesired operation of the
device.
• Equipment includes RF transmitter.
** Note: The Baha Remote Control is optional and works
only with Baha Sound Processors.
ES
Bienvenido
Enhorabuena por su compra de un Co-
chlear
™
Wireless TV Streamer.
Uso previsto
Cochlear Wireless TV Streamer está diseñado para ser una
conexión inalámbrica de un procesador de sonido Cochlear
compatible con un televisor u otro dispositivo de audio.
Indicaciones:
Este accesorio no tiene indicaciones terapéuticas por sí solo.
Se le aplican las indicaciones terapéuticas del procesador de
sonido Cochlear inalámbrico que se use con el accesorio.
Beneficio clínico:
Cochlear Wireless TV Streamer está diseñado para mejorar
la audición al ver la televisión o escuchar el sonido de otro
dispositivo de audio.
Partes del dispositivo Ver la figura
1
1. Toma de alimentación micro USB
2. Botón de emparejamiento
3. Conmutador mono/estéreo
4. Entrada de audio mini jack analógica
5. Entrada de audio (Toslink) óptica
6. Entrada de audio coaxial
7. Subir el volumen
8. Bajar el volumen
9. Luz de alimentación (verde)
10. Luz de actividad (amarilla)
11. Enchufe de pared
12. Conector micro USB
Introducción
Cochlear Wireless TV Streamer le proporcionará una
transmisión de audio de alta calidad desde su televisor,
equipo estéreo, ordenador o dispositivo similar directamente
a sus procesadores de sonido.
Lea este manual detenidamente para sacar el máximo
partido al Cochlear Wireless TV Streamer. Pregúntele a su
profesional de la audición si tiene alguna duda. Para obtener
más información y una lista completa de procesadores de
sonido compatibles, visite el sitio web www.cochlear.com/
compatibility.
Para su seguridad, lea atentamente el capítulo “Información
importante”.
Garantía
La garantía no cubre defectos o daños causados por,
asociados con, o relativos al uso de este producto con un
procesador de sonido que no sea de Cochlear y/o un implante
que no sea de Cochlear. Ver la “Tarjeta de garantía global
limitada de Cochlear” para más detalles.
Aclaración de los símbolos
Los siguientes símbolos se utilizarán en todo el documento.
Aviso
Marca CE
Número de serie
Dispositivo médico
Identificador único de dispositivo
Fecha de fabricación
“Consultar las instrucciones de uso” o las
“Instrucciones de operación”
Este dispositivo incluye un transmisor RF
que funciona en el campo de 2,4 GHz -
2,48 GHz
Riesgo de interferencia
Cumple con la Autoridad Australiana de
Comunicaciones y Medios (ACMA, por sus
siglas en inglés)
Consulte al profesional que le cuida la
audición acerca de la eliminación de este
dispositivo.
Limitación de temperatura
Fabricante
Bajo prescripción
Número de referencia en el catálogo
Certificación de conformidad de radio
para Corea
Certificación de conformidad de radio
para Japón
Certificación de conformidad de radio
para Taiwán
Preparativos
Instalación del Streamer TV
Según el televisor, equipo estéreo, ordenador u otra
configuración de audio, la instalación del TV Streamer se
puede realizar de varias maneras que se describen en la
sección siguiente. Los siguientes pasos le guiarán a través del
proceso de emparejamiento y conexión. Primero, conecte los
cables entre el TV Streamer y la fuente de audio y después
empareje el TV Streamer y los procesadores de sonido.
Nota: El TV Streamer puede funcionar con una entrada
de audio analógica o digital. Lea las secciones siguientes
para obtener más información sobre los formatos de audio
compatibles y cómo conectar el TV Streamer a fuentes
de audio.
Conexión del transmisor para TV a una
fuente de audio digital (por ejemplo,
televisor o equipo estéreo)
Nota: El transmisor para TV es compatible con entradas de
audio analógicas y digitales. Cuando se utiliza una entrada de
audio digital, se admiten los siguientes formatos:
PCM estéreo
- Frecuencia de muestreo: Hasta 192 kHz
- Resolución de muestra: Hasta 32 bits
Dolby Digital
- Canales: 5,1 máx.
- Tasa de bits: 32 kbs a 640 kbs
- Frecuencia de muestreo: 32, 44,1 y 48 kHz
Nota: Dolby Digital Plus (requiere una interfaz HDMI),
Dolby TrueHD, Dolby Pro Logic, Dolby Digital EX, Dolby
Digital Surround EX y AAC (Advanced Audio Coding) no
son compatibles.
Uso de la entrada de audio óptica
(Toslink)
Ver la figura
5
1. Conecte la fuente de alimentación al enchufe de pared e
inserte el cable en la toma micro USB del transmisor para
TV.
2. Introduzca uno de los conectores del cable de audio óptico
en la toma de entrada de audio óptica del transmisor para
TV (n.º 5 en la figura 1).
Nota: La mayoría de cables ópticos se suministran con una
pequeña tapa protectora para proteger la punta del cable.
Retire la tapa protectora antes de insertar el cable.
3. Enchufe el otro extremo del cable de audio óptico en la
salida “Digital Audio Out/Optical” de la fuente de audio.
Uso de la entrada de audio coaxial
Ver la figura
6
1. Conecte la fuente de alimentación al enchufe de pared e
inserte el cable en la toma micro USB del transmisor para
TV.
2. Conecte uno de los conectores del cable de audio coaxial a
la toma coaxial del transmisor para TV (n.º 6 en la figura 1).
3. Enchufe el otro extremo del cable de audio coaxial en la
salida “Digital Audio Out/Coaxial” de la fuente de audio.
Conexión del transmisor para TV a
una fuente de audio analógica (por
ejemplo, televisor o equipo estéreo)
Ver la figura
4
1. Conecte la fuente de alimentación al enchufe de pared e
inserte el cable en la toma micro USB del transmisor para
TV.
2. Inserte el miniconector estéreo macho del cable de audio
en la entrada hembra para miniconector estéreo del
transmisor para TV (n.º 4 en la figura 1).
3. Conecte el otro extremo del cable de audio en el terminal
de salida de audio (“AUDIO OUT”) de la fuente de audio.
La salida de audio (“AUDIO OUT”) está habitualmente
marcada con las letras R (derecha) y L (izquierda). Se suelen
encontrar en la parte posterior de la fuente de audio.
Nota: Con esta instalación, la mayoría de fuentes de
audio enviarán sonido tanto a los procesadores de sonido
como a los altavoces adicionales que estén conectados
simultáneamente a la fuente de audio. En algunas fuentes
de audio, puede ajustar el balance entre la salida de audio
y los altavoces. Consulte el manual de la fuente de audio
para obtener instrucciones.
Instalaciones alternativas del cable de
audio analógico:
Si no es posible conectar el TV Streamer a la toma AUDIO
OUTPUT (SALIDA DE AUDIO) de la fuente de audio con
las clavijas roja y blanca, se pueden usar las alternativas de
instalación siguientes:
Adaptador mini jack:
Ver la figura
3
1. Conecte la fuente de alimentación a la toma de corriente
de pared e inserte el cable en la toma micro USB del TV
Streamer.
2. Inserte el mini jack estéreo del cable de audio en la entrada
del mini jack estéreo del TV Streamer [nº 4 en la figura 1].
3. Conecte el adaptador mini jack estéreo a las clavijas roja y
blanca en el otro extremo del cable de audio.
4. Enchufe el adaptador mini jack estéreo al terminal de salida
“HEADPHONE” (AURICULAR) de la fuente de audio o al
terminal de audio del ordenador.
Nota: La toma de salida HEADPHONE está normalmente
situada en el lado posterior o frontal de la fuente de audio.
Cuando se utiliza la toma HEADPHONE, normalmente
solo el usuario del procesador de sonido oirá el sonido,
y los altavoces del televisor serán silenciados. Si no
se desean altavoces silenciados, consulte la primera
instalación, o la del capítulo siguiente. Su fuente de audio
puede funcionar con los altavoces y la toma HEADPHONE
activados simultáneamente; para más instrucciones,
consulte el manual de la fuente de audio.
Adaptador Scart:
Ver la figura
4
1. Conecte la fuente de alimentación a la toma de corriente
de pared e inserte el cable en la toma micro USB del TV
Streamer.
2. Inserte el mini jack estéreo del cable de audio en la entrada
del mini jack estéreo del TV Streamer [nº 4 en la figura 1].
3. Conecte el adaptador Scart a las clavijas roja y blanca del
extremo opuesto del cable de audio.
4. Enchufe el adaptador Scart en el terminal Scart de la
fuente de audio. Nota: El terminal de salida Scart suele
estar situado en la parte posterior o lateral de la fuente
de audio.
Por favor, consulte el manual de la fuente de audio si se
requiere una configuración adicional de la salida Scart.
Emparejamiento con los procesadores
de sonido
Es posible emparejar su procesador de sonido Cochlear con
tres dispositivos de streaming Cochlear como máximo.
Seleccione un canal separado para cada dispositivo
emparejado con el procesador de sonido.
Patrón de parpadeo de emparejamiento
Pulsacio-
nes en el
botón de
empare-
jamiento
Patrón de parpadeo LED Canal
1 1
2 2
3 3
Emparejamiento del TV Streamer en el
canal 1
1. Asegúrese de que la fuente de alimentación del TV
Streamer esté enchufada a una toma de corriente de pared
y que el indicador de luz verde de la parte frontal del TV
Streamer [nº 9 en la figura 1] esté encendido (ON). Los
procesadores de sonido deben estar apagados (OFF).
2. Pulse una vez el botón de emparejamiento del TV Streamer
[nº 2 en la figura 1]. A continuación, el indicador luminoso
amarillo de la parte frontal del TV Streamer [nº 10 en la
figura 1] parpadeará una vez cada 2 segundos para indicar
que el TV Streamer está listo para ser emparejado en
el canal 1. El TV Streamer permanecerá en el modo de
emparejamiento durante 20 segundos.
3. Mientras el modo de emparejamiento está activado,
encienda su procesador de sonido.
El éxito del emparejamiento se indicará mediante una
melodía audible reproducida en el procesador de sonido, o
una luz parpadeante en el procesador de sonido (según el tipo
de procesador de sonido).
Emparejamiento del TV Streamer en el
canal 2
1. Pulse dos veces el botón de emparejamiento. A conti-
nuación, el indicador luminoso amarillo al frente del TV
Streamer parpadeará dos veces cada 2 segundos para
indicar que el TV Streamer está listo para ser emparejado
en el canal 2.
2. Mientras el modo de emparejamiento está activado,
encienda su procesador de sonido.
Emparejamiento del TV Streamer en el
canal 3
1. Pulse tres veces el botón de emparejamiento. A continua-
ción, el indicador luminoso amarillo de la parte frontal del
TV Streamer parpadeará tres veces cada 2 segundos para
indicar que el TV Streamer está listo para ser emparejado
en el canal 3.
2. Mientras el modo de emparejamiento está activado,
encienda su procesador de sonido.
Streaming
Iniciar streaming
Encienda el televisor, equipo estéreo u otro dispositivo
de audio conectado al TV Streamer. Asegúrese de que
los procesadores de sonido también estén encendidos.
El streaming se puede iniciar de dos maneras:
Opción A
1. Pulse y mantenga presionado el botón de streaming
inalámbrico en su procesador de sonido durante 3
segundos.
2. A una melodía audible o una luz parpadeante (según el tipo
de procesador de sonido) le seguirá la transmisión de audio
a través del TV Streamer.
Opción B
Si tiene un Control Remoto Cochlear Baha** (opcional),
simplemente pulse el botón de streaming [nº 3 en la figura 7]
en el Control Remoto Baha**. Para más información, consulte
el manual del Control Remoto Baha**.
Iniciar el streaming en una segunda o
tercera unidad de TV Streamer Ver la figura
7
Si su procesador de sonido está emparejado con más de un
dispositivo de streaming, puede iniciar el streaming de dos
maneras.
Opción A
Pulse y mantenga presionado el botón de streaming
inalámbrico en su procesador de sonido durante 3 segundos
aproximadamente una 2ª o 3ª vez para acceder al 2º o 3
dispositivo de streaming Cochlear.
Opción B
Pulse el botón de streaming en el Control Remoto Baha**
una 2º o 3º vez para acceder al 2º o 3º dispositivo de
streaming Cochlear.
Los dispositivos de streaming Cochlear se indican con las
letras A, B o C, y el dispositivo de streaming en uso aparece
en la pantalla del Control Remoto Baha**.
Detener el streaming
• Pulse brevemente el botón de streaming en su procesador
de sonido. Esto cancelará el streaming y volverá al último
programa utilizado.
• Para detener el streaming con el Control Remoto Baha**,
pulse el botón “P”, que está situado en el centro del teclado.
• Si está usando el teléfono con el Cochlear Wireless
Phone Clip, el streaming del TV Streamer se interrumpirá
temporalmente. Cuando haya finalizado la llamada
telefónica se reanudará el streaming.
Nota: Si sale del campo del TV Streamer (> 7 metros) pero
regresa a él antes de que hayan transcurrido 5 minutos, su
procesador de sonido se reconectará automáticamente y
continuará el streaming.
Controles
Control del volumen
El TV Streamer está diseñado para proporcionar un nivel de
audición cómodo desde el momento en que se activa. Sin
embargo, para algunos dispositivos o entornos auditivos,
puede ser necesario ajustar el volumen de audición y esto se
puede realizar de varias maneras. Recuerde que los ajustes
de volumen en el TV Streamer sólo inciden en la señal
transmitida y no en el volumen de los sonidos ambientales
normales. Use los botones “+” y “-” [nº 7 y 8 en la figura 1]
para ajustar el volumen en un nivel cómodo. Asegúrese de
que los procesadores de sonido tengan un ajuste cómodo
antes de cambiar los ajustes con el control de volumen. En
la mayoría de los casos este ajuste sólo debe efectuarse una
vez dado que el TV Streamer almacenará el nivel de volumen
que se ajustó más recientemente. Use el Control Remoto
Baha 2** (opcional) para ajustar el nivel de volumen de
streaming y el nivel de volumen del micrófono del procesador
de sonido. Solicite más información sobre este accesorio al
profesional que cuida su audición. En algunos casos, se puede
continuar ajustando el volumen en la fuente de señal, por
ejemplo bajando el volumen del televisor. De esa manera,
se ajustará el volumen del sonido transmitido de manera
inalámbrica a los procesadores de sonido. Ajustar el volumen
del televisor también afectará el volumen de audición en la
habitación.
El ajuste del procesador de sonido y del volumen de
streaming sólo es posible con el Control Remoto Cochlear
Baha** y el procesador de sonido Cochlear Baha.
Control mono/estéreo
El interruptor de dos posiciones [nº 3 en la figura 1] se puede
utilizar para ajustar el streaming de audio en Estéreo (dos
canales) o Mono (un canal). Para ajustes binaurales, es
preferible colocar el conmutador en la posición Estéreo. Para
ajustes monaurales, se debería colocar en la posición Mono.
Modo de retardo ajustable
En casos excepcionales, puede haber una desalineación entre
el audio transmitido a los procesadores de sonido y el sonido
proveniente de los altavoces del televisor (eco), o incluso
una desalineación entre el audio transmitido y la imagen
del televisor (sincronización de voz). Esto puede advertirse
en configuraciones de audio más complejas donde el TV
Streamer no está conectado directamente al televisor (por
ejemplo, mediante un receptor digital u otra unidad auxiliar).
Para superar esos desajustes se puede ajustar el retardo de
streaming desde el TV Streamer de la siguiente manera:
1. Cerciórese de que el TV Streamer esté encendido y de que
los procesadores de sonido reciban el audio transmitido.
2. Pulse y mantenga presionado el botón de emparejamiento
[nº 2 en la figura 1] durante 3 segundos. A continuación,
el TV Streamer entrará en el modo de retardo ajustable
y el indicador luminoso verde de la parte frontal del TV
Streamer parpadeará una vez cada 2 segundos. El indicador
luminoso amarillo se encenderá cada vez que haya
presente una señal de audio.
3. Use el botón “+” y “-” [nº 7 y 8 en la figura 1] en la parte
superior del TV Streamer para aumentar o reducir el
retardo de la señal transmitida en pasos de 10 ms. La señal
transmitida se puede retardar entre 0 y 250 ms.
4. Cuando se haya logrado la alineación óptima entre el
audio transmitido a los procesadores de sonido y el sonido
procedente de los altavoces del televisor o la alineación
entre el audio transmitido y la imagen del televisor, pulse y
mantenga presionado el botón de emparejamiento durante
3 segundos. A continuación, el TV Streamer volverá a
funcionar normalmente y esto se indicará mediante el
brillo constante del indicador luminoso verde.
La compensación ajustada en el modo de retardo ajustable
se almacenará en el TV Streamer. Si no abandona el modo
de retardo ajustable pulsando y manteniendo presionado
el botón de emparejamiento durante 3 segundos, el TV
Streamer reanudará automáticamente el funcionamiento
normal después de 30 minutos. Para restablecer el retardo
a 0 ms (ajuste de fábrica), pulse y mantenga presionado el
botón de emparejamiento al mismo tiempo que enciende
el TV Streamer.
Información importante
Mantenimiento y cuidado
• Limpie el TV Streamer con un paño húmedo. Nunca utilice
productos de limpieza del hogar (polvo de lavado, jabón,
etc.) o alcohol para limpiar el dispositivo.
• Cuando el TV Streamer no se utiliza durante períodos
prolongados, desconecte la fuente de alimentación de la
toma de corriente de pared.
Advertencias generales
• Mantenga este dispositivo fuera del alcance de los niños.
• El TV Streamer utiliza transmisiones codificadas
digitalmente de baja energía para comunicarse con otros
dispositivos inalámbricos. Aunque es poco probable, los
dispositivos electrónicos que estén cercanos pueden verse
afectados. En ese caso, aleje el TV Streamer del dispositivo
electrónico afectado.
• Si utiliza el TV Streamer y este se ve afectado por
interferencia electromagnética, aléjese de la fuente.
Contiene piezas pequeñas que pueden constituir
un peligro de asfixia
Advertencia sobre la alimentación eléctrica
• Use el TV Streamer únicamente con la unidad de
alimentación suministrada con el producto.
• El uso de otras fuentes de alimentación podría dañar o
destruir el producto y puede ser peligroso. El uso de otras
fuentes de alimentación puede dejar sin validez cualquier
aprobación o anular la garantía.
• Cuando desconecte el cable de alimentación o algún
accesorio, sujete y tire del enchufe, no del cable.
• Nunca use una fuente de alimentación que esté dañada.
• No intente desmontar la fuente de alimentación porque
puede exponerlo a una descarga eléctrica peligrosa.
• No use la fuente de alimentación al aire libre o en zonas
húmedas.
Precauciones generales
• No utilice este dispositivo en lugares en los que esté
prohibido utilizar dispositivos electrónicos.
• La radiación de rayos X (p. ej., exploraciones de TC/RM)
puede repercutir de forma negativa en el funcionamiento
de este dispositivo. Apáguelo antes de someterse al
procedimiento y manténgalo fuera de la sala.
• Su procesador de sonido y este dispositivo han recibido
códigos de comunicación únicos durante la programación.
Así, se asegura que el dispositivo no se vea afectado por
procesadores de sonido que utilizan otras personas.
• Los equipos electrónicos de alta potencia, las instalaciones
electrónicas de gran tamaño y las estructuras metálicas
pueden afectar y reducir significativamente el campo de
funcionamiento.
• Utilice sólo accesorios Cochlear originales.
• No altere ni modifique este dispositivo.
• Si se abre el TV Streamer, éste se puede dañar. Consulte al
profesional que cuida su audición si surgen problemas que
no puede solucionar.
• El TV Streamer debe ser reparado por un centro de servicio
autorizado exclusivamente.
• No use el TV Streamer en zonas donde está prohibida la
transmisión RF, tales como aviones, etc.
• Conecte el TV Streamer únicamente a tomas
específicamente destinadas para tal fin.
Incidentes graves
Los incidentes graves son poco frecuentes. Cualquier
incidente grave relacionado con su dispositivo debe
notificarse al representante de Cochlear y a la autoridad de
dispositivos médicos de su país, si existe.
Datos técnicos
Rango de
funcionamiento
Hasta 7 metros
Alimentación
eléctrica
Adaptador de la pared externo
Inalámbrico 2,4 GHz
Temperatura de
funcionamiento
0 a 55 °C
Temperatura de
almacenamiento
-20 a 60 °C
Prueba de temperatura, transporte e
información sobre el almacenamiento
El producto está sujeto a diversas pruebas en ciclos de
temperatura y calor húmedo de -25 °C y +70 °C de
conformidad con normas internas e industriales.
Las designaciones de tipo de los
accesorios inalámbricos para modelos
incluidos en este Manual del usuario
son:
Model: SAS-3
FCC ID: QZ3SAS-3
IC: 8039C-SAS3
MSIP-CRI-1CK-SAS-3
202-SMC098
CCAH15LP1740T5
CMIIT ID:2015DJ4572
00326-16-04187
Declaración
Este dispositivo cumple con la Parte 15 de las normas
de la FCC. El funcionamiento está sujeto a las dos
condiciones siguientes: (1) este dispositivo no puede
causar interferencias dañinas, y (2) este dispositivo debe
aceptar cualquier interferencia recibida, incluidas las que
puedan causar un funcionamiento no deseado. Nota: Este
equipo se ha probado y se ha determinado que cumple
los límites para un dispositivo digital de Clase B, según
la Sección 15 de las Normas de la FCC. Estas condiciones
tienen por objeto ofrecer una protección razonable
contra interferencias perjudiciales en residencias.
Este equipo genera, utiliza y puede irradiar energía de
radiofrecuencia y, si no se instala y se utiliza de acuerdo
con las instrucciones suministradas, podría ocasionar
interferencias perjudiciales para las comunicaciones por
radio. Sin embargo, no es posible garantizar que no vayan
a producirse interferencias en una instalación concreta.
Si este equipo ocasiona interferencias perjudiciales en la
recepción de radio o televisión, que puede comprobarse
encendiendo y apagando el equipo, se recomienda que el
usuario intente corregir la interferencia aplicando una o
varias de las siguientes medidas:
• Vuelva a orientar o a colocar la antena de recepción.
• Aumente la separación entre el equipo y el receptor.
• Conecte el equipo a la toma de corriente en un circuito
distinto de aquél al que esté conectada la unidad
receptora.
• Póngase en contacto con el distribuidor o con un técnico
de radio y televisión.
• Los cambios o las modificaciones pueden anular la
autorización del usuario para utilizar el producto.
Lista de países:
Los productos cumplen con los siguientes requisitos
normativos:
• En la UE: el dispositivo cumple con los requisites básicos
de acuerdo con el Anexo I de la Directiva del Consejo
93/42/CEE para dispositivos medicos (MDD) y los
requisitos básicos y otras disposiciones pertinentes
de la Directiva de Equipos de Radio 2014/53/UE. La
declaración de conformidad puede ser consultada en
www.cochlear.com.
• Los productos con la funcionalidad inalámbrica están
destinados a la venta en países en el Espacio Económico
Europeo así como en Suiza. Especificación de las
restricciones: No se permite utilizar el equipo a
menos de 20 km del centro de Ny Ålesund, Noruega.
• En Estados Unidos: La Parte 15, Subparte C, sección
15.249 de la FCC CFR 47.
• Otros requerimientos normativos internacionales
identificados y aplicables en países fuera de la UE y
Estados Unidos. Consulte los requerimientos locales
del país para estos ámbitos.
• Productos de conformidad con la norma EN 300 328.
• En Canadá, el TV Streamer está certificado de
conformidad con el número de certificado siguiente:
IC:8039C-SAS3.
• Este dispositivo cumple con el/los estándar(es) RSS de
excepción de licencia del Departamento de Industria
de Canadá.
• Este aparato digital de Clase B cumple con la normativa
canadiense ICES-003.
• El funcionamiento está sujeto a las dos condiciones
siguientes: (1) este dispositivo no puede causar
interferencias dañinas, y (2) este dispositivo debe aceptar
cualquier interferencia recibida, incluidas las que puedan
causar un funcionamiento no deseado del dispositivo.
• El equipo incluye un transmisor RF.
** Cochlear Baha Remote Control
Nota: El Control Remoto Baha es opcional y funciona
con los procesadores de sonido Baha exclusivamente.
1
5
7
6
3 4
11
12
8
9
10
7
2 3
6 1 4 5
3
1
2
2
Cochlear Baha Remote Control
**
Cochlear Bone Anchored Solutions AB
Konstruktionsvägen 14, 435 33 Mölnlycke, Sweden
Tel: +46 31 792 44 00 Fax: +46 31 792 46 95
Regional offices:
Cochlear Ltd (ABN 96 002 618 073) 1 University Avenue, Macquarie University, NSW 2109,
Australia Tel: +61 2 9428 6555 Fax: +61 2 9428 6352
Cochlear Americas 13059 E Peakview Avenue, Centennial, CO 80111, USA
Tel: +1 303 790 9010 Fax: +1 303 792 9025
Cochlear AG EMEA Headquarters, Peter Merian-Weg 4, 4052 Basel, Switzerland
Tel: +41 61 205 8204 Fax: +41 61 205 8205
Cochlear Latinoamerica, S. A. International Business Park Building 3835, Office 403,
Panama Pacifico, Panama Tel. +507 830 6220 Fax: +507 830 6218
www.cochlear.com
Cochlear
™
Wireless
TV Streamer
User manual
ZONE 2
English
Español
Français
Português
EN-GB ES FR PT
Cochlear, 科利耳, コクレア, 코클리어, Hear now. And always, Nucleus, Kanso, Baha, the elliptical
logo, and marks bearing an ® or ™ symbol, are either trademarks or registered trademarks of
Cochlear Limited or Cochlear Bone Anchored Solutions AB (unless otherwise noted). Dolby and
the Double-D symbol are registered trademarks of Dolby Laboratories. © Cochlear Bone Anchored
Solutions AB 2020. All rights reserved. MAR20.
MD
 Loading...