1571/128D ALIGNMENT/REPAIR TEST
VERSION 1.2.1
+ — — — — — — — — — — — — -------------— — — — — — — — — —
-----------
— — — — — — — — — — — — — — -----------— — — —
----
— — — — — — — — +
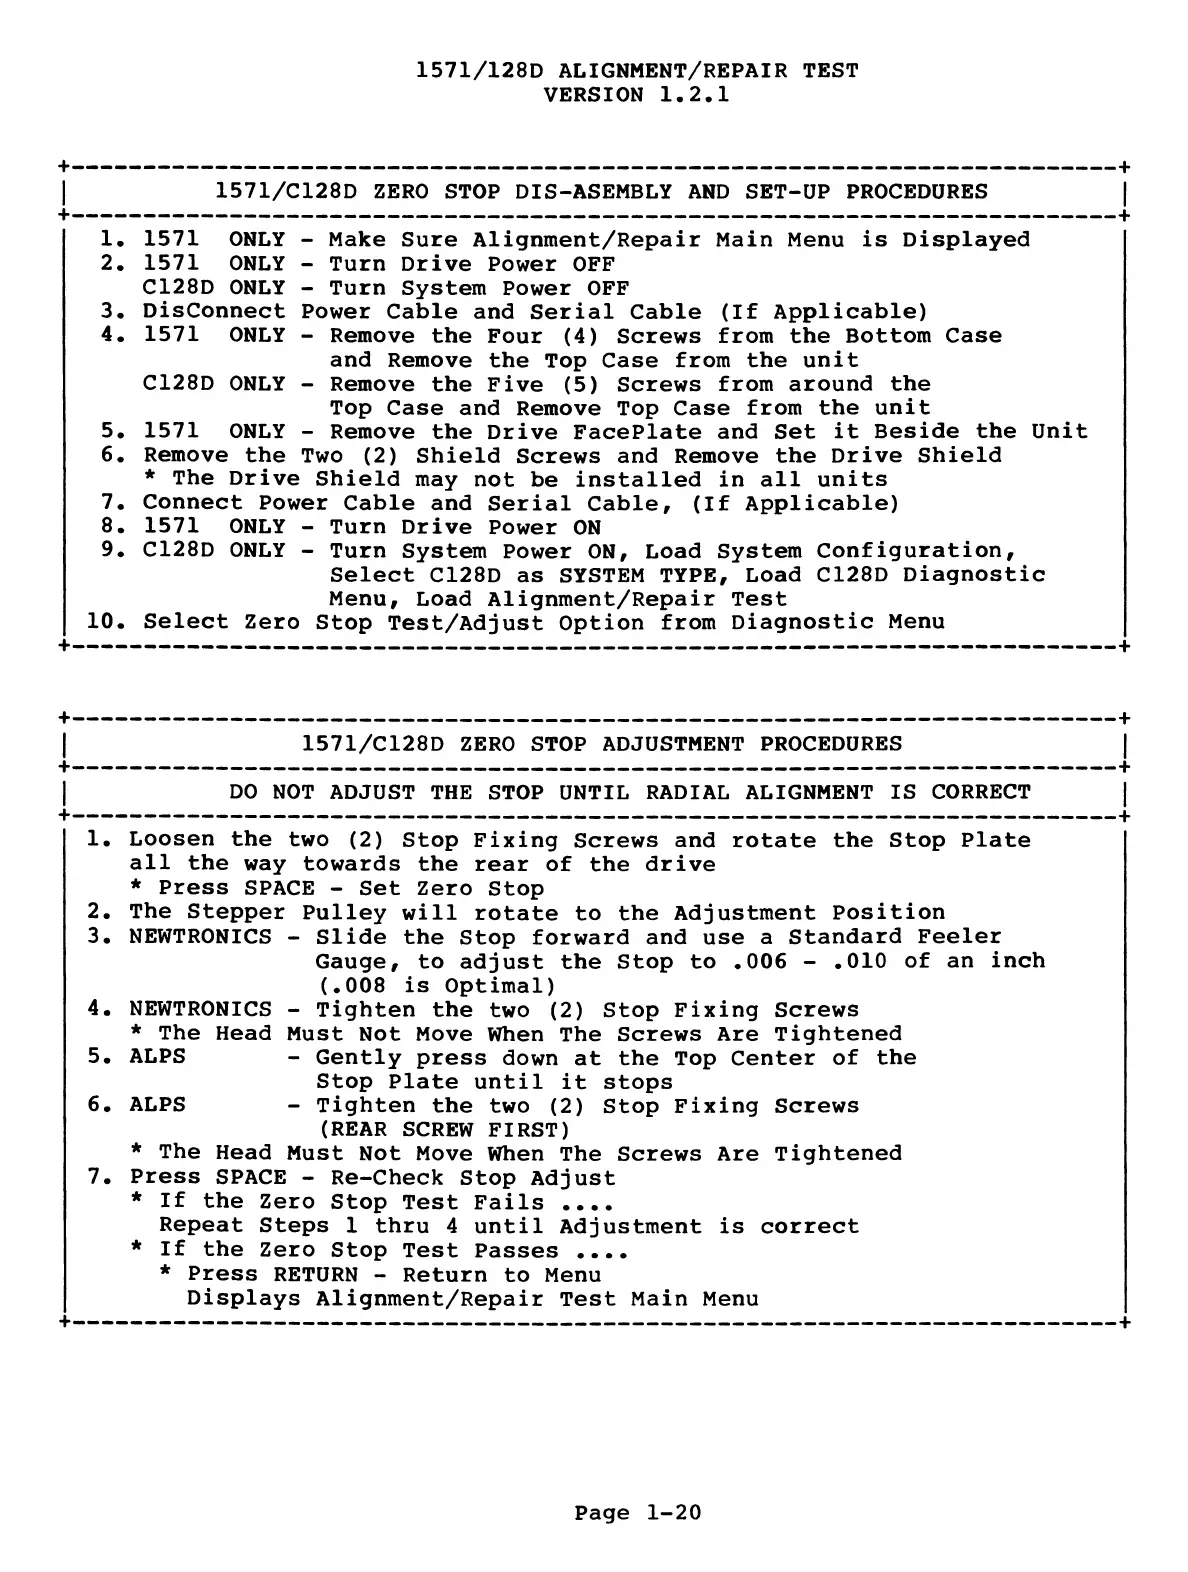
| 1571/C128D ZERO STOP DIS-ASEMBLY AND SET-UP PROCEDURES |
+-------------------------------------------------------------------------------+
1. 1571 ONLY - Make Sure Alignment/Repair Main Menu is Displayed
2. 1571 ONLY - Turn Drive Power OFF
C128D ONLY - Turn System Power OFF
3. Disconnect Power Cable and Serial Cable (If Applicable)
4. 1571 ONLY - Remove the Four (4) Screws from the Bottom Case
and Remove the Top Case from the unit
C128D ONLY - Remove the Five (5) Screws from around the
Top Case and Remove Top Case from the unit
5. 1571 ONLY - Remove the Drive FacePlate and Set it Beside the Unit
6. Remove the Two (2) Shield Screws and Remove the Drive Shield
* The Drive Shield may not be installed in all units
7. Connect Power Cable and Serial Cable, (If Applicable)
8. 1571 ONLY - Turn Drive Power ON
9. C128D ONLY - Turn System Power ON, Load System Configuration,
Select C128D as SYSTEM TYPE, Load C128D Diagnostic
Menu, Load Alignment/Repair Test
10.
-
Select Zero Stop Test/Adjust Option from Diagnostic Menu
-
+
+--------------------------------------------------------------------------------------------------------------------+
| 1571/C128D ZERO STOP ADJUSTMENT PROCEDURES |
+--------------------------------------------------------------------------------------------------------------------+
| DO NOT ADJUST THE STOP UNTIL RADIAL ALIGNMENT IS CORRECT |
+-------------------------------------------------------------------------------+
1. Loosen the two (2) Stop Fixing Screws and rotate the Stop Plate
all the way towards the rear of the drive
* Press SPACE - Set Zero Stop
2. The Stepper Pulley will rotate to the Adjustment Position
3. NEWTRONICS - Slide the Stop forward and use a Standard Feeler
Gauge, to adjust the Stop to .006 - .010 of an inch
(.008 is Optimal)
4. NEWTRONICS - Tighten the two (2) Stop Fixing Screws
* The Head Must Not Move When The Screws Are Tightened
5. ALPS - Gently press down at the Top Center of the
Stop Plate until it stops
6. ALPS - Tighten the two (2) Stop Fixing Screws
(REAR SCREW FIRST)
* The Head Must Not Move When The Screws Are Tightened
7. Press SPACE - Re-Check Stop Adjust
* If the Zero Stop Test Fails ....
Repeat Steps 1 thru 4 until Adjustment is correct
* If the Zero Stop Test Passes ....
* Press RETURN - Return to Menu
Displays Alignment/Repair Test Main Menu
+-------------------------------------------------------------------------------+
Page 1-20
 Loading...